
User's Manual
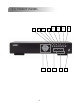
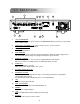

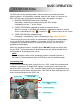
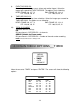
Table Of Contents

1.4 FRONT PANEL
1.4 FRONT PANEL
1) “LED LIGHT”:
HDD: HDD is reading or recording
HDD Full: HDD is full.
ALARM: Once the alarm is triggered
TIMER: When timer recording is turned on
PLAY: Under playing status
REC: Under recording status
2) “MENU”:
Press “MENU” button to enter the main menu.
3) “ENTER”/ “SET”:
Press “ENTER” button to confirm the setting.
Press “SET” to change the position of the channel display.
Press “▲▼◄►“ to select the channel which you would like to change.
Press “+”or “-” to select the channel which You would like to show.
4) “SEARCH” :
Press “SEARCH” button to enter the search menu.
5) “SLOW” :
Under the playback mode, press “SLOW“ button to show slow playback.
6) “ZOOM”:
Press “ZOOM” button to enlarge the picture of selected channel (under the live mode).
7) “ ” / “ - ”:
Press “ “ button to show the 4 channel display mode.
Press “ - ” button to change the setting in the menu.
8) “SEQ”/ “+ ”:
Press “SEQ” button to activate the call monitor function and press “SEQ” button
again to escape the call monitor mode.
Press “+ ” button to change the setting in the menu.
9) “ “ or “Power”:
Press this button to turn on / off the DVR.
(Under the recording mode, please stop recording before turning off the DVR).
6