
Use and Care Manual


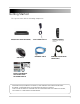
Table Of Contents
- DVR Overview
- Basic Setup
- Step 1: Connect the BNC Cameras
- Step 2: Connect the Mouse
- Step 3: Connect the Ethernet Cable
- Step 4: Connect the Monitor
- Step 5: Connect the Power Adapter and Power on the DVR
- Step 6: Verify Camera Image
- Step 7: Set the Time
- Default System Password & Port Numbers
- Quick Access to System Information
- Connecting Cameras
- Mouse Control
- Remote Control
- Using the On-Screen Display
- Setting the Date and Time
- Recording
- Playback and Backup
- Playing Back Recorded Video
- Using the On-Screen Playback Controls
- Advanced Playback Controls (ECO Blackbox+ Series Only)
- Finding Events in the Playback Bar (ECO Blackbox+ Series Only)
- Controlling the Time Range of the Playback Bar (ECO Blackbox+ Series Only)
- Using Zoom in Playback Mode (ECO Blackbox+ Series Only)
- Using Video Clip Backup (ECO Blackbox+ Series Only)
- Backing Up Video
- Viewing Backed Up Video
- Converting Backed Up Video to AVI Files
- Playing Back Recorded Video
- Managing Passwords
- Using the Main Menu
- Display
- Configuring Custom Channel Names
- Changing the Position of the Channel Name
- Adjusting Camera Color Settings
- Enabling Covert Recording
- Configuring the Time and Recording Time Display
- Configuring Sequence Time
- Changing the Video-out Resolution
- Adjusting Menu Transparency
- Restoring the System’s Resolution if you see a Blank Screen
- Adjusting the Video Margin
- Adding Privacy Zones
- Creating a Custom Split-screen Display (ECO Blackbox+ Series Only)
- Record
- Search
- Network
- Alarm
- Device
- System
- Advanced
- Configuring the "Auto Reboot" feature
- Upgrading the System Firmware
- Restoring to Factory Default Settings
- Restarting or Shutting Down the DVR
- Configuring System Warnings
- Saving Your System Configuration to a USB Flash Drive (ECO Blackbox+ Series Only)
- Loading a System Configuration from a USB Flash Drive (ECO Blackbox+ Series Only)
- Display
- Setting up your DVR for Remote Connectivity
- Lorex Client 11: Client Software for PC
- Remote Viewing Interface
- Changing Viewing Modes
- Taking Screen Shots
- Recording Video
- Showing / Hiding Channels
- Adjusting Sub-menu Options
- Changing the Save Directory of Screenshots or Recorded Video
- Changing the Format of Recorded Video (PC Only)
- Configuring PTZ Settings
- Video Playback
- Configuring Display Settings
- Configuring Privacy Zone Settings
- Configuring Recording Parameters
- Configuring the Recording Schedule
- Configuring System Recording Quality
- Configuring Basic Network Settings
- Configuring the System Substream
- Configuring Email Notification Settings
- Changing the Mobile User Name and Password
- Configuring DDNS Settings
- Configuring Motion Detection Settings
- Configuring your System to "Beep" During Motion
- Configuring Alarm Notifications (ECO Blackbox+ Series Only)
- Configuring Hard Drive Recording Mode
- Configuring PTZ Parameters
- Configuring the System Time and Date
- Changing the System’s Menu Time Out
- Configuring System User Accounts
- Viewing System Information
- Upgrading System Firmware
- Restoring Default Settings
- Configuring Event Settings
- Configuring Auto-Reboot
- Lorex Player 11: Playing Backed up Video on PC
- Lorex Player for Mac: Viewing Backed up Video on Mac
- Mobile Apps: Accessing your DVR Using a Mobile Device
- Appendix A: System Specifications
- Appendix B: Connecting a PTZ Camera
- Appendix C: Connecting Additional External Monitors
- Appendix D: Recording Audio
- Appendix E: Replacing the Hard Drive
- Troubleshooting
- Getting Started

xiii
Changing the DVR’s Client and HTTP Port . . . . . . . . . . . . . . . . . . . . . . . . . . . . . . . . . . . . . . . . . . . . . . . . 44
Adjusting Remote Connectivity Streaming Rates . . . . . . . . . . . . . . . . . . . . . . . . . . . . . . . . . . . . . . . . . . 45
Setting up Email Notification . . . . . . . . . . . . . . . . . . . . . . . . . . . . . . . . . . . . . . . . . . . . . . . . . . . . . . . . . . . 45
Changing the Mobile Connectivity Port, User Name, and Password . . . . . . . . . . . . . . . . . . . . . . . . . . . 46
Configuring DDNS settings . . . . . . . . . . . . . . . . . . . . . . . . . . . . . . . . . . . . . . . . . . . . . . . . . . . . . . . . . . . . 47
Alarm . . . . . . . . . . . . . . . . . . . . . . . . . . . . . . . . . . . . . . . . . . . . . . . . . . . . . . . . . . . . . . . . . 47
Configuring Motion Detection . . . . . . . . . . . . . . . . . . . . . . . . . . . . . . . . . . . . . . . . . . . . . . . . . . . . . . . . . . 47
Configuring Alarm Settings (ECO Blackbox+ Series Only) . . . . . . . . . . . . . . . . . . . . . . . . . . . . . . . . . . . 48
Device . . . . . . . . . . . . . . . . . . . . . . . . . . . . . . . . . . . . . . . . . . . . . . . . . . . . . . . . . . . . . . . . 49
Configuring Hard Drive Settings . . . . . . . . . . . . . . . . . . . . . . . . . . . . . . . . . . . . . . . . . . . . . . . . . . . . . . . . 49
Formatting USB Flash Drives . . . . . . . . . . . . . . . . . . . . . . . . . . . . . . . . . . . . . . . . . . . . . . . . . . . . . . . . . . 49
System . . . . . . . . . . . . . . . . . . . . . . . . . . . . . . . . . . . . . . . . . . . . . . . . . . . . . . . . . . . . . . . . 50
Changing Date Format . . . . . . . . . . . . . . . . . . . . . . . . . . . . . . . . . . . . . . . . . . . . . . . . . . . . . . . . . . . . . . . . 50
Changing Time Format . . . . . . . . . . . . . . . . . . . . . . . . . . . . . . . . . . . . . . . . . . . . . . . . . . . . . . . . . . . . . . . . 50
Changing the System Language . . . . . . . . . . . . . . . . . . . . . . . . . . . . . . . . . . . . . . . . . . . . . . . . . . . . . . . . 50
Changing Video Output - NTSC & PAL . . . . . . . . . . . . . . . . . . . . . . . . . . . . . . . . . . . . . . . . . . . . . . . . . . . 50
Configuring Menu Time Out and Auto Logout . . . . . . . . . . . . . . . . . . . . . . . . . . . . . . . . . . . . . . . . . . . . . 50
Adding Users & Changing the Admin Password . . . . . . . . . . . . . . . . . . . . . . . . . . . . . . . . . . . . . . . . . . . 50
Viewing System Information . . . . . . . . . . . . . . . . . . . . . . . . . . . . . . . . . . . . . . . . . . . . . . . . . . . . . . . . . . . 51
Advanced . . . . . . . . . . . . . . . . . . . . . . . . . . . . . . . . . . . . . . . . . . . . . . . . . . . . . . . . . . . . . . 51
Configuring the "Auto Reboot" feature . . . . . . . . . . . . . . . . . . . . . . . . . . . . . . . . . . . . . . . . . . . . . . . . . . . 51
Upgrading the System Firmware . . . . . . . . . . . . . . . . . . . . . . . . . . . . . . . . . . . . . . . . . . . . . . . . . . . . . . . . 52
Restoring to Factory Default Settings . . . . . . . . . . . . . . . . . . . . . . . . . . . . . . . . . . . . . . . . . . . . . . . . . . . . 52
Restarting or Shutting Down the DVR . . . . . . . . . . . . . . . . . . . . . . . . . . . . . . . . . . . . . . . . . . . . . . . . . . . . 53
Configuring System Warnings . . . . . . . . . . . . . . . . . . . . . . . . . . . . . . . . . . . . . . . . . . . . . . . . . . . . . . . . . . 53
Saving Your System Configuration to a USB Flash Drive (ECO Blackbox+ Series Only) . . . . . . . . . . . . 54
Loading a System Configuration from a USB Flash Drive (ECO Blackbox+ Series Only) . . . . . . . . . . . 54
Setting up your DVR for Remote Connectivity. . . . . . . . . . . . . . . . . . . . . . . 55
System Requirements . . . . . . . . . . . . . . . . . . . . . . . . . . . . . . . . . . . . . . . . . . . . . . . . . . . 55
Accessing your DVR within a Local Network (LAN) . . . . . . . . . . . . . . . . . . . . . . . . . . . 56
Step 1 of 3: Connect your DVR to the Local Area Network . . . . . . . . . . . . . . . . . . . . . . . . . . . . . . . . . . . 56
Step 2 of 3: Obtain the DVR’s Local IP Address and HTTP Port . . . . . . . . . . . . . . . . . . . . . . . . . . . . . . . 56
Step 3 of 3: Enter the DVR’s Local IP Address into the Browser . . . . . . . . . . . . . . . . . . . . . . . . . . . . . . 57
To connect using the DVR’s Local IP Address on a PC: . . . . . . . . . . . . . . . . . . . . . . . . . . . . . . . . . . . . . . 57
To connect to the DVR’s Local IP Address on a Mac: . . . . . . . . . . . . . . . . . . . . . . . . . . . . . . . . . . . . . . . . 58
Accessing your DVR Remotely over the Internet . . . . . . . . . . . . . . . . . . . . . . . . . . . . . 59
Step 1 of 4: Port Forwarding . . . . . . . . . . . . . . . . . . . . . . . . . . . . . . . . . . . . . . . . . . . . . . . . . . . . . . . . . . . 60
Step 2 of 4: Create a DDNS Account . . . . . . . . . . . . . . . . . . . . . . . . . . . . . . . . . . . . . . . . . . . . . . . . . . . . . 60
Step 3 of 4: Enable DDNS on the DVR . . . . . . . . . . . . . . . . . . . . . . . . . . . . . . . . . . . . . . . . . . . . . . . . . . . . 64
Step 4 of 4: Enter the DDNS Address into the Browser . . . . . . . . . . . . . . . . . . . . . . . . . . . . . . . . . . . . . . 65
Lorex Client 11: Client Software for PC. . . . . . . . . . . . . . . . . . . . . . . . . . . . 66
Connecting to your DVR using Lorex Client 11 . . . . . . . . . . . . . . . . . . . . . . . . . . . . . . . 66
Remote Viewing Interface . . . . . . . . . . . . . . . . . . . . . . . . . . . . . . . . . . . . . . . 67
Changing Viewing Modes . . . . . . . . . . . . . . . . . . . . . . . . . . . . . . . . . . . . . . . . . . . . . . . . 68
Taking Screen Shots . . . . . . . . . . . . . . . . . . . . . . . . . . . . . . . . . . . . . . . . . . . . . . . . . . . . 68
Recording Video . . . . . . . . . . . . . . . . . . . . . . . . . . . . . . . . . . . . . . . . . . . . . . . . . . . . . . . . 69