
Use and Care Manual
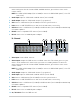

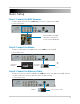

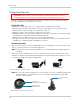
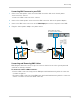
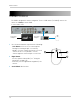
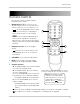
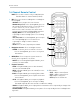
Table Of Contents
- DVR Overview
- Basic Setup
- Step 1: Connect the BNC Cameras
- Step 2: Connect the Mouse
- Step 3: Connect the Ethernet Cable
- Step 4: Connect the Monitor
- Step 5: Connect the Power Adapter and Power on the DVR
- Step 6: Verify Camera Image
- Step 7: Set the Time
- Default System Password & Port Numbers
- Quick Access to System Information
- Connecting Cameras
- Mouse Control
- Remote Control
- Using the On-Screen Display
- Setting the Date and Time
- Recording
- Playback and Backup
- Playing Back Recorded Video
- Using the On-Screen Playback Controls
- Advanced Playback Controls (ECO Blackbox+ Series Only)
- Finding Events in the Playback Bar (ECO Blackbox+ Series Only)
- Controlling the Time Range of the Playback Bar (ECO Blackbox+ Series Only)
- Using Zoom in Playback Mode (ECO Blackbox+ Series Only)
- Using Video Clip Backup (ECO Blackbox+ Series Only)
- Backing Up Video
- Viewing Backed Up Video
- Converting Backed Up Video to AVI Files
- Playing Back Recorded Video
- Managing Passwords
- Using the Main Menu
- Display
- Configuring Custom Channel Names
- Changing the Position of the Channel Name
- Adjusting Camera Color Settings
- Enabling Covert Recording
- Configuring the Time and Recording Time Display
- Configuring Sequence Time
- Changing the Video-out Resolution
- Adjusting Menu Transparency
- Restoring the System’s Resolution if you see a Blank Screen
- Adjusting the Video Margin
- Adding Privacy Zones
- Creating a Custom Split-screen Display (ECO Blackbox+ Series Only)
- Record
- Search
- Network
- Alarm
- Device
- System
- Advanced
- Configuring the "Auto Reboot" feature
- Upgrading the System Firmware
- Restoring to Factory Default Settings
- Restarting or Shutting Down the DVR
- Configuring System Warnings
- Saving Your System Configuration to a USB Flash Drive (ECO Blackbox+ Series Only)
- Loading a System Configuration from a USB Flash Drive (ECO Blackbox+ Series Only)
- Display
- Setting up your DVR for Remote Connectivity
- Lorex Client 11: Client Software for PC
- Remote Viewing Interface
- Changing Viewing Modes
- Taking Screen Shots
- Recording Video
- Showing / Hiding Channels
- Adjusting Sub-menu Options
- Changing the Save Directory of Screenshots or Recorded Video
- Changing the Format of Recorded Video (PC Only)
- Configuring PTZ Settings
- Video Playback
- Configuring Display Settings
- Configuring Privacy Zone Settings
- Configuring Recording Parameters
- Configuring the Recording Schedule
- Configuring System Recording Quality
- Configuring Basic Network Settings
- Configuring the System Substream
- Configuring Email Notification Settings
- Changing the Mobile User Name and Password
- Configuring DDNS Settings
- Configuring Motion Detection Settings
- Configuring your System to "Beep" During Motion
- Configuring Alarm Notifications (ECO Blackbox+ Series Only)
- Configuring Hard Drive Recording Mode
- Configuring PTZ Parameters
- Configuring the System Time and Date
- Changing the System’s Menu Time Out
- Configuring System User Accounts
- Viewing System Information
- Upgrading System Firmware
- Restoring Default Settings
- Configuring Event Settings
- Configuring Auto-Reboot
- Lorex Player 11: Playing Backed up Video on PC
- Lorex Player for Mac: Viewing Backed up Video on Mac
- Mobile Apps: Accessing your DVR Using a Mobile Device
- Appendix A: System Specifications
- Appendix B: Connecting a PTZ Camera
- Appendix C: Connecting Additional External Monitors
- Appendix D: Recording Audio
- Appendix E: Replacing the Hard Drive
- Troubleshooting
- Getting Started
11
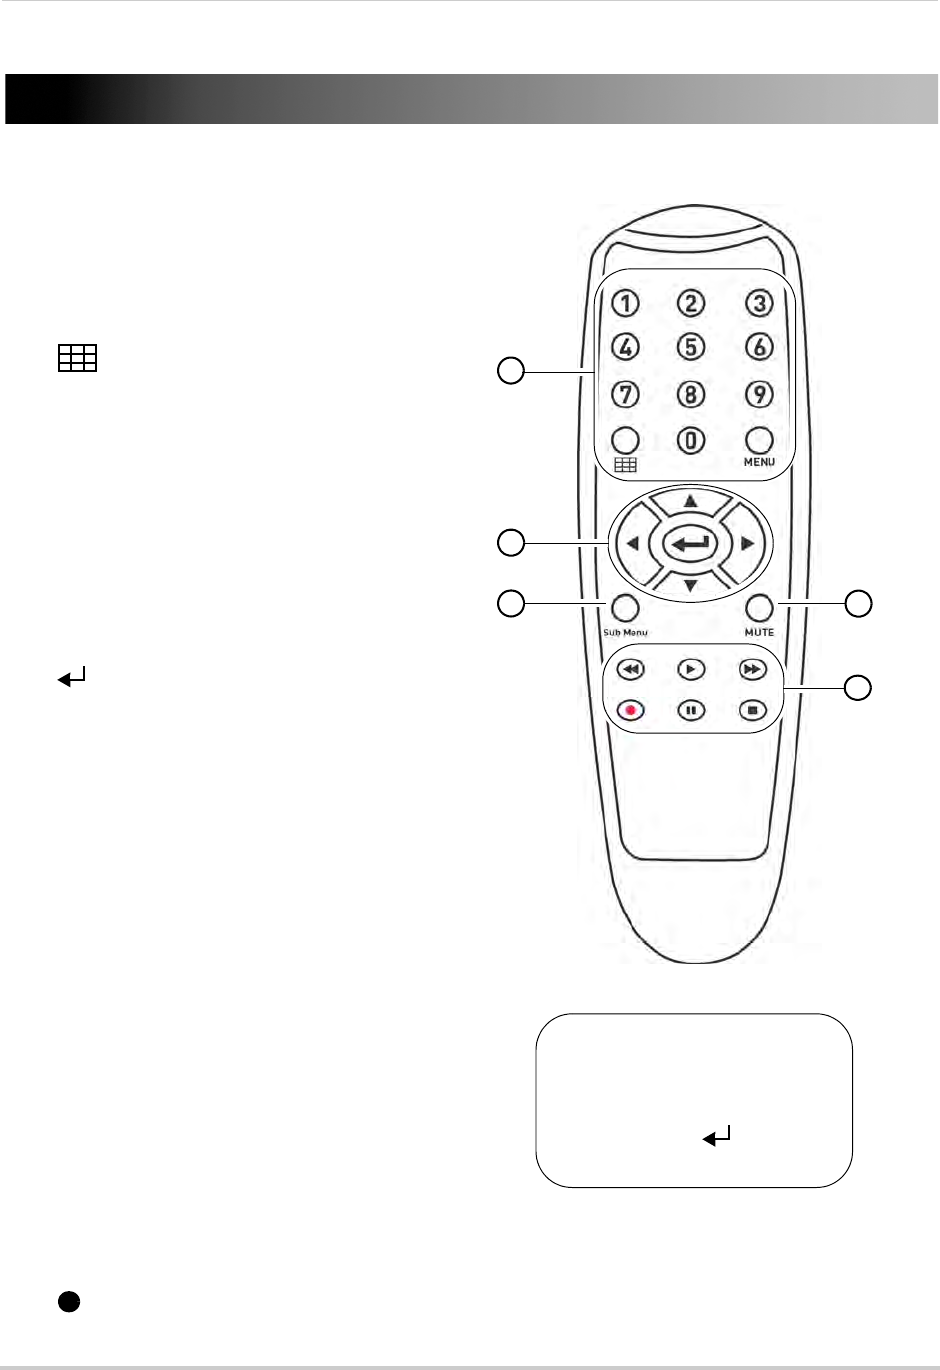
Remote Control
Remote Control
You can also control the DVR using the
included remote control.
1 Number Ke
ys (1-0): Press to select the
desired channel in Full-screen View. Press
1+0 for channel 10, 1+1 for channel 11, etc.
• : In Live Viewing Mode, press to open
Split-screen View. Press repeatedly to
swit
ch between split-screen viewing
modes.
• MENU: Pr
ess to open the Main Menu. In
menus, press to go back / exit menus.
• 0:
Press three times to switch the mouse
and system interface between VGA and BNC
monitors.
2 Navigation Cur
sors: Press to navigate
menus.
• : Press to select menu items. In Live
Viewing Mode, press to access System
Inf
ormation.
3 SUB MENU:
Press to open the Menu Bar.
4 MU
TE: Press to mute / un-mute audio
during Live Viewing and Playback Mode*.
5 Playback Contr
ols:
•
: In Playback Mode, press to fast forward
/ increase fast forward speed.
•
: In Playback Mode, press to rewind /
increase rewind speed.
•
:In Live Viewing Mode, press to open the
Search Menu to select video for playback.
• In Playback Mode, press to play video.
•
: In Live Viewing Mode, press to start
Sequence Mode.
• In Playback Mode, press to pause video.
Pr
ess repeatedly to step through video
frames.
• : Press to stop recording. Password required; does not override scheduled recording.
• : Record: Press to resume recording after recording has been stopped.
1
2
3
4
5
*Audio capable cameras (not included) are required
for audio recording and listen-in audio functionality.
TIP: When using the remote
control to enter password
and camera titles, select the
field using the navigation
buttons, press , and then
press the number buttons.
.