
Use and Care Manual
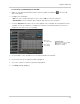
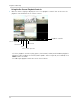
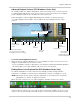
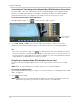
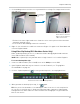
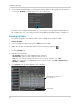
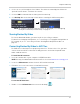
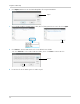
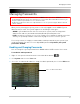
Table Of Contents
- DVR Overview
- Basic Setup
- Step 1: Connect the BNC Cameras
- Step 2: Connect the Mouse
- Step 3: Connect the Ethernet Cable
- Step 4: Connect the Monitor
- Step 5: Connect the Power Adapter and Power on the DVR
- Step 6: Verify Camera Image
- Step 7: Set the Time
- Default System Password & Port Numbers
- Quick Access to System Information
- Connecting Cameras
- Mouse Control
- Remote Control
- Using the On-Screen Display
- Setting the Date and Time
- Recording
- Playback and Backup
- Playing Back Recorded Video
- Using the On-Screen Playback Controls
- Advanced Playback Controls (ECO Blackbox+ Series Only)
- Finding Events in the Playback Bar (ECO Blackbox+ Series Only)
- Controlling the Time Range of the Playback Bar (ECO Blackbox+ Series Only)
- Using Zoom in Playback Mode (ECO Blackbox+ Series Only)
- Using Video Clip Backup (ECO Blackbox+ Series Only)
- Backing Up Video
- Viewing Backed Up Video
- Converting Backed Up Video to AVI Files
- Playing Back Recorded Video
- Managing Passwords
- Using the Main Menu
- Display
- Configuring Custom Channel Names
- Changing the Position of the Channel Name
- Adjusting Camera Color Settings
- Enabling Covert Recording
- Configuring the Time and Recording Time Display
- Configuring Sequence Time
- Changing the Video-out Resolution
- Adjusting Menu Transparency
- Restoring the System’s Resolution if you see a Blank Screen
- Adjusting the Video Margin
- Adding Privacy Zones
- Creating a Custom Split-screen Display (ECO Blackbox+ Series Only)
- Record
- Search
- Network
- Alarm
- Device
- System
- Advanced
- Configuring the "Auto Reboot" feature
- Upgrading the System Firmware
- Restoring to Factory Default Settings
- Restarting or Shutting Down the DVR
- Configuring System Warnings
- Saving Your System Configuration to a USB Flash Drive (ECO Blackbox+ Series Only)
- Loading a System Configuration from a USB Flash Drive (ECO Blackbox+ Series Only)
- Display
- Setting up your DVR for Remote Connectivity
- Lorex Client 11: Client Software for PC
- Remote Viewing Interface
- Changing Viewing Modes
- Taking Screen Shots
- Recording Video
- Showing / Hiding Channels
- Adjusting Sub-menu Options
- Changing the Save Directory of Screenshots or Recorded Video
- Changing the Format of Recorded Video (PC Only)
- Configuring PTZ Settings
- Video Playback
- Configuring Display Settings
- Configuring Privacy Zone Settings
- Configuring Recording Parameters
- Configuring the Recording Schedule
- Configuring System Recording Quality
- Configuring Basic Network Settings
- Configuring the System Substream
- Configuring Email Notification Settings
- Changing the Mobile User Name and Password
- Configuring DDNS Settings
- Configuring Motion Detection Settings
- Configuring your System to "Beep" During Motion
- Configuring Alarm Notifications (ECO Blackbox+ Series Only)
- Configuring Hard Drive Recording Mode
- Configuring PTZ Parameters
- Configuring the System Time and Date
- Changing the System’s Menu Time Out
- Configuring System User Accounts
- Viewing System Information
- Upgrading System Firmware
- Restoring Default Settings
- Configuring Event Settings
- Configuring Auto-Reboot
- Lorex Player 11: Playing Backed up Video on PC
- Lorex Player for Mac: Viewing Backed up Video on Mac
- Mobile Apps: Accessing your DVR Using a Mobile Device
- Appendix A: System Specifications
- Appendix B: Connecting a PTZ Camera
- Appendix C: Connecting Additional External Monitors
- Appendix D: Recording Audio
- Appendix E: Replacing the Hard Drive
- Troubleshooting
- Getting Started
25
Playback and Backup
Advanced Playback Controls (ECO Blackbox+ Series Only)
The ECO Blackbox+ has advanced playback controls that allow you to see when you have
recorded footage and motion events on your cameras. They also allow you to use digital
zoom in playback mode or take backups from short video clips.
Different playback controls appear dependin
g on the number of cameras you have
selected to playback. All available controls appear when you playback from a single
camera.
To use the advanced playback controls:
1 Mo
ve the mouse slightly to display the on-screen playback controls. You can also use the
playback control buttons on the remote control.
• Click the playback controls to play, pause, fast forward, rewind, and slow down playback.
• Click X
or right-click to quit playback and return to the Search Menu.
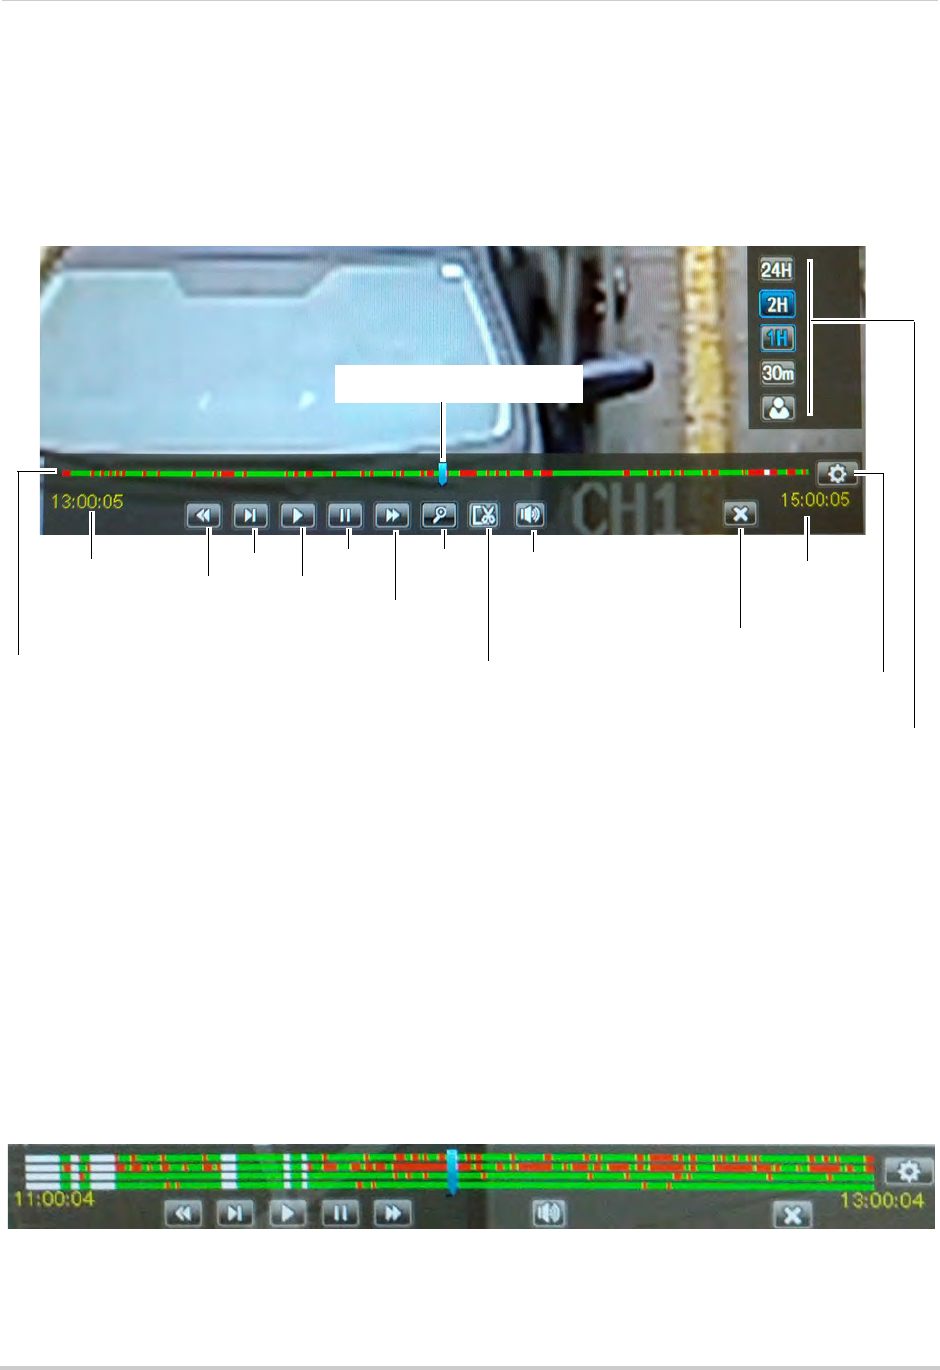
Finding Events in the Playback Bar (ECO Blackbox+ Series Only)
The advanced playback controls show the time and type of video footage available.
Continuous recordings are shown in green and motion or alarm recordings are in red.
NOTE: Motion
detection or alarms must be enabled for each channel before they will be
highlighted, see “Alarm” on page 47 for details.
When up to four channels are selected for playback,
multiple channels are shown.
If more than four channels are selected, one bar
is shown that combines all the selected
channels. This means that video available on any selected channel will be shown in the bar.
Available video footage
Green: Continuous recording
Red: Motion or alarm recording
Start time of
footage shown
in bar
End time of
footage
shown in bar
Exit playback
Change range of time
shown in playback bar
Rewind
Slow
Play
Pause
Fast
Forward
Zoom
Video clip
backup
Mute
Playback cursor (click and
drag to select playback time)
Show playback
time controls
Video footage from up to 4 channels is shown in multiple bars