
Quick Start Manual


Wall Mount Installation
Installation
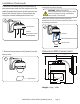
1. Make sure the O-rings (3x) are attached to the top of
the pendant cap (spares are included). Firmly insert the
pendant cap on to the wall mount bracket and twist to
tighten all the way. Insert the bracket screws (3x) to
secure pendant cap to wall mount bracket.
Wall mount bracket
Pendant cap
1
2. Use the back of the wall mount to drill holes for the
mounting screws. If you are running cables through
the wall, also drill a hole for the cables. Run the single
end of the cable through the wall mount and attach
the wall mount to the wall using the wall mounting
screws (4x).
NOTE: Use the included anchors if installing in
drywall.
2
3. Rotate the camera dome cover counterclockwise to
remove.
3
4. Remove the base attachment screws (3x) and
remove the camera from the camera base.
Dome cover
4
Base attachment
screws
Bracket Screws
(pre-attached)
Camera
Camera Base
WARNING - Wall mount is required for outdoor installation.
Camera is not weatherproof without the wall mount.
Wall Mount Contents
MNTV0XWL_INSTALLATION_DIAGRAM_EN_R1 Page 1
1x Wall Mount Bracket1x Pendant Cap 3x Bracket Screws
(pre-attached)
4x Wall Mounting
Screws and Anchors
3x O-rings
(spare)
O-rings
4x Camera
Attachment Screws
(pre-attached)