
User's Manual

DIGITAL VIDEO RECORDER
23
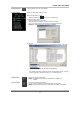
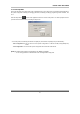
If you click ‘OK’, the audio setup of the QLR1660 Server program is enabled.
- Audio Speaker button: On
- Audio recording and transferring: audio buttons are enabled
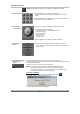
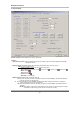
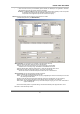
■ Recording On/Off
buttons
▶ Schedule Recording button (
)
: You can enable Schedule Recording according to Setup by clicking the ‘Schedule Rec.’
button.
[NOTE] If ‘Schedule Rec.’ button is off, all kind of recording (video and audio) components
configured in the Setup mode are disabled
▶ Group buttons (A,B)
: By clicking each group button (A,B), displays 8 channel recording buttons belongs to each
group
▶ Channel Recording buttons (1~16)
: Using these buttons, you are able to record each channel by clicking the desired channel.
The Continuous record icon (
) will be displayed on the camera screen.
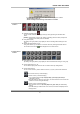
■ Channel Select
buttons
▶ Group buttons (A,B)
: By clicking each group button (A,B), displays 8 channel select buttons belongs to each group
▶ Channel Select buttons (1~16)
: You are able to display each channel in the one-channel mode by clicking buttons
▶ Screen division buttons
: You can see the screen by various division modes of 1,4,6,9,10,13,16 channels with these
buttons.
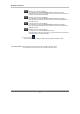
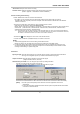
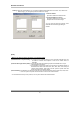
▪
One channel screen (1-channel display)
▪
4-division screen (4-channels display)
: Four 4-division screens of A(1~4ch), B(5~8ch), C(9~12ch), D(13~16ch) are
alternated by clicking.
*By double-clicking a channel on the screen, One channel screen of the channel and
4-division screen are changed alternately.
▪
6-division screen (6-channels display)
: Three 6-division screens of A(1~6ch), B(6~11ch), C(11~16ch) are alternated by
clicking
*By double-clicking a small channel on the screen, the channel are displayed on the
left large screen.