Setting Up Remote Viewing on the L20WD800 Series Combo DVR/ Monitor System Network Setup English Version 090808.1 MODEL: SG19LD – SG17LD Series www.lorexcctv.com Copyright © 2008 Lorex Technology Inc.
Setting up Remote Viewing Setting up Remote Viewing Setting up the Remote Viewing Feature requires several steps. Networking skills are required to correctly configure the remote viewing functions. What do you need? • • • • The LCD/DVR System. A PC with the installed with the Lorex Client 2.
Network Checklist Network Checklist The following checklist is provided to assist you in confirming that all steps have been successfully performed during Network Setup. Use this checklist in conjunction with the detailed steps outlined on the following pages, ticking off each option as you complete it. □ 1. □ □ □ □ □ □ 2.
Network Checklist □ 5. I have enabled PORT FORWARDING on my Router for: □ Port 80 □ Port 6100 NOTE: Each Router is different, therefore the port forwarding settings will vary by model. Please visit us on the web at http://www.lorexcctv.com/support for assistance with several of the most common router types. If your router is not listed, please refer to the manual that came with your Router, or your Router manufacturer for assistance, or visit http://www.portforward.com for common router details.
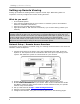
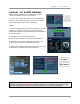
System - IP & MAC Address System - IP & MAC Address The IP & MAC Addresses are necessary for DDNS Setup (for remote access to the System). To Locate the System information, Press the ENTER button on the Front Panel while viewing the Cameras. The System Info window will be displayed. - OR 1. Press the Menu Button on the Front Panel or Remote Control, or right click with the mouse to access the Setup Menu. Select the System Setup option and press the Enter button. 2. Navigate to the System Menu option.
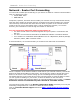
Network - Router Port Forwarding Network - Router Port Forwarding You will need to enable port forwarding on your Router to allow for external communications with your System for ports: • TCP/IP PORT 6100 • WEB PORT 80 Computers, Systems, and other devices inside your network can only communicate directly with each other within the internal network. Computers and systems outside your network cannot directly communicate with these devices.
Network - Router Port Forwarding Web - Finding Your External IP Address You will need to have your External IP address to set up your DDNS account. One of the fastest ways to find this information is to use a 3rd Party website such as http://www.showmyip.com Your IP address can also be found within your Router settings. Refer to your router user guide for further details.
Network - Setting Up Your DDNS Account Network - Setting Up Your DDNS Account Lorex offers a free DDNS service for use with your System. A DDNS account allows you to set up a web site address that points back to your Local Network. The following outlines how to set up your free DNS account. 1. Navigate to http://ddns.strategicvista.net 2. Select the Create Account option from the list on the left side of the screen. 3. Complete the Account Information fields with your personal information.
Network - Setting Up Your DDNS Account 5. Click the Create New Account link at the bottom of the form to submit your request. 6. Your Account information will be sent to you at the E-mail Address you used in Step 3. You will need this information for remote access to your System. Remember to record YOUR information before clicking on the Create New Account link.
Network - Setting Up Your DDNS Account There are two ways to find your DDNS Configuration information at a later date. Option #1: Review the Email sent to you by Lorex: Dear A, Thank you for activating your free Dynamic DNS account for your Lorex DVR Combo. Once you have set up your Lorex device and configured your network, you will be able to view your video images from anywhere in the world using the URL shown at the end of this message. When you visit the Lorex web site at: https://secure.lorexddns.
Network - Setting Up Your DDNS Account Option #2: Log into the Lorex DDNS Website at http://ddns.strategicvista.net and enter your Username and Password.
System - DDNS SETUP System - DDNS SETUP Once the DDNS settings have been configured online, the information must be entered on the System to allow for remote connection via the Lorex Client 2.0 Software (or through Internet Explorer): 1. Access the Main Menu Setup screens, and navigate to the SYSTEM option. Press the ENTER button to access the setup. 2. Navigate to the NETWORK option. Press the Enter button to access the Network settings.
Lorex Client 2.0 Software - Connection Manager Lorex Client 2.0 Software - Connection Manager The Connection Manager contains the setup information to allow the user to remotely connect to the System.
Lorex Client 2.0 Software - Connection Manager Adding a Site (Individual Unit Configuration) NOTE: When entering the information for the IP / DOMAIN NAME: • If you are connecting from within your network (i.e. The System and your PC are both inside your house), you only need to enter the IP address of the System into the software (i.e. 192.168.0.105) • If you are connecting from outside your network (i.e. The System is at Home, and your PC is at work), use the DDNS Domain Name to configure the software).
Lorex Client 2.0 Software - Remote Connection Lorex Client 2.
Network Troubleshooting Tree Network Troubleshooting Tree Use the following tree to assist you with troubleshooting your network setup. Step #1 - I have connected my System to my Router. When I press the ENTER button on my System, my IP is … Similar to 192.168.###.### or anything other than 127.0.0.1 This means that your system has leased an IP address from the Router. 127.0.0.1 See Step #1 Troubleshooting. Once troubleshooting has been performed, please repeat Step #1.
Network Troubleshooting Tree Step #4 – My Network Setup is: One Router connected to the Modem Proceed to Port Forwarding for your Model of Router. We have walkthroughs for several models. If your model is not listed, please refer to your Router Manual or Support, or visit http://www.portforward.com for detailed walkthroughs. Multiple Routers connected to the Modem Multiple Routers require extra setup during the Port Forwarding Section.
Network Troubleshooting Tree Step #6 – I have entered the Settings on my System and pressed the “DDNS STATUS” button You have received a SUCCESS message Your system should be connected to the remote DDNS server now. You have received a FAILED message Your system is not communicating with the remote DDNS Server.
Troubleshooting Steps Troubleshooting Steps We have included troubleshooting steps for the most common issues with each step of the Network Troubleshooting Tree. Please try all the steps listed below before calling for support. Step #1 – My IP is 127.0.0.1 This means that your system is NOT communicating on the network. Some things to try: • Power off the system, and disconnect the Ethernet Cable from both the System and Router.
Troubleshooting Steps Step #3 – My Internet Modem is A High Speed Cable or DSL Modem which *IS* a dual Modem/Router • Your modem may be a model Slipstream, WestTel, Netopia, ActionTec, 2Wire, SMC or another model of dual Router/Modem.
Glossary Glossary Below is a glossary of terms commonly used throughout this document. • DDNS – Dynamic Domain Name System. A Domain Name System assigns a name to an IP Address – for example, www.google.com has an IP address of 64.223.167.99. If you type in www.google.com into your Internet Explorer address bar, your computer sends a request to a Name System, which looks to the IP address for Google to bring the information back to your computer.
Glossary It’s all on the web Product Information Specification Sheets User Manuals Software Upgrades Quick Start Guides Firmware Upgrades VISIT www.lorexcctv.com www.lorexcctv.com Lorex Technology Inc.