En 2K Network Video Recorder (NVR) & Wire-Free Camera System L4248 Series Quick Start Guide lorex.com L4248-Series_QSG_TRILINGUAL_R1.
Thank you for your purchase! How to get started with your 2K NVR & Wire-Free Camera system L4248-Series_QSG_TRILINGUAL_R1.
Safety precautions • • • • • • Read this guide carefully and keep it for future reference. Follow all instructions for safe use and handling of the product. 1RGTCVG VJG ECOGTC YKVJKP VJG URGEKƒGF VGORGTCVWTG JWOKFKV[ CPF XQNVCIG CPF WUG OCPWHCEVWTGT CRRTQXGF accessories. Do not disassemble the camera. Do not point the camera directly at the sun or a source of intense light. Periodic cleaning may be required. Use a damp cloth only. Do not use any harsh, chemical-based cleaners.
Contents Section 1 2 3 4 5 6 Package Contents NVR Overview Camera Overview Before You Start Camera Setup 7 8 9 10 11 App Setup Camera Pairing to the App App Live View Optional: Setup Wizard Install the Camera Recorder Setup L4248-Series_QSG_TRILINGUAL_R1.
1 Package Contents HDD 2K NVR (x1) USB Mouse (x1) 2K Wire-Free Security Camera (x1)* Ethernet Cable (x1) Camera Antenna (x1)* HDMI Cable (x1) Re-chargeable Camera Battery Pack (x1)* Allen key (x1) Drill bit (x1) Screwdriver (x1) Battery Pack Adapter & Cable (x1)* Anchors (x4)* Screws (x4)* Security Screws (x2)* NVR Power Adapter (x1) Mounting Bracket (x1)* *Dependent on the number of cameras included. L4248-Series_QSG_TRILINGUAL_R1.
2 NVR Overview FRONT BACK 1. Power status indicator 3. QR code 2. HDD status indicator 4. HDMI port 5. Ethernet port 3 1 4 5 2 6. USB port (x2) 7. MicroSD slot (card included for VSHFLͤF PRGHOV 8. Power port 6 7 8 Status indicator Dimensions Power status indicator (solid) Operating correctly HDD status indicator (solid) Hard disk drive installed L4248-Series_QSG_TRILINGUAL_R1.indd 6 • Height: 8.6” (220mm) • Width: 2.5” (64mm) • Length: 6.
3 Camera Overview SIDE FRONT 1 2 1. Detachable antenna 3 4. Locking screw 2. Warning light 3. PIR sensor 5. Power port 6. Battery charging indicator 4 5 6 7 8 9 7. Fastener 10 11. Mounting plate slots (x2) 8. Pairing button 9. $GMXVWPHQW ULQJ 10. Battery release tabs (x2) 11 BOTTOM BACK MOUNTING PLATE Dimensions • Height: 4.8” (121mm) • Width: 5.2” (131mm) • Length: 2.9” (73mm) L4248-Series_QSG_TRILINGUAL_R1.
4 Before You Start The camera battery comes partially charged (due to safety regulations). Please, fully charge the battery before use and setup. You can charge the battery pack inside or outside of the camera. To charge the camera battery pack: 1. 4GOQXG VJG RTQVGEVKXG ƒNO QP VJG battery contacts and camera lens. 2. Using the provided battery charging adapter and cable, connect the camera to a nearby outlet.
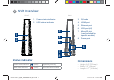
5 Camera Setup 1. Turn the adjustment ring counter-clockwise to loosen and reposition the camera. 2. Screw in the antenna. 3. Insert the power pack into the bottom of the camera. Note: You will hear a ‘beep’ when the power pack is properly inserted. If you do not hear this alert, remove the power pack by pushing in on the battery release tabs then re-insert. L4248-Series_QSG_TRILINGUAL_R1.
6 Recorder Setup 1. Connect the included NVR power adapter to the recorder. 2. Connect the recorder to your router using the included Ethernet cable. Optional: Full Recorder Setup 1. Connect a monitor using the included HDMI cable. 2. Connect the included USB mouse to one of the USB ports. L4248-Series_QSG_TRILINGUAL_R1.
7 App Setup 1. Download the Lorex Cirrus app by scanning the QR code. 2. Open the Lorex Cirrus app. 3. Tap 4. Tap the + icon. Follow the in-app instructions. 5. Enter the following information, then tap Save. to open the menu, then tap Device List. • Media Port: 35000 • Password: 00000000 6. A pop-up will display prompting you to change your password, tap OK. 7. Follow the in-app instructions to complete the setup. L4248-Series_QSG_TRILINGUAL_R1.
8 Camera Pairing to the App 1. From the Home screen, select your recorder from the list of devices. 2. Tap any free channel marked with a 3. Tap Pair. 4. Press and hold the pairing button on the back of the camera until the red LED lights stop flashing, then release the pairing button. A ‘Pairing success!’ message will appear on screen. If you do not see this message, repeat steps 1-4. icon. Optional: Pairing on the recorder Click the icon in an empty channel screen.
9 App Live View Device casting Settings Favorite group Name display Search/playback video Device name L4248-Series_QSG_TRILINGUAL_R1.
10 Optional: Setup Wizard When using the recorder’s interface, you will have to complete the Recorder Setup 9K\CTF 6JG 9K\CTF YKNN JGNR [QW VQ EQPƒIWTG EQTG U[UVGO UGVVKPIU CPF CRRGCTU once you connect a monitor. Log in using the system user name (default: admin) and the new password you created when setting up the recorder, then complete the on-screen instructions. For a complete overview of NVR controls available with the Full Recorder Setup, go to lorex.com/2K-NVRWFCamera.
11 Install the camera Security screw Screws Anchors (Optional) Mounting surface &DPHUD Mounting bracket 1. Set the mounting bracket in the desired mounting position. 2. Mark holes through the mounting bracket. 3. Using the included drill bit, drill holes where marked. 4. Using the included screwdriver, secure the bracket with the provided mounting screws. Optional: If you are mounting the camera into drywall, use the provided drywall anchors. L4248-Series_QSG_TRILINGUAL_R1.
5. Align the camera’s mounting plate slots to the tabs in the mounting bracket. Push in and slide down to secure in place. 6. Insert the security screw through the fasteners on the top of the camera and mounting bracket, then tighten with the screwdriver. 7. Tighten the pre-installed locking screw using the screwdriver. Pre-installed locking screw Note: To remove the power pack in the future, loosen the locking screw. 8. Adjust the camera to the desired position.
Need help? Visit help.lorex.com IRU XS WR GDWH LQIRUPDWLRQ DQG UHVRXUFHV • Download product guides • Watch how-to-videos • Find related troubleshooting tips & FAQs Register your product 3OHDVH VHH RXU IXOO 7HUPV RI 6HUYLFH DQG /LPLWHG +DUGZDUH :DUUDQW\ 3ROLF\ YLVLW lorex.com/warranty. &DXWLRQ 7KH XVHU LV FDXWLRQHG WKDW FKDQJHV RU PRGLILFDWLRQV QRW H[SUHVVO\ DSSURYHG E\ WKH SDUW\ UHVSRQVLEOH IRU FRPSOLDQFH FRXOG YRLG WKH XVHU V DXWKRULW\ WR RSHUDWH WKH HTXLSPHQW L4248-Series_QSG_TRILINGUAL_R1.
7KLV GHYLFH FRPSOLHV ZLWK 3DUW RI WKH )&& 5XOHV DQG ,QGXVWU\ &DQDGD OLFHQFH H[HPSW 566 VWDQGDUG V 2SHUDWLRQ LV VXEMHFW WR WKH IROORZLQJ WZR FRQGLWLRQV WKLV GHYLFH PD\ QRW FDXVH KDUPIXO LQWHUIHUHQFH WKLV GHYLFH PXVW DFFHSW DQ\ LQWHUIHUHQFH UHFHLYHG LQFOXGLQJ LQWHUIHUHQFH WKDW PD\ FDXVH XQGHVLUHG RSHUDWLRQ 127( 7KLV HTXLSPHQW KDV EHHQ WHVWHG DQG IRXQG WR FRPSO\ ZLWK WKH OLPLWV IRU D &ODVV % GLJLWDO GHYLFH SXUVXDQW WR 3DUW RI WKH )&& 5XOHV 7KHVH OLPLWV DUH GHVLJQHG WR SURYLGH UHDVRQDEO
Fr Enregistreur vidéo en réseau 2K (NVR) et le système de caméra sans fils 2K Série L4248 Guide de démarrage rapide lorex.com L4248-Series_QSG_TRILINGUAL_R1.
Merci pour votre achat! Voici comment démarrer votre NVR 2K et votre système de caméra sans fil L4248-Series_QSG_TRILINGUAL_R1.
Mesures de sécurité • • • • • • Lisez attentivement ce guide et gardez-le pour consultation ultérieure. Veuillez suivre les directives pour assurer une utilisation et une manipulation sécuritaires du produit. (CKVGU HQPEVKQPPGT NC ECOȌTC FCPU NGU NKOKVGU FG VGORȌTCVWTG FŨJWOKFKVȌ GV FG VGPUKQP URȌEKƒȌGU GV WVKNKUG\ les accessoires approuvés par le fabricant. Ne démontez pas la caméra. Ne pointez pas votre caméra vers le soleil ou une source intense de lumière.
Contenu Section 1 2 3 4 5 6 7 8 9 10 11 L4248-Series_QSG_TRILINGUAL_R1.
1 Contenu de l’emballage HDD NVR 2K (x1) Caméra de sécurité - UCPU ƒN Z Antenne de caméra (x1)* Bloc-piles rechargeable pour la caméra (x1)* Adaptateur de bloc-piles et câble (x1)* Adaptateur d’alimentation de NVR (x1) 5QWTKUǡ75$ (x1) %ȅDNGǡ'VJGTPGV (x1) Câble HDMI (x1) Clé Allen (x1) Mèche de forage (x1) Tournevis (x1) Ancrages (x4)* Vis (x4)* Vis de sécurité (x2)* Support de montage (x1)* ǡ%GNC FȌRGPF FW PQODTG FG ECOȌTCU KPENWUGU L4248-Series_QSG_TRILINGUAL_R1.
2 Vue d’ensemble du NVR AVANT PRÉCÉDENT 1. ,QGLFDWHXU G̵«WDW G̵DOLPHQWDWLRQ 2. ,QGLFDWHXU G̵«WDW +'' 3 1 4 5 2 3. 4. 5. 6. 7. &RGHb45 Port HDMI Port Ethernet Port USB (x2) )HQWH GH FDUWH PLFUR 6' (carte incluse pour des PRGªOHV VS«FLͤTXHV 8. 3RUW G̵DOLPHQWDWLRQ 6 7 8 Indicateur d’état Dimensions ,QGLFDWHXU G̵«WDW G̵DOLPHQWDWLRQ SHUPDQHQW %RQ IRQFWLRQQHPHQW ,QGLFDWHXU G̵«WDW +'' SHUPDQHQW 'LVTXH GXU LQVWDOO« L4248-Series_QSG_TRILINGUAL_R1.
3 Vue d’ensemble de la caméra AVANT CÔTÉ 1. Antenne G«PRQWDEOH 2. Voyant G̵DYHUWLVVHPHQW 3. Capteur passif à infrarouge 4. Vis de blocage 5. Port G̵DOLPHQWDWLRQ 6. Indicateur de charge de la pile 1 2 3 4 5 6 7. Fixation 8. Bouton de MXPHODJH 9. Bague de U«JODJH 10. Languettes d’ouverture du bloc-pile (x2) 11. Fentes de la SODTXH GH PRQWDJH [ 7 8 9 10 11 Dimensions PARTIE INFÉRIEURE L4248-Series_QSG_TRILINGUAL_R1.indd 24 PLAQUE DE MONTAGE ARRIÈRE • *CWVGWTǡ ǡOO ǡRQ • .
4 Avant de commencer Les piles de la caméra sont livrées partiellement chargées (en raison des règles de sécurité). Prenez soin de charger complètement les piles avant l’utilisation et l’installation. Vous pouvez charger le bloc-piles à l’intérieur ou à l’extérieur de la caméra. Pour charger le bloc-piles de la caméra : 1. 4GVKTG\ NG ƒNO RTQVGEVGWT FGU EQPVCEVU des piles et de la lentille de la caméra. 2.
5 Configuration de la caméra 1. Tournez la bague de réglage dans le sens des aiguilles d’une montre pour relâcher et repositionner la caméra. 2. Visser l’antenne. 3. Insérez le bloc d’alimentation dans la base de la caméra. 5HPDUTXHb Vous entendrez un « signal sonore » lorsque le bloc d’alimentation est correctement inséré. Si vous n’entendez pas cette alerte, retirez le bloc-pile en appuyant sur les languettes d’ouverture, puis réinsérez-le. L4248-Series_QSG_TRILINGUAL_R1.
6 Configuration de l’enregistreur 1. Connectez l’adaptateur d’alimentation inclus à NVR. 2. Connectez l’enregistreur à votre routeur à l’aide du câble Ethernet inclus. Optionnel: Installation complète de l’enregistreur 1. Connectez un moniteur à l’aide du câble HDMI fourni. 2. Connectez la souris USB incluse à l’un des ports USB. L4248-Series_QSG_TRILINGUAL_R1.
7 Configuration de l’application 1. Téléchargez l’application Lorex Cirrus en balayant le code QR. 2. 1WXTG\ NŨCRRNKECVKQP .QTGZǡ%KTTWU 3. Appuyez sur Device List. 4. Appuyez sur l’icône +. Suivez les instructions dans l’application. 5. %QPƒIWTG\ NGU ȌNȌOGPVU UWKXCPVU RWKU CRRW[G\ UWT Save. pour ouvrir le menu, puis appuyez sur • Media Portǡ • Passwordǡ 6. 7PG HGPȍVTG EQPVGZVWGNNG UŨCHƒEJGTC RQWT XQWU KPXKVGT ȃ changer votre mot de passe, appuyez sur OK. 7.
8 Jumelage de la caméra avec l’application 1. À partir de l’écran d’accueil, sélectionnez votre enregistreur dans la liste d’appareils. 2. Appuyez sur n’importe quel canal libre marqué avec une icône . 3. Appuyez sur Pair. 4. Appuyez et maintenez le bouton de jumelage à l’arrière de la caméra jusqu’à ce que les feux LED rouges cessent de clignoter, puis relâchez le bouton de jumelage. Le message « Pairing success! » apparaîtra à l’écran. Si vous ne voyez pas ce message, répétez étapes 1-4.
9 Visionnement de l’application en direct Diffusion de l’appareil Paramètres Groupe favori #HƒEJCIG FW PQO Rechercher ou lire une vidéo Nom de l’appareil L4248-Series_QSG_TRILINGUAL_R1.
10 Optionnel : Assistant de configuration Lors de l’utilisation de l’interface de l’enregistreur, vous devrez compléter NŨCUUKUVCPV FG EQPƒIWTCVKQP FG NŨGPTGIKUVTGWT .ŨCUUKUVCPV XQWU CKFGTC ȃ EQPƒIWTGT les paramètres de base du système et il apparaît une fois que vous connectez un moniteur. %QPPGEVG\ XQWU GP WVKNKUCPV NG PQO FŨWVKNKUCVGWT FW U[UVȋOG RCT FȌHCWVǡ admin) GV NG PQWXGCW OQV FG RCUUG SWG XQWU CXG\ ETȌȌ NQTU FG NC EQPƒIWTCVKQP FG NŨGPTGIKUVTGWT RWKU UWKXG\ NGU KPUVTWEVKQPU SWK ƒIWTGPV ȃ NŨȌE
11 Installation de la caméra 9LV GH V«FXULW« Vis Ancrages (facultatifs) Surface de PRQWDJH &DP«UD Support de PRQWDJH 1. Placez le support de montage dans la position souhaitée. 2. Marquez les trous à travers le support de montage. 3. À l’aide de la mèche de forage fournie, percez les trous marqués. 4. 7VKNKUG\ NG VQWTPGXKU HQWTPK RQWT ƒZGT NG UWRRQTV FG OQPVCIG CXGE NGU XKU FG OQPVCIG HQWTPKGU 2SWLRQQHOb Si vous montez la caméra sur le placoplâtre, utilisez les ancrages fournis.
5. Alignez les fentes de la plaque de montage de la caméra sur les languettes du support de montage. Poussez et faites INKUUGT XGTU NG DCU RQWT NG ƒZGT GP RNCEG 6. +PUȌTG\ NC XKU FG UȌEWTKVȌ FCPU NGU ƒZCVKQPU UWT NC DCUG FG la caméra et le support de montage, Puis, serrez avec le tournevis. 7. Resserrer la vis de verrouillage en utilisant un tournevis. La vis de verrouillage 5HPDUTXHb Pour le retrait ultérieur du bloc d’alimentation, relâchez la vis de blocage. 8.
Besoin d’aide? Consultez la page help.lorex.com SRXU REWHQLU GHV LQIRUPDWLRQV HW GHV UHVVRXUFHV ¢ MRXUb • 7«O«FKDUJH] OHV JXLGHV GH SURGXLWV • 5HJDUGH] GHV YLG«RV SUDWLTXHV • 7URXYH] GHV FRQVHLOV HQ PDWLªUH GH G«SDQQDJH HW GHV )$4 FRQQH[HV Enregistrez votre produit 9HXLOOH] FRQVXOWHU QRV FRQGLWLRQV G̵XWLOLVDWLRQ FRPSOªWHV HW QRWUH SROLWLTXH GH JDUDQWLH OLPLW«H GX PDW«ULHO VXU OH VLWH lorex.com/warranty.
&HW DSSDUHLO HVW FRQIRUPH j OD SDUWLH GHV UqJOHV GH OD )&& HW DX[ QRUPHV 566 H[HPSWHV GH OLFHQFH G ,QGXVWULH &DQDGD / H[SORLWDWLRQ HVW VRXPLVH DX[ GHX[ FRQGLWLRQV VXLYDQWHV FHW DSSDUHLO QH GRLW SDV FDXVHU G LQWHUIpUHQFHV QXLVLEOHV FHW DSSDUHLO GRLW DFFHSWHU WRXWH LQWHUIpUHQFH UHoXH \ FRPSULV OHV LQWHUIpUHQFHV SRXYDQW SURYRTXHU XQ IRQFWLRQQHPHQW LQGpVLUDEOH 5(0$548( &HW pTXLSHPHQW D pWp WHVWp HW GpFODUp FRQIRUPH DX[ OLPLWHV G XQ DSSDUHLO QXPpULTXH GH FODVVH % FRQIRUPpPHQW j OD SDUWLH
Es Grabadora de vídeo en red 2K (NVR) y sistema de cámara sin cables Serie L4248 Guía de inicio rápido lorex.com L4248-Series_QSG_TRILINGUAL_R1.
¡Gracias por su compra! Cómo empezar con su 2K NVR y Sistema de cámara sin cables L4248-Series_QSG_TRILINGUAL_R1.
Precauciones de seguridad • • • • • • Lea esta guía atentamente y guárdela para referencias futuras. Siga todas las instrucciones para usar y manejar el producto de manera segura. 1RGTG NC EȄOCTC FGPVTQ FG NC VGORGTCVWTC JWOGFCF [ XQNVCLG GURGEKƒECFQU [ WUG CEEGUQTKQU CRTQDCFQU RQT el fabricante. No desarme la cámara. No apunte la cámara directamente al sol o a fuentes de luz intensa. Es posible que se requiera una limpieza periódica. Utilice solamente un paño humedecido.
Contenido Sección 1 2 3 4 5 6 7 8 9 10 11 L4248-Series_QSG_TRILINGUAL_R1.
1 Contenido del paquete HDD NVR 2K (x1) Cámara de seguridad inalámbrica 2K (x1)* Mouse USB (x1) Cable Ethernet (x1) Antena de cámara (x1)* Cable HDMI (x1) Paquete de baterías recargables de la cámara (x1)* Llave Allen (x1) Broca (x1) Destornillador (x1) Cable y adaptador del paquete de baterías (x1)* Anclajes (x4)* Tornillos (x4)* Tornillos de seguridad (x2)* Adaptador de corriente NVR (x1) Soporte de montaje (x1)* *Depende del número de cámaras incluidas. L4248-Series_QSG_TRILINGUAL_R1.
2 Descripción general de la NVR PARTE FRONTAL ATRÁS 1. 2. Indicador del estado de HQHUJ¯D Indicador de estado del HDD 3 1 4 5 2 3. 4. 5. 6. 7. 8.
3 Descripción general de la cámara LATERAL PARTE FRONTAL 1 2 1. 2. 3. 3 4. 5. 4 5 6 6. Antena GHVPRQWDEOH Luz de advertencia Sensor infrarrojo pasivo (PIR) Tornillo de seguridad Puerto de DOLPHQWDFLµQ Indicador de carga de la EDWHU¯D 7. 8. Sujetador Botón de HPSDUHMDPLHQWR 9. Anillo de ajuste 10. Pestañas de liberación (x2) 11. Ranuras de la SODFD GH PRQWDMH (x2) 7 8 9 10 11 Dimensiones INFERIOR L4248-Series_QSG_TRILINGUAL_R1.
4 Antes de comenzar Las baterías de la cámara vienen parcialmente cargadas (debido a las normas de seguridad). Cargue EQORNGVCOGPVG NC DCVGTȐC CPVGU FG WUCTNC [ EQPƒIWTCTNC 2WGFG ECTICT GN RCSWGVG FG DCVGTȐCU FGPVTQ y fuera de la cámara. Para cargar el paquete de baterías de la cámara: 1. Retire la película protectora de los contactos de la batería y el lente de la cámara. 2. Utilizando el adaptador de carga de la batería y el cable suministrados, conecte la cámara a una toma de corriente cercana.
5 Configuración de la cámara 1. Gire el anillo de ajuste en sentido antihorario para aflojar y reposicionar la cámara. 2. Atornille la antena. 3. Inserte y empuje el cargador hacia arriba en la base de la cámara. Nota: Escuchará un “bip” cuando el cargador esté correctamente insertado. Si escucha esta alerta, retire el cargador presionando las pestañas de liberación y, luego, vuelva a insertarlo. L4248-Series_QSG_TRILINGUAL_R1.
6 Configuración de la grabadora 1. Conecte el adaptador de corriente incluido a la grabadora. 2. Conecte la grabadora a su enrutador usando el cable Ethernet incluido. Opcional: Configuración completa de la grabadora 1. Conecte a un monitor con el cable HDMI incluido. 2. Conecte el mouse USB incluido a uno de los puertos USB. L4248-Series_QSG_TRILINGUAL_R1.
7 Configuración de la aplicación 1. Descargue la aplicación Lorex Cirrus escaneando el código QR. 2. Abra la aplicación Lorex Cirrus. 3. Pulse 4. Pulse el ícono +. Siga las instrucciones en la aplicación. 5. Ingrese la siguiente información, luego pulse Save. para abrir el menú, luego pulse Device List. • Media Port: 35000 • Password: 00000000 6. Aparecerá una ventana emergente que le pedirá que cambie su contraseña, pulse OK. 7. 5KIC NCU KPUVTWEEKQPGU GP NC CRNKECEKȕP RCTC ƒPCNK\CT NC EQPƒIW
8 Emparejamiento de la cámara con la aplicación 1. En la pantalla de inicio, seleccione su grabadora de la lista de dispositivos. 2. Pulse cualquier canal libre marcado con un ícono 3. Pulse Pair. 4. Mantenga pulsado el botón de emparejamiento en la parte posterior de la cámara hasta que las luces LED rojas dejen de parpadear y, a continuación, suelte el botón de emparejamiento. El mensaje "Pairing success!" aparecerá en la pantalla. Si no ve este mensaje, repita pasos 1-4. .
9 Visualización en vivo en la aplicación Transmisión de dispositivo %QPƒIWTCEKȕP Grupo favorito Pantalla del nombre Nombre del dispositivo L4248-Series_QSG_TRILINGUAL_R1.
10 Opcional: Asistente de configuración Cuando utilice la interfaz de la grabadora, deberá completar el Asistente de EQPƒIWTCEKȕP FG NC ITCDCFQTC 'N CUKUVGPVG NG C[WFCTȄ C EQPƒIWTCT NQU CLWUVGU FGN sistema central y aparecerá cuando conecte un monitor. Inicie sesión con el nombre de usuario del sistema (predeterminado: admin) y NC PWGXC EQPVTCUGȓC SWG ETGȕ CN EQPƒIWTCT NC ITCDCFQTC NWGIQ EQORNGVG NCU instrucciones en pantalla.
11 Instalación de la cámara Tornillo de seguridad Tornillos Anclajes (opcional) 6XSHUͤFLH GH PRQWDMH &£PDUD Soporte de PRQWDMH 1. Coloque el soporte de montaje en la posición de montaje deseada. 2. /CTSWG NQU QTKƒEKQU C VTCXȌU FGN UQRQTVG FG OQPVCLG 3. %QP NC DTQEC KPENWKFC VCNCFTG NQU QTKƒEKQU FQPFG GUVȌP OCTECFQU 4.
5. Alinee las ranuras de la placa de montaje de la cámara a las pestañas del soporte de montaje. Empuje y deslice hacia abajo para que esté asegurada en su lugar. 6. Inserte el tornillo de seguridad a través de los sujetadores en la parte superior de la base de la cámara y el soporte de montaje, luego ajuste el tornillo usando el destornillador. 7. Apriete el tornillo de bloqueo preinstalado usando el destornillador.
¿Necesita ayuda? Visite help.lorex.com SDUD REWHQHU LQIRUPDFLµQ \ UHFXUVRV DFWXDOL]DGRV • 'HVFDUJXH ODV JX¯DV GH ORV SURGXFWRV • Vea videos instructivos • (QFXHQWUH VXJHUHQFLDV SDUD OD UHVROXFLµQ GH SUREOHPDV \ SUHJXQWDV IUHFXHQWHV relacionadas Registre su producto &RQVXOWH QXHVWURV 7«UPLQRV GH VHUYLFLR FRPSOHWRV \ OD 3RO¯WLFD GH JDUDQW¯D OLPLWDGD GH hardware en lorex.com/warranty.
(VWH GLVSRVLWLYR FXPSOH FRQ OD 3DUWH GH ODV QRUPDV GH OD )&& \ ORV HVWiQGDUHV 566 H[HQWRV GH OLFHQFLD GH ,QGXVWU\ &DQDGD (O IXQFLRQDPLHQWR HVWi VXMHWR D ODV GRV FRQGLFLRQHV VLJXLHQWHV HVWH GLVSRVLWLYR QR SXHGH FDXVDU LQWHUIHUHQFLDV SHUMXGLFLDOHV HVWH GLVSRVLWLYR GHEH DFHSWDU FXDOTXLHU LQWHUIHUHQFLD UHFLELGD LQFOXLGDV ODV LQWHUIHUHQFLDV TXH SXHGDQ FDXVDU XQ IXQFLRQDPLHQWR QR GHVHDGR 127$ (VWH HTXLSR KD VLGR SUREDGR \ FXPSOH FRQ ORV OtPLWHV SDUD XQ GLVSRVLWLYR GLJLWDO GH &ODVH % GH DFXHUGR FR