960-Hour Time Lapse Video Cassette Recorder User’s Guide SG-7960 Be sure to read carefully and follow all the SAFETY INFORMATION on pages i, ii, iii. Keep the manual in a safe place for future reference.
Safety information CAUTION RISK OF ELECTRIC SHOCK DO NOT OPEN CAUTION: TO REDUCE THE RISK OF ELECTRIC SHOCK, DO NOT REMOVE COVER (OR BACK). NO USER-SERVICEABLE PARTS INSIDE. REFER SERVICING TO QUALIFIED SERVICE PERSONNEL. The lightning flash with arrowhead symbol, within an equilateral triangle, is intended to alert the user to the presence of uninsulated “dangerous voltage” within the product’s enclosure that may be of sufficient magnitude to constitute a risk of electric shock.
Specifications General Specifications Recording method Audio recording Tape speed Specified video cassette tape Recording/playback time Fast forward/rewind time Television system Dual-azimuth 4-head rotating helical scanning system In 2, 6, and 18 hour modes 33.
Use SYMPTOM 14 Cleaning – Unplug this video product from the wall outlet before cleaning. Do not use liquid cleaners or aerosol cleaners. Use a damp cloth for cleaning. 15 Object and Liquid Entry – Never push objects of any kind into this video product through openings as they may touch dangerous voltage points or “short-out” parts that could result in a fire or electric shock. Never spill liquid of any kind on the video product.
Contents Troubleshooting Guide If the unit does not operate normally when you follow the instructions indicated in the manual, please refer to the table below. SYMPTOM No power. POSSIBLE CAUSE The power cord is not correctly connected to the wall outlet. - Connect the power cord firmly into the wall outlet. The unit is in timer recording standby mode. - This is normal, not a malfunction. No image displayed on the monitor TV. The connections are not correct.
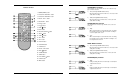
Daily Inspection Locations of controls and indicators The following daily inspections are recommended in order to assure long-term and trouble-free operation of the unit. Front panel The daily inspections are particularly important if using autorepeat recording. Inspection Procedure 1 Turn on the power to the camera, TV monitor and other connected devices. ✔ • If the security lock is engaged, it has to be released before proceeding with theinspection.
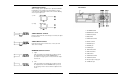
Connecting to a Multiview System for a Alarm Recording Digital Display 1 Operation Indicators display the actual operation mode. Operation Mode 2 3 4 5 37 960-Hour Time Lapse Video Cassette Recorder Indicator 1 Record(REC) REC 2 Record pause (REC PAUSE) REC + 3 Playback (PLAY) 4 Still image (STILL) 5 Fast forward (FF) 6 Rewind (REW) 7 CUE(CUE) + + 8 Review(REVIEW) + + 9 Slow(Pause Still + FF, Pause Still + REW) + + Cassette indicator : Comes on when a cassette is loaded.
6 Power Loss indicator : Flashes on after power loss. 7 CNT indicator : CNT Comes on when the tape or alarm counter is on. 8 SPD indicator : SPD Comes on when the play or recording speed is on. 9 AM indicator : AM (PM : “AM” off) 10 RMC.L indicator : RMC.L Comes on when the RMC LOCK sw is set to the “ON” position. 11 S.REC indicator : S.REC Comes on when “YES” is selected in the menu for the series recording. 12 R.REC indicator : R.
SW OUTPUT Terminal Back Panel While recording, a pulse signal(DC 5V) is output at the SW OUT terminal after each recording period. This terminal is usually connected to the switch input of devices like a camera switching unit, or a quad compressor. 1) Low 2) High 1 SERIES OUTPUT Terminal During recording, when the end of the tape is reached, the output becomes DC 5V .
ALARM INPUT Terminal Remote Control This terminal is to connect PIR sensors, door contacts or any type of motion detectror. 1 POWER(TIMER) button 1) If the input becomes DC 5V for 500 msec or more, the VCR starts alarm recording. 2 PLAY/STILL TRACKING + button 3 PLAY/STILL TRACKING - button “N/C” (Normally CLOSED Switch Circuit) 2) 4 PAUSE / STILL + button “N/O” (Normally OPEN Switch Circuit) If the input becomes 0V for 500 msec or more, the VCR starts alarm recording.
Connections Checking Usage Duration 1 Press the MENU button to display the initial MENU. ✔ 2 Press the SHIFT button to move the arrow mark ( ) to “Running Time.” Press the SHIFT button to display the Running Time. • The Running Time data cannot be reset even though the reset button is pressed. If the RESET button is pressed, all data can be reset except the running time data. Connect the video camera and monitor TV as shown in the figure below.
Checking the Alarm Recording Times Types of On-screen Displays and Display Sequence • If the VCR is in timer recording stand-by mode (the “ “ indicator is displayed on the display panel), the on-screen displays will not be available. First press the Power/Timer button, to cancel the recording stand-by mode, then proceed with the VCR programming. When finished, press the Power/Timer button again to return the VCR to timer recording stand-by mode. • When a menu is displayed, recording will not be possible.
7 Press the MENU button, the normal screen is displayed. ✔ In the following cases, the buzzer will be heard approximately 5 times. – If the REC button is pressed while a cassette without erasure-prevention tab is loaded. • The setting procedure is now complete. Setting the Buzzer 1 Press the MENU button to display the initial MENU. 2 Press the SHIFT button to select VCR Mode Set. The VCR MODE SET menu is displayed. A – If a cassette, without the erasureprevention tab, is loaded while the timer is set.
Video Cassette Tapes Setting the Security Lock (Set Lock) ✔ The security lock function is designed to prevent accidental stopping of recording if the STOP button is pressed inadvertently. • If you try to record on a cassette without the erasure-prevention tab, the VCR will eject the cassette.
Other Functions ✔ • When you insert a cassette, the counter always resets to zero. • There is no tape counter indication for the blank portions of tape. • In the 2-hour recording speed mode only, the tape counter indicates real hours, minutes and seconds. • In the other SP recording speed modes (24H, 36H), the tape counter indication is a ratio of the 2-hour mode base indication. (In 24-hour recording mode, each “second” of the tape counter actually represents approximately 24/2 =12 real seconds.
6 Press the SET - (or +) button to set the minutes (eg : 30), then press the SHIFT button. Alarm Scan 7 The seconds are already set to “00”. 2 Press the SHIFT button to search forward or in reverse without entering a specific alarm number. 8 Press the SHIFT 1 Repeat steps 1 to 3. button. • The display returns to the normal screen. 9 Press the SET - (or +) button to set the month (eg 04), then press the SHIFT button.
Alarm Search Changing the On-Screen Display 1 Press the Menu button to display the initial menu. 2 Press the SHIFT button to select Search Select, then press the SHIFT button to display the SEARCH SELECT menu. Selecting the On-screen Display You can select whether or not to display the time, date, frame counter, alarm counter, counter title. 1 Turn the power on to all devices used. 2 Press the MENU button. The initial MENU is displayed. The arrow mark ( ) is located in “VCR Mode Set”.
6 Press the SET - (or +) button to set “YES” for the functions described below. ✔ • The items for which “YES” is set are recorded. The items for which “NO” is set at step 6 above are not recorded. Time . . . . Date . . . . . Frame Cnt Alarm Cnt . Counter . . Title . . . . . . . . . . . . . . . . . .The .The .The .The .The .The time is displayed. Month-Day-Year is displayed. number of frames is displayed. number of alarms is displayed. counter is displayed. title is displayed.
Normal Playback Normal Recording Normal Playback 1 Turn on the power to the TV monitor. 2 Load the video cassette tape. ✔ • A slow motion effect or accelerated playback effect can be achieved by using a slower or faster playback speed than the speed used for recording. 3 Press the REC/PLAY speed. SPEED (or ) button to select the playback • The selected playback speed is displayed on the display panel.
Program Timer Recording Autorepeat Recording There are two program timer recording methods, daily recording or recording on certain days of multiple weeks (weekly recording). Autorepeat Recording The same tape can be recorded over many times. Please note that if you activate this feature you will lose the entire previous recording. Example 1 : To record on every Thursday from 10 : 00 to 18 : 00 , in 24hour mode (recording speed) 1 Press the Menu, SHIFT , SHIFT display the REC MODE SET menu.
✔ • During series recording, autorepeat recording or timer recording are not possible. • If in the REC MODE SET menu, “Series Rec Set” is set to “NO”, series recording will not be possible. 3 Press the REC button on VCR No.1. 9 • Recording will start in series recording mode. 4 Set the security lock on VCR No.1. • When the end of the tape on VCR No.1 is reached, the output at the SERIES OUT terminal will switch signal. This will start recording on VCR No.2, the tape will stop and be ejected on VCR No.1.
12 Press the MENU button three times, the normal screen is displayed. Panic Recording This feature is similar to an alarm recording, but the recording time is not pre-selected. When there is a panic input at the PANIC IN terminal, recording will start and continue for up to 2 hours. Series Recording Using 2 VCRs or more, the series recording function lets you switch recording from one unit to the next (only with VCRs of the same model as this one). 13 Press the POWER/TIMER button.
Connecting to a Lorex Monitor for Alarm Recording To Cancel a Program Timer Recording 1 Repeat step 1 above. 2 Press the SHIFT (or ) button until the cursor is located in the “Y” corresponding to the timer recording to cancel. 3 Press the SET - (or +) button, to select “N”. 4 Press the MENU button three times until the normal screen is displayed. 5 Press the POWER/TIMER button. • The clear button can erase the programmed timer recording in the line that the cursor is located. Notes...
Alarm Recording Alarm Recording Counter Display Alarm Recording Setting Alarm recording is performed when there is an input (trigger) at the ALARM IN terminal “ “ is displayed on the display panel. 1 Make all necessary connections. 2 Press the MENU, SHIFT , SHIFT the REC MODE SET menu. ✔ • During alarm recording all buttons are disabled except the STOP button. If the STOP button is pressed, the alarm recording will stop.