
User's Manual


✔
• To modify or cancel
timer recording, press
the POWER/TIMER
button to cancel the
timer recording mode.
17 960-Hour Time Lapse Video Cassette Recorder 960-Hour Time Lapse Video Cassette Recorder 22
12 Press the MENU button three times, the normal screen is displayed.
13 Press the POWER/TIMER button.
• The timer recording indicator “ “ will light on the display panel. The
VCR is now in timer recording stand-by mode.
Example 2 : To record everyday from 10 : 00 to 18 : 00, in 24-hour
mode (recording speed)
1 Repeat steps 1 to 3.
2 Press the SHIFT button, until the cursor is on “DLY”. The MENU
below is displayed.
3 Repeat steps 5 to 13.
Programmed timer recording Example 2
Changing a Program Timer Recording
1 Press the MENU, SHIFT , SHIFT , SHIFT buttons in sequence
to display the TIMER PROGRAM SET(1) menu.
2 Press the SHIFT (or ) button, until the cursor is located in the
setting to correct.
3 Press the SET - (or +) button, to correct the setting.
• Press the MENU button three times until the normal screen is
displayed.
4 Press the POWER/TIMER button.
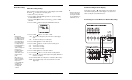
Item VCR No.1 VCR No.2
and on
Cassette tape Loaded Loaded
Operation mode Stop Stop
Repeat Rec Set “NO” “NO”
Series Rec Set “YES” “YES”
Timer recording OFF (not set) OFF (not set)
Security lock switch
(SET LOCK switch) “OFF” “ON”
This feature is similar to an alarm recording, but the recording time is
not pre-selected. When there is a panic input at the PANIC IN termi-
nal, recording will start and continue for up to 2 hours.
Using 2 VCRs or more, the series recording function lets you switch
recording from one unit to the next (only with VCRs of the same
model as this one).
Series Recording Setup
1 Connect 2 VCRs or more as illustrated below.
2 Set the following items as indicated.
Panic Recording
Series Recording