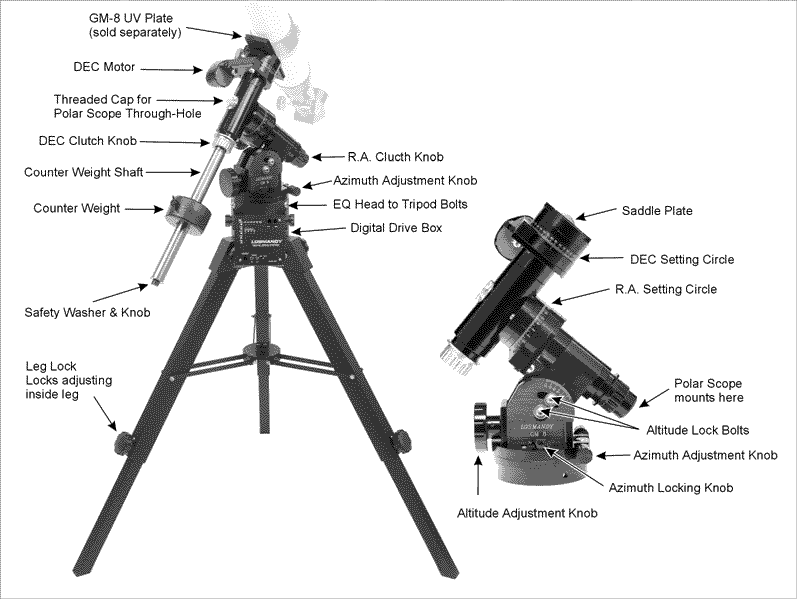
THE LOSMANDY GM 8 MOUNT Checking the parts Depending on which accessories you ordered, your GM 8 mount was shipped in two to four boxes. The contents of each box are as follows: • Equatorial Mount • Adjustable Tripod, Counterweight Shaft • Digital Drive Box, Hand Control, Cables, Mounting Bolts, Allen Wrench, Counterweight Safety Screw • 7 lb. Weight, Locking Bolt Remove all the parts from their respective boxes and place them on a flat, clear work area. A large floor space is ideal.
1. Insert the base of the equatorial mount into the top of the central column. 2. Rotate the equatorial mount on the central column until the holes in the mount line up with those in the central column. 3. Insert the three screws provided through the holes in the central column and into the equatorial mount. 4. Tighten the screws to hold the equatorial mount in place. There are three possible orientations which allow you to select a convenient location of the electronic console.
1. Remove the polar axis end covers by rotating counterclockwise. 2. Insert the objective end of the Polar Axis Finder into the opening on the lower end of the polar axis. 3. Rotate the slip ring on the Polar Axis Finder until snug. The Polar Axis Finder should still rotate without play. Installing the polar alignment illuminator If you look through the Polar Axis Finder in the daytime the reticle is clearly visible. To see the reticle at night, however, you need to install the illuminator. 1.
While the above instructions describe a perfect balance arrangement, there should be slight imbalance to ensure the best possible tracking. When the scope is on the west side of the mount the counterweight should be slightly imbalanced to the counterweight bar side. And when the tube is on the east side of the mount there should be a slight imbalance toward the telescope side. This is done so that the worm gear is pushing against the slight load. THE AMOUNT OF THE IMBALANCE IS VERY SLIGHT.
Keep in mind that adjusting the mount is done during the polar alignment process only. Once polar aligned, the mount must NOT be moved. Pointing the telescope is done by moving the mount in right ascension and declination, as described earlier in this manual. Once the appropriate adjustments have been made and you are aligned on the celestial pole, turn the clock drive on and the telescope will track.
Dual-axis electronics • Diamond push button pattern • R.A.
sections are .3x, .5x, 2x, 4x, 8x, and 16x sidereal rate. For guiding, use either the .3x or .5x setting. These two rates allow optical use with auto guiders. For auto guiders, use the 2x setting for calibrating and .5x for playback. The faster settings of 2x, 4x, 8x, 16x and 32x are perfect for positioning objects within the field of view. To move the telescope at the 16x speed WITHOUT changing the guide setting, press the button that corresponds to the direction you want to move the telescope.
2. Insert a high power eyepiece with illuminated cross hairs into your telescope. Orient the guiding eyepiece cross hairs so that one is parallel to the declination axis while the other is parallel to the R.A. axis. 3. Center the guide star on the illuminated cross hairs, focus the telescope, and study the periodic movement. 4. Take a few minutes to practice guiding. This will help you familiarize yourself with the periodic error of the drive and the operation of the hand control box. 5.
2. Locate the north/south switch (labeled N/S) just to the right of the ON/OFF switch. 3. Change the switch from "N" to "S" setting. NOTE: If the "N" or "S" is not visible, the N position is away from the edge of the circuit board; S is toward the edge. 4. Replace the cover. The direction of the drive motor is now reversed and will work in the southern hemisphere. Changing from the southern hemisphere to the northern hemisphere requires flipping the switch from the "S" to "N" setting.
The Wheel of Stars The daily motion of the Sun across the sky is familiar to even the most casual observer. This daily trek is, of course, not the Sun moving as early astronomers thought, but the result of the Earth�s rotation. This rotation also causes the stars to do the same, scribing out large circles as the Earth completes one rotation. The size of the circular path a star follows depends on where it is in the sky.
The constant, mentioned above, is a relationship between your latitude and the angular distance the celestial pole is above the northern (or southern) horizon. The angular distance from the northern horizon to the North Celestial Pole is always equal to your latitude. To illustrate this, imagine that you are standing on the north pole, latitude +90°. The North Celestial Pole, which has a declination of +90°, would be directly overhead (90° above the horizon). Now, let�s say that you move 1° south.
4. Adjust the mount in altitude and azimuth until Polaris is in the small space on the line between Eta h Ursa Major (Alkaid - at the end of the handle of the Big Dipper) and Epsilon e Cassiopeia (Segin - the beginning of the W). 5. Note the second brightest star in the field. 6. Place this star in space on the line between Cassiopeia and the bowl of the Big Dipper. If you can not get Polaris and this second star in their respective places, rotate the polar axis finder until you can.
whose coordinates are known and easy to look up. (For a list of bright stars to align the R.A. setting circle see the list at the back of this manual.) 2. Center the star in the finder. 3. Center the star in the field of the telescope. 4. Start the clock drive so that the mount tracks the star. 5. Look up the coordinates of the star from a star catalog. 6. The R.A. setting circle should rotate freely. Adjust it until the proper coordinates line up with the R.A. indicator.
The motors on the mount are of a type called stepper. This means that the motors move in a precise angular step for every electric pulse and may create a barely audible noise with every step. If the connector on the motor gets damaged, the motor may oscillate back and forth and sound as if it's running regardless of any speed settings. The connector on the motor needs to be replaced. Clutches can not be tightened, Clutches skip then grab, when moving, Axes do not move freely.
Yes and no. The ST-4 and ST-5 can be plugged into the same power supply. The ST-6 and greater can NOT be. You must have a different power source, they can NOT be tide together in anyway. How tight do I need to make the clutches? Clutches are designed so that the operator does not have to loosen a knob to move the telescope. You find the setting that you like and leave it. The clutches will operate with just the slightest tension, though fully locked.


