Ceiling Mounted Folding Attic Ladders Installation Instructions
WARNING Before you start installing your new Louisville Ceiling Mounted Folding Attic Ladder, you must read and understand the following: 1. Installation requires two people. 2. Do NOT open folding attic ladder until it is securely installed in the ceiling. 3. Check the ceiling height to make sure the ladder length is correct. If the ladder is too short, return it to the point of purchase for an exchange.
10. Before installation, read all the instruction labels on the folding attic ladder. 11. Improper installation of this folding attic ladder could put undue stress on its components and could result in failure and serious bodily injury. 12. Follow the “Trimming Wood Folding Attic Ladder to Length” instructions on the Critical Step Detail Page (See page 9) for proper trimming instructions. 13. Do NOT use deck or sheetrock screws to install folding attic ladder.
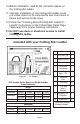
For Residential Use Only INSTALLATION INSTRUCTIONS FOR WOOD MODELS (PREMIUM, CHAMPION, BIG BOY) AND FOR ALUMINUM MODELS (SUMMIT & EVEREST) READ INSTRUCTIONS AND WARNINGS COMPLETELY BEFORE STARTING IMPORTANT: Do not open folding attic ladder until instructed to in step number 3. PEOPLE, TOOLS AND MATERIAL NEEDED: ❑ Two (2) people are required Model Rough Opening ❑ Stepladder ❑ Hammer Max.
INSTALLATION INSTRUCTIONS FOR CEILING MOUNTED FOLDING ATTIC LADDER 1. Make a rough opening in the ceiling, and frame to size as shown in Table 2. • If the folding attic ladder is wider than the spacing between ceiling joists, you should consult a structural engineer before installing, since cutting into a ceiling joist could weaken the structural integrity of your ceiling. Figure 3 2.
TEMPORARY SUPPORT STRAP INSTALLATION Provided are four (4) E-Z Hang temporary support straps for installing this folding attic ladder. Follow instructions below to install straps. Figure 5 A. Open the folding attic ladder box and remove the folding attic ladder. B. Place the folding attic ladder on the floor with the door opening on your left-hand side. C.
INSTALLATION INSTRUCTIONS FOR CEILING MOUNTED FOLDING ATTIC LADDER (continued) 3. Position one person in the attic, and position one person in the room below (the room the attic ladder will unfold into). • The person in the room below will need to raise the folding attic ladder into the rough opening and position the folding attic ladder’s door flush with the ceiling surface.
INSTALLATION INSTRUCTIONS FOR CEILING MOUNTED FOLDING ATTIC LADDER (continued) 4. Plywood shims provided with this unit are for final squaring only. • • • • • If the space between the rough opening and the folding attic ladder frame exceeds a quarter of an inch of space, a piece of plywood or some other spacing material should be placed along the full length of the unit. Then use the plywood shims provided to make the final square adjustments.
Critical Step Detail Page Your safety is dependent upon following these instructions TRIMMING FOLDING ATTIC LADDER TO LENGTH Figure 7 A Measure these distances B B Floor A No Gap No Gap Figure 8 Feet are flush with floor Figure 9 Gap Feet are NOT flush with floor Figure 7 shows how to trim to length as explained in the following directions: 1. Press down on the climbing section to insure that the power arms are fully extended. 2. Fold the bottom section under the middle section. 3.
Check the length after making your cuts 1. Again, be sure the attic ladder power arms are fully extended. 2. Trimmed correctly, your attic ladder should look like Figure 8. • No gaps in the section and both feet flat on the floor should be the result. 3. If the attic ladder looks like Figure 9, then both of the legs are too long, and the attic ladder is not safe to use. • Check your measurements and trim the legs to length. 4.
Everest Aluminum Folding Attic Ladder Opening and Closing Instructions Closely follow instructions attached to pole hook when opening and closing Everest Folding Attic Ladder. Required to open and close: • Two People • Folding Attic Ladder Pole Hook • Stepladder or Platform ladder Opening Instructions: 1. Standing on the floor, reach up with the pole hook and firmly hook the eye on the attic door. 2. Position a stepladder to the side of the attic ladder’s climbing section drop-down area.
Replaceable Parts Item Number 1 Item Replacement Part No. Tension Spring 999843B Tension Spring Everest / Big Boy 999843D 2 Power Arm Assembly (Left) PR315500 LH 3 Power Arm Assembly (Right) PR315500 RH For Replacement Parts: Call Customer Service at 1-888-666-2811 Louisville Ladder PN951503D www.louisvilleladder.