
- COZY/ Louisville Tin and Stove Co. Inc. INSTALLATION AND OPERATING INSTRUCTIONS Gas-Fired Vented FLOOR FURNACE 90N30A, 90N50A, 90N65A, 90N75A

CUTTING THE FLOOR OPENING
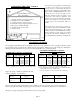
Consult the specification chart on Page 2 for the correct floor opening size for the floor furnace to be installed. Lay out the
opening size on the floor by using masking tape or cutting a piece of cardboard to the opening size. The opening must be cut
square. If you have determined that there is nothing under the floor to interfere with the installation, you are now ready to cut
the opening. Start by drilling ½ inch holes inside the lines of each corner. Use a keyhole saw or a properly grounded saber saw
to cut along the lines making sure to keep the lines straight and the corners square. If the opening dimensions are not correct,
it may be difficult to fit the floor furnace into the opening. Forcing the floor furnace through the opening may create stresses
that cause the floor furnace to be excessively noisy.
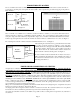
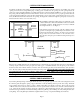
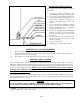
Most installation will require cutting a floor joist. Cut the floor joist
so that double headers of the same size lumber can be used to frame
around the floor furnace. Double headers are necessary to maintain
the strength of the floor. See Figure 4.
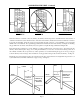
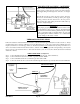
If the clearance between the bottom of the floor furnace and the
ground is not adequate, dig a pit that will provide clearances of at
least 6 inches under the floor furnace, 18 inches on the end where
the gas valve is located and 12 inches on the other three sides.
Slope the sides of the pit to prevent dirt from caving into the pit. See
Figure 5.
JOIST
DOUBLE
HEADER
FLOOR
FURNACE
OPENING
FIGURE 4
FIGURE 5
If there is any possibility that water may accumulate in the pit, a drain must be provided. If a drain cannot be provided, fabricate
a waterproof pan of at least 16 ounce per square foot sheet copper or a suitable substitute. Size the pan to provide 6 inches
clearance to the bottom of the floor furnace, 18 inches on the side where the gas valve is located and 6 inches on the other three
sides. The sides of the pan must extend at least 4 inches above the ground. Anchor the pan to prevent it from floating
up against the bottom of the floor furnace when water is present. Failure to do so may result in the pan
rising to seal off air for combustion and venting. If this occurs, carbon monoxide (C.O.) a colorless,
odorless gas that can cause serious injury or death may be formed.
SETTING THE FLOOR FURNACE
Lay aside the grill and package containing the thermostat, wires, etc., grasp two opposite sides of the outer casing and lower the
floor furnace gently through the opening. Support the furnace evenly by the flange at the top of the outer casing. Trim back
carpet, padding, and other types of floor covering so that the entire flange rests directly on the floor. If not evenly supported
on all four sides, stresses may be created that cause excessive expansion and contraction noises as the floor furnace heats and
cools. Anchor the floor furnace in place by driving two galvanized roofing nails through each side of the outer casing into the
double headers approximately 1 inch below the flange. Place the grill into position making sure it lays flat against the outer
casing flange. Leave the grill in place until time to light the furnace to keep occupants from falling into the furnace.
Page 5
FLOOR FLOOR
JOIST
JOIST
FLOOR
FURNACE
6” Minimum
12”
Minimum
18”
Minimum
6” Minimum
DRAFT
HOOD
Vent Pipe