
Installation Manual

MICROPHONE CONNECTION
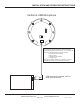
Connection to the can be made using any standard USB type B male cable on one end,
the other end is dependant on the type of device that the unit in most instances the plugged into a USB
type A port. The
Verifact A USB
Verifact A USB is compatible with the USB 2.0 standard.
ELECTRICAL CONNECTION
A USB type B port is located on the rear of the unit.
CONNECTING VERIFACT USB MICROPHONE TO DEVICES.
INSTALLATION TIPS
1. Use high quality shielded USB cables. The USB specification recommends cable length not to exceed 5m,
performance of the device when using cable lengths longer than 5m cannot be guaranteed.
2. Microphone should be installed closest to the area to be monitored and documented.
3. Avoid installing microphone near air vents, air conditioners, fans and other equipment that generate
high sound and air pressure.
4. If microphone is installed in a police interview room, room should be conditioned with any type of carpeting, acoustical
ceiling tiles, acoustical foam, etc. to reduce echo. This will enhance the quality of live and recorded audio.
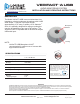
The is cylindrical, 4” dia. x 1½” H, and has four mounting holes for surface mounting to a
ceiling or other flat surface. It should be positioned so that the microphone is 4’ to 8’ from the area of desired
Verifact A USB
The model Verifact A USB is compatible with devices running Windows 7/8/10 and Linux operating
systems. For a detailed list of compatible operating systems please contact the factory. When the
device is plugged into a compatible host device the operating system will auto-install the necessary
software drivers and the device will appear as a USB audio device under the device list. The
device can then be selected as the primary “Recording Device” for the system to enable operation.
INSTALLATION AND OPERATING INSTRUCTIONS
Page 2 of 3
LOUROE ELECTRONICS 6955 VALJEAN AVENUE, VAN NUYS, CA 91406 TEL (818) 994-6498 FAX 994-6458
website: www.louroe.com e-mail: sales@louroe.com
(818)
®
USB_mic-inst_03/17
®