
User's Manual


Model LUH-15TA
EXPOSED:
• Open Architecture (with installer-furnished hardware): Use the two threaded 1/4–20 mounting posts (on
back of horn) to mount the horn with 1/4-20 threaded rods or bolts, or custom rigging hardware. Tighten the
three dog ears to clamp the horn to the trim ring. Press the mesh grille into the ring to t securely in place.
• Ceiling or Wall (with LUH-BRKT bracket): Mount the bracket to the surface. Then place the back of the horn
through the trim ring and use the two threaded 1/4–20 mounting posts (on back of horn) to mount the horn to
the bracket. Tighten the three dog ears to clamp the horn to the trim ring. Press the mesh grille into the ring to
t securely in place.
RECESSED: Before mounting the horn in recessed applications, be sure to check for obstructions behind the
ceiling or wall. For more information, see the technical paper online at https://www.lowellmfg.com/wp-content/
uploads/Checking_above_the_ceiling_before_you_cut.pdf
• Existing Drywall: Use the inside of the trim ring to trace a 7.25" diameter mounting hole in the ceiling (or
wall). Cut the hole. Place the back of the horn through the trim ring and into the mounting hole, aligning tapped
holes on the ring with those in the lip of the horn. Holding the horn ush against the ceiling (or wall), tighten the
three mounting dogs to clamp the horn to the ring. Press the mesh grille into the ring to t securely in place.
• Drop Tile Ceiling (with LUH-TBAR tile bridge): The tile-bridge distributes the weight of the speaker to the
ceiling grid, which will help prevent sagging. Begin by removing the ceiling tile and placing the bridge on the
back of the tile to mark where the mounting hole should be cut. Cut the 7.25" mounting hole, then replace the
tile in the ceiling grid with the bridge sitting on top of it. Place the back of the horn through the trim ring and
into the mounting hole. Holding the horn ush against ceiling tile, tighten the three dog ears on the back of the
horn to clamp it to the trim ring, tile and bridge. Press the mesh grille into the ring to t securely in place.
• New Construction
— Before Drywall is Installed (with LUH-RIB rough-in bridge): Reserve space for the horn by mounting
a rough-in bridge to the framing, positioning the bridge so the return lip protrudes into the room. The
drywaller uses the lip as a guide to trace the mounting hole. Be sure to install wiring so it can be accessed
when drywall is in place. After drywall is installed and painted, mount the horn by placing the back of it
through the trim ring and into the mounting hole. Holding the horn ush to the ceiling (or wall), tighten the
horn's three dog ears to clamp it to the bridge and trim ring. Then press the mesh grille into the ring so it
ts securely in place.
— Exterior Masonry (with LUH-BOX backbox and LUH-TP trim plate): Run speaker wire into the backbox,
then mount the box in the wall using mortar to hold it in place. After the mortar dries, mount the trim plate
to the front of the backbox using four 8-32 screws (provided). The trim plate is larger than the backbox so
it will cover rough mortar edges. Place the back of horn through the trim ring and into the box. Tighten the
three dog ears to clamp the horn to the backbox and ring. Press the mesh grille into the ring to t securely
in place.
— Interior Masonry (with LUH-BOX-INT backbox): Run speaker wire into the backbox, then mount the
box in the wall using mortar to hold it in place. After the mortar dries, mount the trim plate to the front of the
backbox using four 8-32 screws (provided). The trim plate is larger than the backbox so it will cover rough
mortar edges. Place the back of horn through the trim ring and into the box. Tighten the three dog ears to
clamp the horn to the backbox and ring. Press the mesh grille into the ring to t securely in place.
SURFACE-MOUNT:
• Exterior Surface (with LUH-BOX backbox): Run speaker wire into backbox, then mount backbox to surface.
Place back of horn through trim ring and into backbox. Tighten three dog ears to clamp horn to backbox and
trim ring. Press the ne mesh grille into the trim ring so it ts securely in place.
• Interior Surface (with LUH-BOX-INT backbox): Run speaker wire into backbox, then mount backbox to
surface. Place back of horn through trim ring and into backbox. Tighten three dog ears to clamp horn to
backbox and trim ring. Press the ne mesh grille into the trim ring so it ts securely in place.
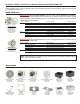
Recessed in drywall
Exposed (with U-bracket)
Recessed in drop tile
ceiling (with t-bridge)
Recessed before drywall
installed (with rough-in bridge)
Recessed in masonry
(with backbox & trim plate)
Surface-mount
(with backbox)
INSTALLATION
WARNING!Speakerinstallationshouldonlybeperformedbyqualiedprofessionalswithexperienceandknowledgeofload-ratedhardware,andsafeinstallationmounting
andriggingtechniques.Improperlyinstalledequipmentcanresultinpropertydamage,personalinjuryordeath,and/orliabilitytotheinstallingcontractor.Thespeakersystem
mustbemountedinaccordancewithalllocal,state,andfederalcodesandregulations,andtheinstallationmustconformtoindustrystandardpractices.Itistheresponsibility
oftheinstallertoproperlyselectallhardwareforriggingandinstallation,safetyandrestraintcables,andtoconsultalicensedmechanicalorstructuralengineertoevaluate
andcertifythestructuralintegrityandsafetyofanymountingmethodanditssuitabilityforthebuildingstructure.LowellManufacturingCompany,itsafliates,employees,
and/orindependentsalesrepresentatives,arenotresponsiblefortheuse,misuse,misapplication,orunsafeinstallationofanyhornorspeakersystem.
NOTE: To determine speaker spacing, see the technical paper “Distributed System Speaker Spacing for the Integrator” at LowellMfg.com. An online spacing
calculator is also available.
2