Table of Contents Rotary Tillers RTA2064, RTA2072, RTR2064 & RTR2072 25590 311-328M Operator’s Manual ! Read the Operator’s manual entirely. When you see this symbol, the subsequent instructions and warnings are serious - follow without exception. Your life and the lives of others depend on it! © Copyright 2007 Printed 7/03/07 Cover photo may show optional equipment not supplied with standard unit.
Land Pride Table of Contents Table of Contents Important Safety Information . . . . . . . . . . .1 Section 4: Maintenance and Lubrication 14 Safety at All Times . . . . . . . . . . . . . . . . . . . . . . . . . 1 Look For The Safety Alert Symbol . . . . . . . . . . . . . 1 Safety Labels . . . . . . . . . . . . . . . . . . . . . . . . . . . . . 4 Maintenance . . . . . . . . . . . . . . . . . . . . . . . . . . . . 14 Tine Replacement . . . . . . . . . . . . . . . . . . . . . . . .
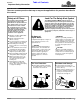
Land Pride ▲ Table of Contents Important Safety Information Important Safety Information These are common practices that may or may not be applicable to the products described in this manual. Safety at All Times Look For The Safety Alert Symbol Thoroughly read and understand the instructions given in this manual before operation. Refer to the “Safety Label” section, read all instructions noted on them.
Table of Contents Land Pride Important Safety Information These are common practices that may or may not be applicable to the products described in this manual. Use Safety Lights and Devices Transport Machinery Safely ▲ Slow moving tractors, selfpropelled equipment, and towed implements can create a hazard when driven on public roads. They are difficult to see, especially at night. ▲ Flashing warning lights and turn signals are recommended whenever driving on public roads.
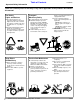
Table of Contents Land Pride Important Safety Information These are common practices that may or may not be applicable to the products described in this manual. Prepare for Emergencies ▲ Be prepared if a fire starts. ▲ Keep a first aid kit and fire extinguisher handy. ▲ Keep emergency numbers for doctor, ambulance, hospital and fire department near phone. Wear Protective Equipment Avoid High Pressure Fluids Hazard ▲ Protective clothing and equipment should be worn.
Table of Contents Land Pride Important Safety Information Safety Labels 1. Your tiller comes equipped with all safety labels in place. They were designed to help you safely operate your tiller. Read and follow these directions. 2. Keep all safety labels clean and legible. 3. Replace all damaged or missing labels. To order new labels go to your Land Pride dealer. 4. Some new equipment installed during repair require safety labels to be affixed to the replaced component as specified by Land Pride.
Land Pride Table of Contents Important Safety Information 818-142C General Rotating Driveline 25591 818-858C 25591 General Safety Instructions 818-540C Shield missing - Do Not operate.
Table of Contents Land Pride Introduction Introduction Land Pride welcomes you to the growing family of new product owners. This implement has been designed with care and built by skilled workers using quality materials. Proper assembly, maintenance, and safe operating practices will help you get years of satisfactory use from the machine. Application The RTA20 & RTR20 Series Rotary Tillers are just right for home gardening, landscape work, vegetable farming or food plot maintenance.
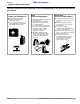
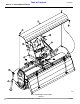
Land Pride Table of Contents Section 1: Assembly and Set-Up Section 1: Assembly and Set-Up Tractor Requirements Driveline Guard Assembly This tiller is designed with a 3-point category I hitch. Horsepower rating of tractor should not exceed 40 PTO horsepower. 1. Assemble clamp (#5) to the plate (#8) with one of the wing bolts (#9). 2. Assemble the driveline guard (#6) to the top hitch with the four other wing bolts (#9). 3. Install cover (#7) to tiller with wing bolts (#9). 4.
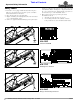
Table of Contents Land Pride Section 1: Assembly and Set-Up 20548 Hitch, Stand & Shaft Cover Assembly Figure 1-1 8 RTA2064, RTA2072, RTR2064 & RTR2072 Rotary Tillers 311-328M 7/03/07
Table of Contents Land Pride Section 1: Assembly and Set-Up Tractor Hook-Up Implement End Refer to Figure 1-2: 1. When using tractors with multi-speed PTO, be certain PTO is set for 540 RPM. 2. Back tractor up to tiller until lower 3-Point links are aligned with hitch clevises on tiller. 3. Secure the tractor’s 3-Point lower links to the lower hitch clevises using 7/8” diameter hitch pins. 4. Secure the tractor’s top link to the tiller top hitch using a 3/4” diameter hitch pin (supplied by customer).
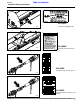
Table of Contents Land Pride Section 1: Assembly and Set-Up Refer to Figure 1-6: 3. The driveline will require shortening if it is too long to fit between the tractor and tiller gearbox. Shorten driveline as follows: a. Set tractor in park, shut tractor engine off, set park brake and remove switch key. b. Pull driveline apart into two sections as shown in Figure 1-6. Attach the outer driveline universal joint to the tractor shaft and inner driveline universal joint to the tiller gearbox shaft.
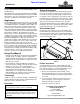
Land Pride Table of Contents Section 2: Operating Section 2: Operating Transporting IMPORTANT: Always disengage PTO before raising the tiller to transport position. ! CAUTION When traveling on public roads whether at night or during the day, use accessory light and devices for adequate warning to operators of other vehicles. Comply with all federal, state and local laws. 1. When raising the tiller to the transport position, be sure that driveline does not contact tractor or tiller.
Table of Contents Land Pride Section 2: Operating Operating Instructions Before using your Land Pride RTA20 Series Rotary Tiller, you should have completely read the Operator’s Manual, properly attached the Tiller to the tractor, cut the Drive-line to proper length, Run-in the clutch, and gone through the Operating Checklist. If you have missed any of these steps, please complete them before proceeding. Now that you have properly prepared yourself and your tiller, it’s time to do some tilling.
Table of Contents Land Pride Section 3: Adjustments Section 3: Adjustments Drive Chain Refer to Figure 3-1: The tension on the drive chain can be easily adjusted by using the chain tightener stud. Should excessive backlash occur, unscrew the lock nut, turn the bolt, Figure 3-1, clockwise as indicated by the arrow, until idler arm is firm against chain, then back the bolt off counterclockwise 1/4” turn. Re-lock the lock nut while holding the head of the bolt in place.
Table of Contents Land Pride Section 4: Maintenance and Lubrication Section 4: Maintenance and Lubrication Maintenance ! Driveline Protection CAUTION For safety reasons, each maintenance operation must be performed with the tractor’s PTO disengaged, the Tiller lowered completely to the ground or on safely supported blocking, tractor engine shut off and ignition key removed. Proper servicing and adjustment can increase the life of any implement.
Table of Contents Land Pride Section 4: Maintenance and Lubrication Clutch Disassembly & Assembly If clutch run-in procedure indicates that one or more of the friction disks did not slip, then the clutch must be disassembled to separate the friction disks. Assembly NOTE: Before proceeding, secure clutch firmly in a vise or other clamping device to prevent injury. Step 1 Place the hub and friction disks into the housing. Disassembly Step 1 Remove snap ring.
Table of Contents Land Pride Section 4: Maintenance and Lubrication Clutches With 8 Hex Socket Bolts Clutch Run-In Refer to Figure 4-3: 1. Loosen counterclockwise all 8 hex head socket bolts uniformly 6 full turns. 2. Cycle clutch on and off 5 or 6 times (15 seconds on and 15 seconds off) with the engine operating at half throttle. Disengage driveline, shut off tractor and remove key. Wait for all components to stop before dismounting from tractor. 3. Tighten hex head socket bolts fully back.
Land Pride Table of Contents Section 4: Maintenance and Lubrication Storage At the end of the working season or when the tiller will not be used for a long period, it is good practice to clean off any dirt or grease that may have accumulated on any of the moving parts. Check the tines for wear and replace if necessary. See Tine Replacement earlier in this section. Inspect the tiller for loose, damaged or worn parts and adjust or replace if needed. Lubricate as noted in Lubrication starting on page 18.
Table of Contents Land Pride Section 4: Maintenance and Lubrication Lubrication Lubrication Legend Multi-purpose spray lube Multi-purpose grease lube Multi-purpose oil lube 20 Intervals in hours at which lubrication is required. 8 Hours Driveline U-Joint (Both Ends) Coat PTO u-joint with grease every 8 hours of operation. 22230 Type of grease = Multi-Purpose Quantity = Coat Generously 20 Hours Driveline Shaft Disconnect Driveline from the tractor and slide apart.
Land Pride Table of Contents Section 4: Maintenance and Lubrication As Required Fill Plug Chaincase Drain Plug With tiller on level ground, check oil level in chaincase by removing lower plug. Oil should reach the plug hole. Fill if necessary with Shell Alvania EP00 oil and retighten plug. Tiller should be level when checking. Type = Recommended: Shell Alvania EP00 Oil Alternate: SAE 90 wt.
Table of Contents Land Pride Section 5: Specifications & Capacities Section 5: Specifications & Capacities RTA20 & RTR20 Series Model Weight Tilling Width Overall Width Offset Capabilities Number of Flanges Number of Tines per Flange PTO Driveline RTA2064 RTR2064 RTA2072 689 lbs. 748 lbs. 734 lbs.
Table of Contents Land Pride Section 6: Features & Benefits Section 6: Features & Benefits RTA20 & RTR20 Series Features Benefits 20 Series Fills the gap between our 15 and 25 Series Tillers, both in size and price. Tractor HP 23 - 40 HP. Gearbox Warranty 3 Years on housing, gears, shafts & seals. Shows our confidence in the product. Working Widths 64” & 72” Meets a wide range of customer needs. Formed Deck Handles material more efficiently, sheds water.
Table of Contents Land Pride Section 7: Troubleshooting Section 7: Troubleshooting Problem Machine makes intermittent clicking noise Driveline vibrates Gearbox noise is noticeable and constant Oil leaking from gearbox Rotor will not turn Tillage depth insufficient Soil texture too coarse Soil texture too fine Machine skips or leaves crop residue Tines balling up with soil Tiller bumping on ground 22 Cause Solution Loose tines Tighten tines Gearbox tooth damaged Replace damaged gear Chai
Table of Contents Land Pride Section 8: Appendix Section 8: Appendix Torque Values Chart Bolt Head Identification Bolt Size (Inches) in-tpi 1 1/4" - 20 1/4" - 28 5/16" - 18 5/16" - 24 3/8" - 16 3/8" - 24 7/16" - 14 7/16" - 20 1/2" - 13 1/2" - 20 9/16" - 12 9/16" - 18 5/8" - 11 5/8" - 18 3/4" - 10 3/4" - 16 7/8" - 9 7/8" - 14 1" - 8 1" - 12 1-1/8" - 7 1 1/8" - 12 1 1/4" - 7 1 1/4" - 12 1 3/8" - 6 1 3/8" - 12 Grade 2 Grade 5 N · m ft-lb 3 N · m 7.4 8.
Table of Contents Land Pride Section 8: Appendix Notes 24 RTA2064, RTA2072, RTR2064 & RTR2072 Rotary Tillers 311-328M 7/03/07
Table of Contents Land Pride Section 8: Appendix Warranty Land Pride warrants to the original purchaser that this Land Pride product will be free from defects in material and workmanship beginning on the date of purchase by the end user according to the following schedule when used as intended and under normal service and conditions for personal use.
Corporate Office: P.O. Box 5060 Salina, Kansas 67402-5060 USA www.landpride.