
Operating Instructions and Installation Instructions

144
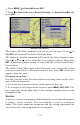
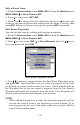
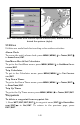
4. Set the first route waypoint: press
ENT. In this example, we started
our route at the intersection of 11th Street and 145th E. Ave. The route
ends at a public hunting area next to a river. (Our route creation ex-
ample is illustrated in the following figures.)
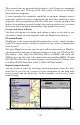
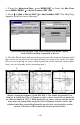
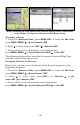
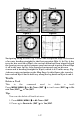
Route creation sequence, continued: Fig. 4. Point (3) set at on-ramp
turn. Fig. 5. Waypoint (4) set at highway exit to frontage road leading
to river. Waypoint (5) ends the route at a tree stand in the hunting
area. Fig. 6. Press EXIT to save the route and you return to this screen.
5. Move the cursor to the next point in the route, a spot where you need
to turn or change direction, and press
ENT to set the next waypoint.
6. Repeat step five until the route reaches your destination.
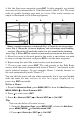
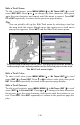
7. To save your route, press
EXIT. The unit reverts to the Edit Route
screen, with the route automatically named "Route 1" and stored in the
unit's internal memory. (In our example, Route 1 already existed, so
the unit automatically made "Route 2.")
You can edit the route and run other commands, but if you are finished
with the route for now, return to the last page displayed by
pressing
EXIT repeatedly.
Delete a Route
1. From the
NAVIGATION PAGE, press MENU|ENT or from the MAP PAGE press
MENU|MENU|↓ to ROUTE PLANNING|ENT.
2. Press ↓ to route name|
ENT.
3. Press ↓ to
NAVIGATE|ENT|→ to DELETE|ENT|← to YES|ENT.
Tip:
You can also delete all routes at once:
1. From the
NAVIGATION PAGE, press MENU|ENT or from the MAP PAGE
press
MENU|MENU|↓ to ROUTE PLANNING|ENT.
2. Press → to
DELETE ALL|ENT|← to YES|ENT.
5. 6.4.