
Operating Instructions and Installation Instructions


151
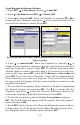
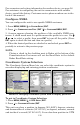
Create Waypoint by Entering a Position
1. Press WPT|→ to SUBCATEGORY column|↓ to NEW|ENT.
2. Press ↓ to
ENTERED POSITION|ENT|→ to CREATE|ENT.
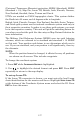
3. Press → to
LATITUDE|ENT. Enter the latitude by pressing ↑ or ↓ to
change the first character, then press → to the next character and re-
peat until the latitude is correct. Press
ENT.
New Waypoint screen (left). Edit Waypoint menu with Latitude high-
lighted (right).
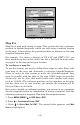
4. Press ↓ to LONGITUDE|ENT. Enter the longitude by pressing ↑ ↓ to
change the first character, then press → to the next character and repeat
until the longitude is correct. Press
ENT. To edit the waypoint's name,
altitude, depth or symbol, proceed to Step 5. If you want to see the way-
point on the map, press
EXIT, select GO TO WAYPOINT or FIND ON MAP and
press
ENT. If you select Go to Waypoint, a route will be automatically be
created directing you to the new waypoint. If you choose Find on Map,
the map screen will appear with the cursor crosshairss centered on the
waypoint you created.
5. You can edit the waypoint's Name, Altitude or Depth by highlighting
the desired category and pressing
ENT. Use ↑ ↓ to change the first
character, then press → to the next character and repeat until the de-
sired name, altitude or depth has been entered. Press
ENT.
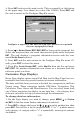
6. To edit the waypoint's symbol, highlight CHOOSE SYMBOL and press
ENT. The Icon Window will appear with 63 symbols. Select the desired
symbol and press
ENT.
7. Press
EXIT, which will open the Waypoint Information menu with up
to four options: Go To Waypoint, Find on Map, Edit Waypoint and De-
lete Waypoint. Select the desired option and press
ENT.