
User guide


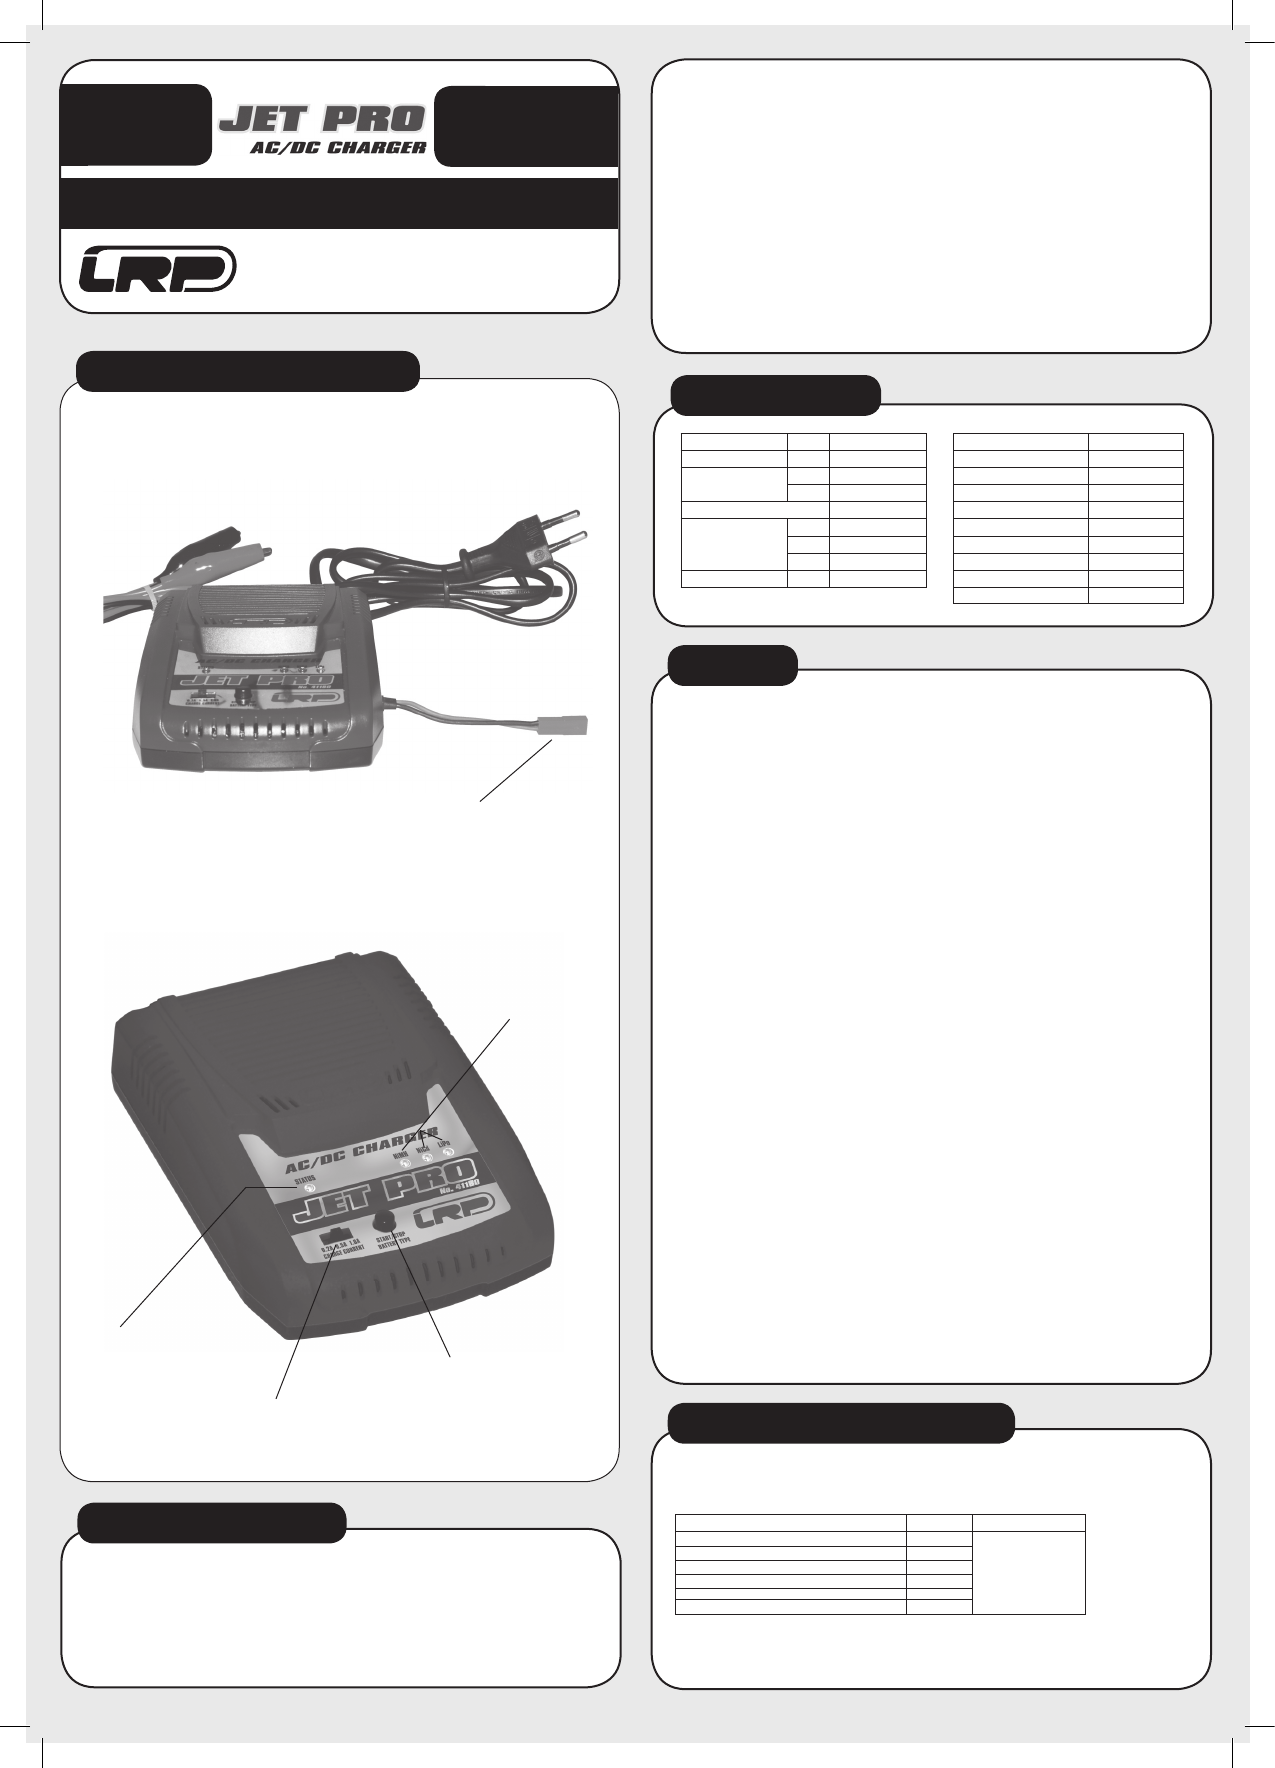
1. CONNECTIONS / OPERATION
2. RECOMMENDATIONS
5. USAGE
6. MULTI-PROTECTION SYSTEM
4. SPECIFICATION
100-240V AC / 12V DC
PLUG IN AND CHARGE
1-8 CELLS NIMH/NICD
1-3 CELLS LIPO
LA00041
USER GUIDE
Dimensions
[mm]
134x95x35mm
Delta Peak
yes
Weight
[g]
300g
Safety Timer
yes
Input Voltage
[AC]
100-240V
Acoustic Signal Type
Buzzer
[DC]
11-15 V
Multi-Protection-
yes
Charging Mode
Linear
Advanced Digital
yes
Charging
Capability
LiPo
1-3 cells (3.7-11.1V)
Status LED‘s
4
NiMH
1-8 cells (1.2-9.6V)
Multifunction Button
1
NiCd
1-8 cells (1.2-9.6V)
DC Input Connection
Alligator Clamps
Charge Current
[A]
0.2 - 0.5 - 1.0A
AC Input Connection
AC connector
Output Connection
RX battery, female
LRP electronic GmbH,
Wilhelm-Enssle-Str. 132-134, 73630 Remshalden, Germany
info@LRP.cc www.LRP.cc
Specifications subject to change without notice.
Dear Customer,
thank you for your trust in this LRP product. By purchasing a LRP JET-PRO charger, you have chosen a
high-performance charger full of new design features, such as:
• NiMH - LiPo - NiCd Fast Charge • Dual Input (100-240Vac + 12Vdc)
• Microprocessor Controlled • Plug in and Charge
• 25-Year Warranty • Multi-Protection-System
Please read the following instructions carefully before you start using your LRP JET-PRO charger. This
user guide contains important notes for the installation, the safety, the use and the maintenance of this
product. Thus protecting yourself and avoid damages of the product.
Proceed according to the user guide in order to understand your LRP JET-PRO charger better. Please
take your time as you will have much more joy with your product if you know it exactly.
This user manual shall be kept in a safe place. If another customer is using this product, this manual
has to be handed out together with it.
ORDER.NO.
41180
Connect the LRP JET-PRO charger to a suitable source:
main power with 100-240V AC
a suitable powersupply or car-battery with 11-15V DC
After turn-on, the battery type LED‘s indicates which battery type is selected. If your desired battery
type is selected already, you can go straight to point B) below.
For maximum convienence, the JET-PRO charger checks and adjusts itself automatically to the con-
nected number of cells. You do not have to adjust the number of cells in any way, no matter if you use
8 cell NiMH or 2 cell LiPo for example.
A) Battery Type Selection
Press and hold the START/STOP button until green Battery Type LED starts flashing, which
indicates you have entered battery type selection mode. The selected type is indicated by the
blinking LED.
By pressing the START/STOP button again, you can now toggle between the battery type and
you can select the desired type by either pressing START/STOP for 2sec or...
If you wait longer then 3sec, the selected battery type will be permanently saved, the LED
will turn ON all the time and the charger automatically leaves battery type selection mode and
that.
Note: The charging process of the battery won´t be started at this time!
Caution: always be careful for correct battery type selection, as charging a pack in the wrong mode
may result in damage to the battery!
B) Start Charging Process
Select the desired charge current with the slide switch (0.2 / 0.5 / 1.0A) depending on the
battery you want to charge (refer to „2.Recommendations“ on the left).
Press Start/Stop button shortly, the Status LED turns ON (red) to indicate that charge process
has started. The Status LED will remain red until battery has been fully charged.
Note: Charge process can be stopped anytime by pressing Start/Stop button, then Status LED will
turn off.
C) End of Charge
When battery is fully charged, the STATUS LED will flash for 15sec and the charger will beep
to indicate that the battery has been fully charged now.
For NiMH/NiCd cells, trickle charge is now active.
If the Start button is pressed, the Status LED should be OFF.
You can again select battery type or the charger can again charge.
The JET-PRO chargers is protected against faults and operator errors by the Multi-Protection-Sy-
stem. Faults/Errors are indicated by the beeper and different LED flashing sequences. All faults/
errors stop the charging process to protect the charger and the battery. The errors are as following:
Failure
LED Code
Error Status
Input voltage below 11V or over 15.0V
1
The active battery type
LED flashes and the
charger beeps 3sec
intervals.
Battery connected with reverse polarity
2
No battery connected
3
Safety Timer exceeded (>3hrs charge time)
4
Battery Error
5
Charger Malfunction
6
Press Start/Stop button to stop LED‘s flashing and charger beeping, this will return the JET-PRO
charger to stand-by mode.
DC INPUT: connect to a suitable DC source
with 11-15V. Be careful with correct polarity!
- Red = Plus
- Black = Minus
Always follow the cell manufacturers charge-/usage-recommendations, never use batteries outside
their specifications.
As a safe „rule of thumb“, charging your packs with 0.5C* is always a safe value!
* C=Nominal capacity of the battery. E.g. with a nominal capacity of 3300mAh (3,3Ah), the battery can be charged with a max.
current of 3,3A.:
OUTPUT CONNECTOR: connect battery to be
charged to the attached RX-battery female con-
nector. Be careful with correct polarity!
AC INPUT: connect to main power
with 100-240VAC
Caution: Do not alter the connector
as this will void your warranty!
STATUS LED: indicates if charger is
in stand-by-mode (LED off), charging
(LED on) or battery has been fully
charged (LED flashing).
SLIDE SWITCH: adjust char-
ge current (0.2 - 0.5 - 1.0A)
START/STOP BUTTON: used
to select battery type and start/
stop charging process.
BATTERY TYPE LED‘s: indi-
cate which battery type has
been selected.