
Logic MegaRAID Express User's Guide

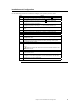


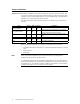
Table Of Contents
- 1 Overview
- 2 Introduction to RAID
- 3 RAID Levels
- 4 Features
- 5 Configuring MegaRAID Express 500
- 6 Hardware Installation
- Checklist
- Installation Steps
- Summary
- 7 Cluster Installation and Configuration
- Software Requirements
- Hardware Requirements
- Installation and Configuration
- Driver Installation Instructions under Microsoft Windows 2000 Advanced Server
- Network Requirements
- Shared Disk Requirements
- Cluster Installation
- Installing the Windows 2000 Operating System
- Setting Up Networks
- Configuring the Cluster Node Network Adapter
- Configuring the Public Network Adapter
- Verifying Connectivity and Name Resolution
- Verifying Domain Membership
- Setting Up a Cluster User Account
- Setting Up Shared Disks
- Configuring Shared Disks
- Assigning Drive Letters
- Verifying Disk Access and Functionality
- Cluster Service Software Installation
- Configuring Cluster Disks
- Validating the Cluster Installation
- Configuring the Second Node
- Verify Installation
- SCSI Drive Installations
- Configuring the SCSI Devices
- Terminating the Shared SCSI Bus
- 8 Troubleshooting
- A SCSI Cables and Connectors
- B Audible Warnings
- C Cluster Configuration with a Crossover Cable
- Glossary
- Index

Chapter 7 Cluster Installation and Configuration
69
Installation and Configuration
Use the following procedures to install and configure your system as part of a cluster.
Step Action
1 Unpack the controller following the instructions on page 51.
2 Set the hardware termination for the controller as “always on”. Refer to the J1
Termination Enable jumper settings on page 54 for more information.
3 Configure the IDs for the drives in the enclosure. See the enclosure
configuration guide for information.
4 Install one controller at a time. Press <Ctrl> <M> at BIOS initialization to
configure the options in the steps 5 – 11. Do not attach the disks yet.
5 Set the controller to Cluster Mode in the Objects > Adapter > Cluster Mode
menu.
6 Disable the BIOS in the Objects > Adapter > Enable/Disable BIOS menu.
7 Change the initiator ID in the Objects > Adapter > Initiator ID menu.
8 Power down the first system.
9 Attach the controller to the shared array.
10 Configure the first controller to the desired arrays using the Configure > New
Configuration menu.
11
Follow the on-screen instructions to create arrays and save the
configuration. Initialize the logical drives before powering off the system.
12 Power down the first system.
13 Repeat steps 4 – 7 for the second controller.
Note:
Do not have the cables for the second controller attached to the
shared enclosure yet.
14 Power down the second server.
15 Attach the cables for the second controller to the shared enclosure and power
up the second system.
16 If a configuration mismatch occurs, enter the <Ctrl> <M> utility. Go to the
Configure > View/Add Configuration > View Disk menu to view the disk
configuration. Save the configuration.
17 Proceed to the driver installation for a Microsoft cluster environment.