
Logic MegaRAID Express User's Guide
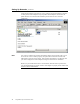

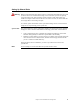
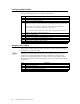


Table Of Contents
- 1 Overview
- 2 Introduction to RAID
- 3 RAID Levels
- 4 Features
- 5 Configuring MegaRAID Express 500
- 6 Hardware Installation
- Checklist
- Installation Steps
- Summary
- 7 Cluster Installation and Configuration
- Software Requirements
- Hardware Requirements
- Installation and Configuration
- Driver Installation Instructions under Microsoft Windows 2000 Advanced Server
- Network Requirements
- Shared Disk Requirements
- Cluster Installation
- Installing the Windows 2000 Operating System
- Setting Up Networks
- Configuring the Cluster Node Network Adapter
- Configuring the Public Network Adapter
- Verifying Connectivity and Name Resolution
- Verifying Domain Membership
- Setting Up a Cluster User Account
- Setting Up Shared Disks
- Configuring Shared Disks
- Assigning Drive Letters
- Verifying Disk Access and Functionality
- Cluster Service Software Installation
- Configuring Cluster Disks
- Validating the Cluster Installation
- Configuring the Second Node
- Verify Installation
- SCSI Drive Installations
- Configuring the SCSI Devices
- Terminating the Shared SCSI Bus
- 8 Troubleshooting
- A SCSI Cables and Connectors
- B Audible Warnings
- C Cluster Configuration with a Crossover Cable
- Glossary
- Index

MegaRAID Express 500 Hardware Guide
84
Configuring Shared Disks
Perform the following procedure to configure the shared disks.
Step Description
1 Right-click on My Computer.
2 Click on Manage, then click on Storage.
3 Double-click on Disk Management.
4 Make sure that all shared disks are formatted as NTFS and are designated as Basic. If you
connect a new drive, the Write Signature and Upgrade Disk
Wizard starts automatically.
If this occurs, click on Next to go through the wizard. The wizard sets the disk to
dynamic, but you can uncheck it at this point to set it to basic.
To reset the disk to Basic, right-click on Disk #
(where # identifies the disk that you are
working with) and click on Revert to Basic Disk.
5 Right-click on unallocated disk space.
6 Click on Create Partition…
7 The Create Partition Wizard begins. Click on Next twice.
8 Enter the desired partition size in MB and click on Next.
9 Accept the default drive letter assignment by clicking on Next.
10 Click on Next to format and create a partition.
Assigning Drive Letters
After you have configured the bus, disks, and partitions, you must assign drive letters to
each partition on each clustered disk.
Note
: Mountpoints is a feature of the file system that lets you mount a file system using an
existing directory without assigning a drive letter. Mountpoints is not supported on
clusters. Any external disk that is used as a cluster resource must be partitioned using
NTFS partitions and have a drive letter assigned to it. Use the procedure below to assign
driver letters.
Step Description
1 Right-click on the desired partition and select Change Drive Letter and Path.
2 Select a new drive letter.
3 Repeat steps 1 and 2 for each shared disk.
4 Close the Computer Management window.