
Logic MegaRAID Express User's Guide
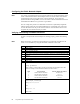

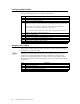


Table Of Contents
- 1 Overview
- 2 Introduction to RAID
- 3 RAID Levels
- 4 Features
- 5 Configuring MegaRAID Express 500
- 6 Hardware Installation
- Checklist
- Installation Steps
- Summary
- 7 Cluster Installation and Configuration
- Software Requirements
- Hardware Requirements
- Installation and Configuration
- Driver Installation Instructions under Microsoft Windows 2000 Advanced Server
- Network Requirements
- Shared Disk Requirements
- Cluster Installation
- Installing the Windows 2000 Operating System
- Setting Up Networks
- Configuring the Cluster Node Network Adapter
- Configuring the Public Network Adapter
- Verifying Connectivity and Name Resolution
- Verifying Domain Membership
- Setting Up a Cluster User Account
- Setting Up Shared Disks
- Configuring Shared Disks
- Assigning Drive Letters
- Verifying Disk Access and Functionality
- Cluster Service Software Installation
- Configuring Cluster Disks
- Validating the Cluster Installation
- Configuring the Second Node
- Verify Installation
- SCSI Drive Installations
- Configuring the SCSI Devices
- Terminating the Shared SCSI Bus
- 8 Troubleshooting
- A SCSI Cables and Connectors
- B Audible Warnings
- C Cluster Configuration with a Crossover Cable
- Glossary
- Index

Chapter 7 Cluster Installation and Configuration
85
Verifying Disk Access and Functionality
Perform the steps below to verify disk access and functionality.
Step Description
1 Click on Start.
2 Click on Programs. Click on Accessories, then click on Notepad.
3 Type some words into Notepad and use the File/Save As command to save it as a test file
called test.txt. Close Notepad.
4 Double-click on the My Documents icon.
5 Right-click on test.txt and click on Copy.
6 Close the window.
7 Double-click on My Computer.
8 Double-click on a shared drive partition.
9 Click on Edit and click on Paste.
10 A copy of the file should now exist on the shared disk.
11 Double-click on test.txt to open it on the shared disk.
12 Close the file.
13 Highlight the file and press the Del key to delete it from the clustered disk.
14 Repeat the process for all clustered disks to make sure they can be accessed from the first
node.
After you complete the procedure, shut down the first node, power on the second node
and repeat the procedure above. Repeat again for any additional nodes. After you have
verified that all nodes can read and write from the disks, turn off all nodes except the first,
and continue with this guide.