SAS2 Integrated RAID Solution User Guide Version 2.
Revision History Version and Date Version 2.0, August 2010 Description of Changes Added new models of supported controllers. Version 1.1, August 2009 Applied extensive general editing improvements. Version 1.0, July 2009 Initial release of this document. LSI, the LSI logo, Fusion-MPT are trademarks or registered trademarks of LSI Corporation or its subsidiaries. All other brand and product names may be trademarks of their respective companies.
SAS2 Integrated RAID Solution User Guide Table of Contents Table of Contents Chapter 1: Introduction to the Integrated RAID Solution . . . . . . . . . . . . . . . . . . . . . . . . . . . . . . . . . . . . . . . . . . . . . . . . . . . . . . . . . . . . . . . . . . . . . . . . . . . . . . . . . . .5 1.1 Overview . . . . . . . . . . . . . . . . . . . . . . . . . . . . . . . . . . . . . . . . . . . . . . . . . . . . . . . . . . . . . . . . . . . . . . . . . . . . . . . . . . . . . . . . . . . . . . . . . . .
Table of Contents SAS2 Integrated RAID Solution User Guide Chapter 5: Creating Integrated Striping Volumes . . . . . . . . . . . . . . . . . . . . . . . . . . . . . . . . . . . . . . . . . . . . . . . . . . . . . . . . . . . . . . . . . . . . . . . . . . . . . . . . . . . . . . . . .25 5.1 Integrated Striping Configuration Overview . . . . . . . . . . . . . . . . . . . . . . . . . . . . . . . . . . . . . . . . . . . . . . . . . . . . . . . . . . . . . . . . . . . . . . . . . . . . . . . . . . . .25 5.
Chapter 1: Introduction to the Integrated RAID Solution | Overview SAS2 Integrated RAID Solution User Guide Chapter 1 Introduction to the Integrated RAID Solution This chapter provides an introduction to the features and benefits of the LSI Integrated RAID solution for LSI SAS2 controllers. 1.1 Overview The LSI Integrated RAID solution provides cost benefits for the server or workstation market that requires the extra performance, storage capacity, and/or redundancy of a RAID configuration.
Chapter 1: Introduction to the Integrated RAID Solution | Benefits and Features 1.2 Benefits and Features SAS2 Integrated RAID Solution User Guide The LSI Integrated RAID solution has the following benefits and features: Support for up to 10 disks per Integrated RAID volume, with one or two volumes on each SAS2 controller. Each controller can support can support 14 volume drives, including one or two hot spare disks.
Chapter 2: Overview of Integrated RAID Mirrored Volumes | Introduction SAS2 Integrated RAID Solution User Guide Chapter 2 Overview of Integrated RAID Mirrored Volumes This chapter provides an overview of the LSI Integrated RAID features that support the creation of mirrored arrays. 2.
Chapter 2: Overview of Integrated RAID Mirrored Volumes | Operation of Mirrored Volumes 2.3 Operation of Mirrored Volumes Page 8 SAS2 Integrated RAID Solution User Guide Ability of mirrored volumes to run in optimal mode or in degraded mode if one mirrored disk in an Integrated Mirroring volume fails or if one or more mirrored disks fail in an Integrated Mirroring + Striping volume or Integrated Mirroring Enhanced volume. Support for hot swapping.
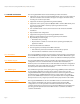
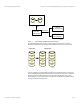
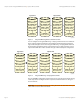
Chapter 2: Overview of Integrated RAID Mirrored Volumes | Operation of Mirrored Volumes SAS2 Integrated RAID Solution User Guide Integrated Mirroring Volume Primary Mirror SAS LSI Fusion-MPT SAS2 Controller NVSRAM (For Write Journaling) Memory Bus FLASH (For Configuration) 3_00006-00 Figure 1: Typical Integrated Mirroring Implementation The following figure shows the logical view and physical view of an Integrated Mirroring volume. Each logical block address (LBA) is mirrored on the second disk.
Chapter 2: Overview of Integrated RAID Mirrored Volumes | Operation of Mirrored Volumes SAS2 Integrated RAID Solution User Guide Logical View Physical View Mirrored Stripe 1 Mirrored Stripe 1 Mirrored Stripe 1' Mirrored Stripe 2 Mirrored Stripe 2 Mirrored Stripe 2' Mirrored Stripe 3 Mirrored Stripe 3' Mirrored Stripe 3 Mirrored Stripe 4 Mirrored Stripe 4 Mirrored Stripe 5' Mirrored Stripe 6 Mirrored Stripe 6' Mirrored Stripe N Mirrored Stripe N-1' Mirrored Stripe N Mirrored Stripe N’ +
SAS2 Integrated RAID Solution User Guide Chapter 2: Overview of Integrated RAID Mirrored Volumes | Mirrored Volume Features 2.4 Mirrored Volume Features This section describes features of Integrated Mirroring, Integrated Mirroring + Striping, and Integrated Mirroring Enhanced volumes. You can configure one or two mirrored volumes on each LSI SAS2 controller. 2.4.
Chapter 2: Overview of Integrated RAID Mirrored Volumes | Mirrored Volume Features SAS2 Integrated RAID Solution User Guide 2.4.6 Disk Write Caching By default, the Integrated RAID firmware disables disk write caching for mirrored volumes. It does this to ensure that the write journal entry stored in nonvolatile static RAM (NVSRAM) is always valid. If you enable disk write caching (not recommended), you may cause the disk write log to be invalid. 2.4.
Chapter 3: Creating Mirrored Volumes | Mirrored Volume Configuration Overview SAS2 Integrated RAID Solution User Guide Chapter 3 Creating Mirrored Volumes This chapter explains how to create Integrated Mirroring, Integrated Mirroring + Striping, and Integrated Mirroring Enhanced volumes with the LSI SAS2 BIOS Configuration Utility (SAS2 BIOS CU). 3.
Chapter 3: Creating Mirrored Volumes | Creating Mirrored Volumes SAS2 Integrated RAID Solution User Guide Disks must have 512-byte blocks and must not have removable media. Integrated mirroring volumes must have two disks, Integrated Mirroring Enhanced volumes can have three-to-ten disks, and Integrated Mirroring + Striping volumes can have an even number of disks ranging from four-to-ten disks.
Chapter 3: Creating Mirrored Volumes | Creating Mirrored Volumes SAS2 Integrated RAID Solution User Guide 4. Move the cursor to the RAID Disk column and select a line that has a No entry in this column, indicating that the disk is not already part of the volume you are creating. To add the disk to the new array, change the No to Yes by pressing the space bar. This is the Primary disk in the array.
Chapter 3: Creating Mirrored Volumes | Creating Mirrored Volumes SAS2 Integrated RAID Solution User Guide 4. Move the cursor to the RAID Disk column and select a line that has a No entry in this column, which indicates that the disk is not already part of the volume you are creating. To add the disk to the new array, change the No to Yes by pressing the space bar. CAUTION: The SAS2 BIOS CU deletes all existing data from the disks drives when you select them to use for a mirrored volume. 5.
Chapter 3: Creating Mirrored Volumes | Managing Hot Spare Disks SAS2 Integrated RAID Solution User Guide 4. Again, wait until synchronization completes on the new disk and the volume returns to the Optimal state. 5. In the Adapter List window of the SAS2 BIOS CU, use the arrow keys to select the LSI SAS adapter with the RAID 1 volume, and then press Enter. The Adapter Properties window appears. 6. Use the arrow keys to select RAID Properties, and then press Enter. The Select New Array Type window appears.
Chapter 3: Creating Mirrored Volumes | Managing Hot Spare Disks SAS2 Integrated RAID Solution User Guide Figure 6: Manage Array Window The Manage Hot Spares window appears. 6. Identify a disk that is not part of a RAID volume (i.e., the value in the Drive Status column is not RAID) and that is not already identified as a hot spare disk. A global hot spare disk must have 512-byte blocks and nonremovable media. The disk type must be either SATA with extended command set support or SAS with SMART support.
Chapter 3: Creating Mirrored Volumes | Other Configuration Tasks SAS2 Integrated RAID Solution User Guide 3.4 Other Configuration Tasks This section explains how to perform other configuration and maintenance tasks for mirrored volumes. 3.4.1 Viewing Volume Properties Follow these steps to view the RAID properties of the mirrored volume(s): 1. In the SAS2 BIOS CU, select an LSI SAS2 adapter from the Adapter List. The Adapter Properties window appears. 2. Select RAID Properties.
Chapter 3: Creating Mirrored Volumes | Other Configuration Tasks 3.4.3 Activating an Array SAS2 Integrated RAID Solution User Guide A volume (array) can become inactive if, for example, you remove it from one controller or computer and install it on a different one. The Activate Array option allows you to reactivate an inactive volume. This option is available only when the selected volume is currently inactive. Follow these steps to activate a selected volume: 1.
Chapter 3: Creating Mirrored Volumes | Other Configuration Tasks SAS2 Integrated RAID Solution User Guide After a pause, the utility deletes the array. If there is another remaining array and one or two hot spare disks, the BIOS checks the hot spare disks to determine if they are compatible with the remaining volume. If they are not compatible (too small or wrong disk type), the BIOS deletes them also. 3.4.
Chapter 3: Creating Mirrored Volumes | Other Configuration Tasks SAS2 Integrated RAID Solution User Guide Figure 7: Boot Device on SAS Topology Window If a device is currently designated as the alternate boot device, the Device Info column shows the word Alt. 3. To select the preferred boot disk, move the cursor to the disk, and press Alt + B. 4. To remove the boot designator, move the cursor to the current boot disk, and press Alt + B. This controller no longer has a disk designated as boot. 5.
Chapter 4: Overview of Integrated Striping | Introduction SAS2 Integrated RAID Solution User Guide Chapter 4 Overview of Integrated Striping This chapter provides an overview of the LSI Integrated RAID features that support the creation of striped arrays. 4.1 Introduction The LSI Integrated RAID solution enables you to create Integrated Striping volumes for applications that require the faster performance and increased storage capacity of striping.
Chapter 4: Overview of Integrated Striping | Integrated Striping Description 4.3 Integrated Striping Description SAS2 Integrated RAID Solution User Guide On Integrated Striping volumes, the firmware writes data across multiple disks instead of onto one disk. It does this by partitioning each disk’s storage space into 64-KB stripes. The firmware interleaves the stripes round-robin so that the combined storage space consists alternately of stripes from each disk.
Chapter 5: Creating Integrated Striping Volumes | Integrated Striping Configuration Over- SAS2 Integrated RAID Solution User Guide Chapter 5 Creating Integrated Striping Volumes This chapter explains how to create Integrated Striping volumes using the LSI SAS2 BIOS Configuration Utility (SAS2 BIOS CU). 5.1 Integrated Striping Configuration Overview The LSI SAS2 BIOS CU is a menu-driven utility program that enables you to easily configure and manage Integrated RAID volumes.
Chapter 5: Creating Integrated Striping Volumes | Creating Integrated Striping Volumes SAS2 Integrated RAID Solution User Guide Disks must have 512-byte blocks and must not have removable media. Integrated Striping volumes must have at least two disks and no more than 10 disks. Integrated Striping volumes do not support hot spare disks. Follow these steps to configure an Integrated Striping volume with the SAS2 BIOS CU, after.
Chapter 5: Creating Integrated Striping Volumes | Other Configuration Tasks SAS2 Integrated RAID Solution User Guide 8. From the menu options, select Save changes then exit this menu. A Processing message appears briefly, and then the SAS2 BIOS CU returns to the Adapter Properties window. Initialization of the new array continues in the background. NOTE: Repeat the previous instructions to create a second Integrated Striping volume, if desired, and if enough additional disks are available. 5.
Chapter 5: Creating Integrated Striping Volumes | Other Configuration Tasks SAS2 Integrated RAID Solution User Guide 6. Press Y to activate the array. The array becomes active after a pause. 5.3.3 Deleting an Array CAUTION: Before you delete an array, be sure to back up the data. Follow these steps to delete a selected volume (array): 1. In the Adapter List window, use the arrow keys to select an LSI SAS adapter. The Adapter Properties window appears. 2.
Chapter 5: Creating Integrated Striping Volumes | Other Configuration Tasks SAS2 Integrated RAID Solution User Guide NOTE: The LEDs on the disk drives flash, as previously described, if the firmware configuration is correct and the drives are in a disk enclosure. 5.3.5 Selecting a Boot Disk You can select a boot disk in the SAS Topology window. The next time you boot the computer, the firmware moves this disk to scan ID 0, making it the new boot disk.
Chapter 5: Creating Integrated Striping Volumes | Other Configuration Tasks SAS2 Integrated RAID Solution User Guide 6. To select an alternate boot disk, move the cursor to the disk and press Alt + A. NOTE: To change the alternate boot device from one disk to another, follow steps 4 and 5 in this procedure, but use Alt + A instead of Alt + B.
SAS2 Integrated RAID Solution User Guide Appendix A: | Hardware and Software Requirements Appendix A Using the SAS2 Integrated RAID Configuration Utility This appendix explains how to use the command-line-driven SAS2 Integrated RAID configuration utility (SAS2IRCU) to create Integrated RAID volumes on LSI SAS2 controllers in the manufacturing environment. SAS2IRCU is a command-line utility that you can use to configure the Integrated RAID functions of LSI SAS2 controllers.
Appendix A: | Interface Description A.1.2 Operating System and Software Support SAS2 Integrated RAID Solution User Guide SAS2IRCU requires PCI™ 2.x or PCI 3.0 firmware and MPI v2.0. SAS2IRCU supports the following operating systems: WinPE 1.x (Server 2003/XP), WinPE 2.0 (Vista), WinPE 2.1 (Server 2008) Requires Windows® driver v2.00.00.17 or greater. UEFI 2.1 Linux® 2.6 Kernel - Red Hat® Enterprise Linux (RHEL) 5, SUSE® Linux Enterprise Server (SLES) 10 Requires Linux driver v00.255.04.
SAS2 Integrated RAID Solution User Guide Appendix A: Table 1: | Commands SASIRCU Commands (Continued) Operating System SAS2IRCU Command DOS Linux EFI WinPE CONSTCHK X X X X ACTIVATE X X X X LOCATE X X X X LOGIR X X X X The commands are not case sensitive. The command descriptions use the following conventions: A.3.1 Common Command-Line Parameters Enter the text in italic exactly as shown on the command line. Replace text enclosed in < > with a required parameter.
Appendix A: | Commands SAS2 Integrated RAID Solution User Guide The disk identified by the first Enclosure:Bay on the command line becomes the primary disk drive when you create an Integrated Mirroring (RAID 1) volume. If the controller resynchronizes the disk drives, the data on the primary disk drive becomes available when you access the newly created volume. When the IR firmware creates a RAID 1 volume, it starts a background initialization of the volume.
SAS2 Integrated RAID Solution User Guide Program Return Value Appendix A: 0x00 SUCCESS: Command completed successfully. 0x01 FAILURE: Bad command-line arguments or operational failure. 0x02 ADAPTER_NOT_FOUND: Cannot find specified adapter. | Commands The DELETE command deletes all of the Integrated RAID volumes and hot spare drives from the specified LSI SAS2 controller. The command does not change any other controller configuration parameters. A.3.
Appendix A: | Commands SAS2 Integrated RAID Solution User Guide Sample Output Following is a sample of the information that the DISPLAY command returns. Read configuration has been initiated for controller 0 -----------------------------------------------------------Controller information -----------------------------------------------------------Controller type : SAS2008 BIOS version : 7.00.02.00 Firmware version : 00.250.19.
SAS2 Integrated RAID Solution User Guide Appendix A: | Commands Logical drive status values are as follows: Okay (OKY) – The volume is active and drives are functioning properly. User data is protected if the current RAID level provides data protection. Degraded (DGD) – The volume is active. User data is not fully protected because the configuration has changed or a drive has failed. Failed (FLD) – The volume has failed. Missing (MIS) – The volume is missing.
Appendix A: | Commands SAS2 Integrated RAID Solution User Guide Observe the following rules when creating hot spare disks: Command Line Parameters Program Return Value You cannot create a hot spare disk unless at least one RAID1, RAID10, or RAID1E volume already exists. You cannot create a hot spare and add it to an inactive Integrated RAID volume. For hard-disk drives, you cannot add a SAS hot spare disk if the existing volumes on the controller use SATA disks.
SAS2 Integrated RAID Solution User Guide Sample Output Appendix A: | Commands Following is an example of the information that the STATUS command returns when a volume resynchronization is in progress: Background command progress status for controller 0... IR Volume 1 Volume ID : 6 Current operation : Synchronize Volume status : Enabled Volume state : Degraded Physical disk I/Os : Not quiesced Volume size (in sectors) : 70311936 Number of remaining sectors : 68250624 Percentage complete : 2.
Appendix A: | Commands SAS2 Integrated RAID Solution User Guide The MFGPAGE command updates information on manufacturing pages. Only DOS and EFI support this command. A.3.8 MFGPAGE Command Command Line Parameters Program Return Value – The index of the controller with the manufacturing pages you want to update. – The passcode required for DOS access. – The manufacturing page (4 or 10) that requires an update.
SAS2 Integrated RAID Solution User Guide Appendix A: | Commands The LOCATE command locates a specific drive in a volume by turning on its location indicator and flashing its LED. A.3.11 LOCATE Command Command Line Parameters sas2ircu locate – The index of the controller with the drives that you need to locate. – The enclosure and bay number of the drive.