
Owner's manual


Digital Video Recorder User Manual
34
Step2: the setup steps of Buzzer, Email, To Alarm Out
are familiar with alarm handling. User can refer to
Chapter 4.5.1 Sensor alarm handling for more details.
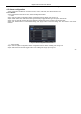
Step 3: select a hard disk in the pull down list box. When
the disk capacity is lower than that value, there will
appear some text information on the lower right of the live
image.
Step 4: click “default” button to resort default setting; click
“apply” button to save the setting; click “exit” button to exit
current interface.
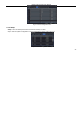
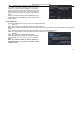
Fig4-27 other alarm
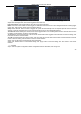
4.5.5 Alarm out
Alarm out includes three sub menus: alarm out, schedule and buzzer
① Alarm out
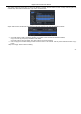
Step1: enter into system configurationalarm out; refer to Fig 4-28:
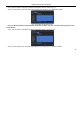
Step2: in this interface, set relay alarm out name, select hold time which means the interval time between the two adjacent
alarms.
Step3: user can setup all channels with same parameters. Tick off “all” to do relevant setup.
Step4: click “apply” button to save the setting; click “exit” button to exit current interface.
② Schedule
Step1: enter into system configurationschedule;
Step2: the setup steps of alarm out schedule are familiar
with schedule; user can refer to 4.4.1 Schedule for
details.
Note: the default schedule of motion detection is
full-selected, that is, the color of schedule setting
interface is blue.
Fig 4-28 system configuration-alarm out