Intelligent Touch Panel (Bluetooth + DMX / Programmable) UB1 UB2 UB4 Manual www. ltech-led.
Product Introduction The Intelligent Touch Panel is an American base wall switch, integrating Bluetooth 5.0 mesh protocol and DMX signals. It is a simple but elegant design with CNC aviation aluminum frame and 2.5D tempered glass. The panel is suitable for multi-scene and multi-zone lighting control applications. Working with Bluetooth systems makes it more convenient and intelligent.
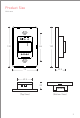
Product Size Unit: mm 120 84 75 120 29.5 43.
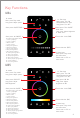
Key Functions UB1 Brightness shortcuts 25%, 50%, 100% 1- 4 Zone keys Short press: Turn ON Select/Deselect the zone Long press: Turn OFF Short press: All ON/OFF Touch color circle (DIM) 4 Scene keys Short press: Play scene and save scene Please refer to P12 to save scenes UB2 Color tone shortcuts Cool white Neutral white Warm white Short press: All ON/OFF DMX address settings for CT: Standard: Both channels are for CT values Default: Set in the App Please refer to P8 for more instructions 1- 4 Zone
Key Functions UB4 16 modes Short press: Play mode Long press: Adjust speed 1- 4 Zone keys Short press: Turn ON Select/Deselect the zone Long press: Turn OFF Short press: ON/OFF RGB Short press: Turn ON/OFF white color Long press: Adjust brightness of white color Short press : All ON/OFF Touch color circle (RGB) 16 modes (Press“ ”to switch) 1. 3 color jumping 2. 7 color jumping 3. White strobe 4. 7 color strobe 5. Red green gradient 6. Red blue gradient 7. Green blue gradient 8. Red yellow gradient 9.
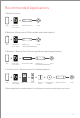
Recommended Applications 1 .Wireless Control App Intelligent touch panel Bluetooth driver lamp 2 .Wireless + Wired control ( With reliable and stable signals) App Intelligent touch panel DMX driver lamp (DIM/CT/RGB/RGBW/RGBWY) 3 . Wireless + Wired control (Enriching different lighting applications) App Intelligent touch panel Bluetooth to DMX lamp DMX driver (DIM/CT/RGB/RGBW/RGBWY) 4 .
Bluetooth Application Diagram Bluetooth 5.0 Mesh Bluetooth driver Lamp/LED strip Intelligent touch panel Bluetooth driver Lamp/LED strip Bluetooth 5.0 Mesh Bluetooth driver Lamp/LED strip Bluetooth driver APP Lamp/LED strip Bluetooth driver Lamp/LED strip Bluetooth 5.0 Mesh Bluetooth driver Lamp/LED strip Super panel Bluetooth driver Lamp/LED strip Bluetooth 5.0 Mesh Bluetooth driver Intelligent wireless switch Lamp/LED strip Bluetooth driver Bluetooth 5.
DMX Application Diagram Zone 1 DMX DMX decoder Lamp/LED strip UB1 Zone 2 DMX driver Lamp/LED strip Zone 3 DMX decoder Bluetooth Lamp/LED strip Zone 4 APP DMX driver Lamp/LED strip Zone 1 DMX DMX decoder Lamp/LED strip UB2 Zone 2 DMX driver Lamp/LED strip Zone 3 DMX decoder Lamp/LED strip Each zone can be installed with multiple decoders. When the total number of decoders in 4 zones exceeds 32, please add DMX signal amplifiers.
DMX Channel Output Sheet Types Addresses Zones 1 2 DIM CT CT2 RGBW RGBWY DIM1 DIM2 C1 W1 BRT1 CT1 R1 G1 R1 G1 3 DIM3 C2 BRT2 B1 B1 4 DIM4 W2 CT2 W1 W1 5 DIM1 DIM2 C3 W3 BRT3 CT3 R2 G2 Y1 R2 6 7 DIM3 C4 BRT4 B2 G2 8 DIM4 W4 CT4 W2 B2 9 DIM1 DIM2 C1 W1 BRT1 CT1 R3 G3 W2 Y2 R3 10 11 DIM3 C2 BRT2 B3 12 DIM4 W2 CT2 W3 G3 13 DIM1 DIM2 C3 W3 BRT3 CT3 R4 G4 B3 W3 14 15 DIM3 C4 BRT4 B4 Y3 16 DIM4 W4 CT4 W4 R4 17 DIM1 DIM2 C1 W1 BRT1 CT
Installation Instructions Step 1: Remove the panel plate with a flathead screwdriver, as shown below. Step 2: Attach the wires to the panel, as shown in the diagram below . Please be sure to turn off the power to the circuit at the circuit breaker or fuse box before attaching the wires.
Step 3: Install the panel plate. Once the wires are attached correctly, you can gently fold any excess wire and compress the panel into the junction box. Tighten the screws to secure the panel plate to the box. Glass panel cover Panel plate Junction box Step 4: Put the panel cover in place. Gently snap the panel cover onto the plate. Attentions Please use in spacious and open space. Avoid metal obstructions above and in front of products. Please use in a cool and dry environment.
App Operating Instructions 1.Register an account 1.1 Scan the QR code below with your mobile phone and follow the prompts to complete the app installation. 1.2 Open the App and log in or register an account. Scan and download the App 2.Paring instructions After a new user creating a home , click “+”icon in the upper right corner and come to the “Add device” list. Follow the prompts to add the driver successfully. Then choose “Intelligent switch- intelligent touch panel”in “Add device” list.
3.How to bind lights /light groups and save scenes After pairing, get access to control interface and choose the button for the zone lighting you are editing. The button can bind lights and light groups. Local scenes: After adjusting the zone lighting to appropriate status, click “Save” button and follow the prompts to save lighting status of the zone in the scene.After saving, click the corresponding scene button to execute the current local lighting scene (Supporting 16 scenes currently).
5.Normal modes and advanced modes Normal modes: Click “Mode”icon and access the mode interface. Click the blank area of the mode and it can be executed. There are 12 editable normal modes in total which satisfy the general needs of customers(Currently, only RGBW & RGBWY support normal modes). Advanced modes: Click the blank area of the mode and it can be executed. There are 8 editable advanced modes in total which satisfy the general needs of customers.
After complete editing, click “Apply” and the mode can be applied to the device. 6.How to share control of your home The home sharing mode adopted are able to share the home or transfer the home founder to other home members. Switch to “Me” menu and choose “Home management”. Click the home that you want to share and click “Add member”, then follow the prompts to complete the home sharing .
Warning Changes or modifications to this unit not expressly approved by the party responsible for compliance could void the user’s authority to operate the equipment. This device complies with Part 15 of the FCC Rules. Operation is subject to the following two conditions: (1) this device may not cause harmful interference, and (2) this device must accept any interference received, including interference that may cause undesired operation.