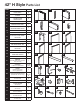
42” H Style Parts List PART DESCRIPTION QTY A DOOR STILE 2 B REINFORCEMENT PLATES 2 C TOP/BOTTOM DOOR RAILS 2 D REINFORCEMENT CLIP 4 E CENTER DOOR RAIL 1 F CENTER RAIL REINFORCEMENT CLIPS 2 G U CLIP BRACKETS 2 J DOOR PANELS BOTTOM 7 J1 STARTER DOOR PANELBOTTOM 1 J2 STARTER DOOR PANEL TOP 1 K DOOR PANELS TOP 7 L1 END DOOR PANEL TOP 1 L2 END DOOR PANEL BOTTOM 1 M SIDE FINISHING STRIPS 2 N TOP/BOTTOM FINISHING STRIPS 2 O ROLLER BRACKETS 2 P (includes handle,
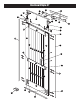
Overview H Style 42” O Q R T S X G N Y X R1 T W O D C G D A M L1 A K K K K F K K K M J1 P E F L2 J J J J Z J J J J2 C B V B D N
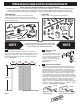
42” Barn Door Track Extension Kit For the 42” Barn door, it is necessary to use the track extension included in your Barn door kit. Kit Includes 1 Ea. 2 Ea. 2 Ea. 2 Ea. 2 Ea. 2 Ea. 1 Ea. Tools Needed Level To attach the extender, lay the track on the floor. Slip the extender (R1) onto the end of the track where the door will be in the open position. It is important that the side of the track extender with the lip is facing to the top.
PVC Barn Door Assembly and Track Installation H Style 42” Please read ALL instructions before you begin installation. You MUST determine if you need a Mounting Board prior to doing ANY installation. Due to many overlapping factors such as the location of wall studs, the weight of a Barn door and the various types of trim used in homes, we recommend using a Mounting Board in all situations. Track must be installed into Solid Blocking or Head Casing.
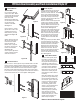
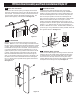
PVC Barn Door Assembly and Track Installation H Style 42” 4. Attach Stile to Bottom Rail 6. Fig. 2A Lay one of the Stiles (A) onto work surface. Make sure the side with the large holes are facing outward. Insert one of the Reinforcement plates (B) into the bottom of the Stile into the innermost chamber of the Stile. See Figure 3. Place 2 of the 4” screws (Z) into the 2 holes in the outside of the channel. Make sure they are fully inserted. See Figure 4A & 4B Figure 3 Fig.
PVC Barn Door Assembly and Track Installation H Style 42” 8. 10. Attach Remaining Stile Finishing Strips Secure the remaining stile (A) (repeat of step #4). Make sure the side with Snap the 2 side finishing strips (M) into place. Snap the top and the large holes is facing outward. Insert one of the Reinforcement plates bottom strips (N) into place. See Figure 14. (B) into the bottom of the Stile into the innermost chamber of the Stile.
PVC Barn Door Assembly and Track Installation H Style 42” 12. Place door onto Track Position the door over the opening and slightly tilt the bottom of the door outward away from the wall. Set the rollers securely onto the track. Once the door is safely mounted and is secure, turn the 2 safety spacers 180 degrees towards the wall. This positions them properly under the track. See Figure 16. 14.