LUCCI AIRFUSION ARIA CEILING FAN INSTALLATION OPERATION MAINTENANCE WARRANTY INFORMATION CAUTION READ INSTRUCTIONS CAREFULLY FOR SAFE INSTALLATION AND FAN OPERATION. V1.
Aria Fan Installation Instructions THANK YOU FOR PURCHASING Thank you for purchasing this quality Lucci product. To ensure correct function and safety, please read and keep all instructions before using the product. SAFETY PRECAUTIONS Read and Save These Instructions This product conforms to UL standard 507. 1. WARNING -To avoid possible electrical shock, before installing or servicing your fan, disconnect the power by turning off the circuit breaker of the fuse box to the outlet box. 2.
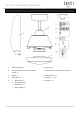
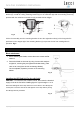
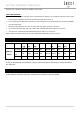
Aria Fan Installation Instructions PARTS LIST Unpack your ceiling fan and carefully identify the parts. Please refer to Fig 1. Fig.
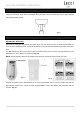
Aria Fan Installation Instructions INSTALLING THE MOUNTING BRACKET If there isn’t an existing outlet box, then install one using the following instructions: Disconnect the power by removing the fuses or turning off the circuit breakers. Secure the outlet box (A) (not included) directly to the building structure. Use appropriate fasteners and materials (not included). The outlet box and its bracing must be able to fully support the weight of the moving fan (at least 35 lbs).
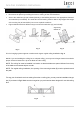
Aria Fan Installation Instructions HANGING THE FAN Pass the power supply wires (C) from the ceiling outlet box (B) through the center of the ceiling mounting bracket (D). Install the ceiling mounting bracket (D) on the outlet box (B) with the mounting screws (F) provided with the outlet box and washers (E) provided with fan. Fig. 6 Fig. 7 Fig. 6 Lift the fan assembly onto the mounting bracket.
Aria Fan Installation Instructions ELECTRICAL WIRING DIAGRAM WARNING: To avoid possible electrical shock, be sure you have turned off the power at the main circuit panel. Follow the steps below to connect the fan to your household wiring. Use the wire connecting nuts supplied with your fan. Secure the connectors with electrical tape. Make sure there are no loose wire strands or connections. 1. Connect the household live supply wire (black) to receiver input wire (black, AC IN L) as shown in Fig. 10. 2.
Aria Fan Installation Instructions FINISHING THE INSTALLATION Slide and align the canopy up to the mounting bracket. Ensure all electrical wiring is tucked inside the canopy and that the wires are not damaged during this step. Secure the canopy to the hanger bracket using the screws provided. Fig.
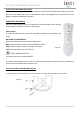
Aria Fan Installation Instructions INSTALLING THE REMOTE BATTERY 2 x AAA 1.5V (size) batteries are required to operate the remote control. Remove the battery cover from the back of the remote and insert 2 x AAA batteries. Ensure the polarities are correct as shown in the battery compartment. (Batteries included.) OPERATING THE REMOTE: Before you start using the remote, take the time to read through this section and get familiar with the buttons and function of each button.
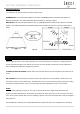
Aria Fan Installation Instructions REVERSING SWITCH Your ceiling fan can operate in either summer or winter mode. SUMMER Mode: The reverse switch shall be in the “down” (SUMMER) position to make the fan rotate in an anticlockwise direction. The airflow will be directed downwards, for cooling in summer. WINTER Mode: The reverse switch shall be in the “up” (WINTER) position to make the fan rotate in a clockwise direction.
Aria Fan Installation Instructions the motor run – All electric motors are audible to some extent. CARE AND CLEANING: Periodic cleaning of your ceiling fan is the only maintenance required. Use a soft brush or lint free cloth to avoid scratching the paint finish. Please turn off electricity power when you do so. Do not immerse your ceiling fan in the water. It could damage the motor or the blades and create the possibility of an electrical shock.
Aria Fan Installation Instructions GRACIAS POR SU COMPRA Gracias por adquirir este producto de calidad Lucci. Para garantizar un funcionamiento correcto y seguro, lea y respete todas las instrucciones antes de usar el producto. MEDIDAS DE SEGURIDAD Lea y guarde estas instrucciones Este producto cumple con la norma 507 de UL. 1. ADVERTENCIA - Para evitar posibles descargas eléctricas, corte la corriente que va a la caja eléctrica desde el disyuntor o la caja de fusibles. 2.
Aria Fan Installation Instructions LISTA DE PIEZAS Desembale su ventilador de techo e identifique perfectamente sus componentes. Consulte la Fig. 1. Fig.
Aria Fan Installation Instructions INSTALACIÓN DEL SOPORTE MURAL Si no hay una caja eléctrica ya instalada, instale una siguiendo estas instrucciones: Corte la corriente quitando los fusibles o bajando los disyuntores. Asegure la caja eléctrica (A) (no incluida) directamente a la estructura del edifico. Utilice los elementos y materiales de fijación apropiados (no incluidos).
Aria Fan Installation Instructions CÓMO COLGAR EL VENTILADOR Pase los cables de corriente (C) de la caja eléctrica del techo (B) por el centro del soporte mural del techo (D). Instale el soporte mural del techo (D) en la caja eléctrica (B) con los tornillos de montaje (F) incluidos con la caja eléctrica y las arandelas (E) incluidas con el ventilador. Fig. 6 Fig. 7 Fig. 6 Levante el conjunto del ventilador y móntelo en el soporte mural.
Aria Fan Installation Instructions DIAGRAMA DE CONEXIONES ELÉCTRICAS ADVERTENCIA: Para evitar posibles descargas eléctricas, asegúrese de que la corriente esté cortada en el cuadro de distribución. Siga los pasos siguientes para conectar el ventilador al cableado doméstico. Utilice las tuercas de conexión de alambre suministradas con su ventilador. Asegure los conectores con cinta aislante. Asegúrese de que no haya hilos de cable o conexiones sueltos. 1.
Aria Fan Installation Instructions CÓMO FINALIZAR LA INSTALACIÓN Deslice hacia arriba y alinee el florón con el soporte mural. Asegúrese de que todo el cableado eléctrico quede insertado dentro del florón y de que los cables no se dañen durante este paso. Fije el florón al soporte del colgador utilizando los tornillos suministrados. Fig.
Aria Fan Installation Instructions INSTALACIÓN DE LAS PILAS DEL MANDO A DISTANCIA El mando a distancia funciona con 2 pilas AAA de 1,5V. Retire la tapa del compartimiento de las pilas ubicada en la parte posterior del mando de distancia e inserte 2 pilas de tipo AAA. Asegúrese de que la polaridad es la correcta, tal y como se indica en el compartimento de la batería. (Pilas incluidas).
Aria Fan Installation Instructions Funcionamiento reversible Su ventilador puede girar en dirección de reloj o en la contraria. Modo VERANO: Si el interruptor para dirección del giro está hacia “abajo” (SUMMER) el ventilador girará en dirección de reloj. El flujo de aire estará dirigido hacia abajo para enfriar con una brisa directa. Modo INVIERNO: Si el interruptor para dirección del giro está hacia “arriba” (WINTER) el ventilador girará contra dirección de reloj.
Aria Fan Installation Instructions CUIDADO Y MANTENIMIENTO : 1) La limpieza periódica de su ventilador de techo es el único mantenimiento que se requiere. Utilice un cepillo blando o un paño que no deje pelusa para no arañar el acabado de pintura. Por favor, corte la corriente cuando haga esto. 2) No sumerja el ventilador de techo en el agua, dado que podría dañar el motor o las aspas y causar posibles descargas eléctricas.