
Instructions


EN
18 | LUCTRA
English
Scope of delivery
• User manual
• Lamp
• Power supply unit with plug-in connector
• Power cable with Euro plug
• Power cable with UK plug-in connector, type G
• Microfibre cloth
Different mountings and accessories are included with the delivery depending on the LUCTRA
®
TABLE PRO series product that you have chosen:
• TABLE PRO: Table-top base to set up on tables
• TABLE PRO CLAMP: Wall or table-top mounting (with 2× adhesive foam pads, 1× Allen
key, 4× screws and rawlplugs for wall mounting)
• TABLE PRO PIN: Fastening to a mounting hole or drill hole on the table (1× adhesive foam
pad, 1× Allen key)
Note:
Please contact our service team if one of the parts are missing or damaged.
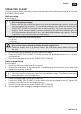
Assembly
– Always place the lamp on a pre-assembled pin as the last assembly step irrespective of
the mounting being used.
NOTICE!
Risk of damage to the lamp!
Make sure that the lamp is fully supported on the pin and can be moved freely.
Note:
A minimum gap (approx. 1–2mm) is needed between the lamp and mounting for easy
rotation of the lamp.
The different mounting options are described below. The electrics must be connected after the
lamp has been assembled (▶see “Connecting the electrics” on page20).
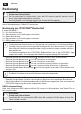
TABLE PRO
▶see image2
1. Place the table-top base(4) at the desired position.
2. Place the lamp onto the table-top base(4) as shown.