
Installation Guide
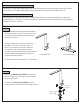

Step 4
3
A
B
*rubber
o-ring
*rubber
o-ring
base
plate
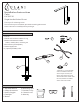
Step 3
1
A. For 1-hole installation, insert the faucet through
the hole on the sink.
B. For 3-hole installation, insert the faucet in to the
base plate and then through the hole on the sink.
*Note: Make sure that the rubber o-ring stays above
the mounting surface for 1-hole installation or
between the faucet and base plate for 3-hole installation.
Secure the faucet by firmly hand tightening the rubber washer,
metal washer and mounting nut back on the faucet threads
underneath the sink. Tighten the screws on the mounting nut
with a Phillips screwdriver.
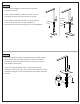
Note: The optional Stability Collar (1) has been added as
reference in the image. This can be used for thinner sinks to add
additional strength. If used, insert between the rubber and metal
washers.