Because you’re not like everyone else.
BECAUSE YOU’RE NOT LIKE EVERYONE ELSE. And neither are we. Always at the forefront of our industry, our goal is to offer the best quality product and consumer value on the market. Our team is constantly pushing the boundaries of innovation and design to create exceptional products to help you achieve a more comfortable living or work space. Our goal is to ensure that every Luma Comfort customer is 100% satisfied with their product.
CONTENTS Important Safety Information .......................................................................... 4 Get To Know Your Misting Fan ........................................................................ 5 Product Benefits .......................................................................................... 5 Parts List...................................................................................................... 5 Assembly Instructions............................................
IMPORTANT SAFETY INFORMATION These instructions are not meant to cover every possible condition and situation that may occur. Please read all instructions before using this misting fan. Failure to carefully read all instructions may result in possible electric shock or fire hazard, and will void the manufacturer’s warranty. 1. 2. 3. 4. 5. 6. 7. 8. 9. 10. 11. 12. 13. 14. 15. Use this misting fan only as instructed in this owner’s manual. Other uses may cause electric shock, injury or fire.
GET TO KNOW YOUR MISTING FAN PRODUCT BENEFITS Designed for cooling large areas such as patios, factories, manufacturing facilities, garages, athletic fields, greenhouses and more Centrifugal misting system means there’s no clogged nozzles and no need to use filtered water Constructed of heavy-gauge, anticorrosive metal for safety and durability Quiet, high-efficiency fan motor Adjustable misting flow with a fully-insulated seal around the water pump Oscillating fan head covers a wider a
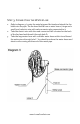
ASSEMBLY INSTRUCTIONS It is strongly recommended that a second person be available to assist during the assembly process. DO NOT plug in the fan before assembly. This misting fan comes in two separate boxes. Carefully remove all packaging materials and retain for future storage/use. Make sure there is no residual foam left in any of the components. A screwdriver and wrench will be required to assemble this misting fan. STEP 1: ASSEMBLING THE STAND POLE 1. 2. Refer to diagram 1 below.
STEP 2: CONNECTING THE BACK PANEL 1. 2. 3. 4. Refer to diagram 2. Find the rectangular panel located on the back of the stand pole. Remove this back panel from the stand pole by completely unscrewing it from the stand pole. Set it aside. Locate the water pump. This is packaged separately from the stand pole and can be found in box #1. You will see 2 water hoses (1 large and 1 small) and 1 electric wire connected to the water pump.
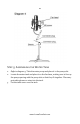
STEP 3: CONNECTING THE WATER LINE 1. 2. 3. Refer to diagram 3. Locate the metal pipe and fan head and attach the fan head onto the pipe. The fan head should have 2 water hoses (1 large and 1 small) and 1 electric wire with male connector plug connected to it. Take the electric wire with the male connector that is located on the back of the fan head and thread it through hole D. Take the large water hose with 2 smaller water hoses within it and thread the entire piece through hole C.
STEP 4: CONNECTING THE FAN HEAD TO THE STAND POLE 1. 2. 3. 4. 5. 6. 7. 8. Refer to diagram 4. Place the stand pole/base on a level surface. Take the water hoses and electric wire from the fan head/pipe and thread them through the top of the stand pole. Do not attach the fan head to the stand pole yet. Connect the male and female connector plugs together. Take the small water hose from the fan head/metal pipe and connect it to the other valve opening attached to the back panel.
STEP 5: ASSEMBLING THE WATER TANK 1. 2. 3. Refer to diagram 5. Take the water pump and place it in the pump slot. Locate the water tank and place it on the fan base, making sure to line up the pump opening with the pump slot so that they fit together. Place any protruding hoses or wires into the tank. Put the tank cover over the tank. www.LumaComfort.
OPERATING INSTRUCTIONS 1. 2. 3. 4. 5. This misting fan can operate with optimal output in temperatures up to 104°F. Lift up the tank cover and fill the tank with clean water. Connect the fan to a power supply. Turn on the fan by pressing the red power switch. This misting fan has 3 different fan speeds. Turn the speed dial to adjust the fan speed.
6. 7. 8. 9. To start the misting function, press the misting button located on the stand pole. The misting function will only work if the fan speed is set. The pump and misting plate should power on at this time. To adjust the misting volume, turn the misting switch dial located near the top of the fan head. To turn on the oscillation function, turn the oscillation dial located on the back of the fan motor. The maximum run time for a full tank on high speed is approximately 4 hours.
Use a soft cloth and a solution of mild soap and warm water to clean the fan’s exterior. Do not use harsh cleaners, gasoline, paint thinner, benzene, etc., as these substances can damage the misting fan. Thoroughly dry all of the fan’s parts with a soft cloth before reconnecting the unit to a power supply. Drain the water tank after the misting fan has been in use. Regular, scheduled cleaning of the water tank and misting plate before each use is also recommended.
TECHNICAL SUPPORT Luma Comfort is committed to providing a premier service experience. If you are experiencing any technical issues with your product related to either setup or operation, please contact our product support team at 1-866-737-6390 or support@lumacomfort.com.
WARRANTY Luma Comfort products are warranted to be free from defects in workmanship or materials for one (1) year from the date of purchase. If the product is found to be defective within this period, Luma Comfort, at its sole option, will repair or replace any components that fail during normal operation. The repairs or replacement will be made at no charge to the customer for parts and labor, assuming that the customer shall be responsible for all transportation costs to and from Luma Comfort.