PC170 Document Camera User Manual - English [Important] To download the latest version of Quick Start Guide, multilingual user manual, software, or driver, etc., please visit Lumens http://www.Mylumens.com/goto.
Table of Contents Copyright Information ....................................................................................................3 Chapter 1 Safety Instructions .....................................................................................4 Precautions .................................................................................................. 5 FCC Warning................................................................................................
7.6 I would like to use the auto focus .................................................................25 7.7 I would like to adjust the brightness ............................................................. 25 7.8 I would like to turn on/off the lamp ............................................................... 25 7.9 I would like to freeze images ........................................................................26 7.10 I would like to rotate the image ..................................
Copyright Information Copyrights © Lumens Digital Optics Inc. All rights reserved. Lumens is a trademark that is currently being registered by Lumens Digital Optics Inc. Copying, reproducing or transmitting this file is not allowed if a license is not provided by Lumens Digital Optics Inc. unless copying this file is for the purpose of backup after purchasing this product. In order to keep improving the product, Lumens Digital Optics Inc.
Chapter 1 Safety Instructions Always follow these safety instructions when setting up and using the Document Camera: 1. Do not place Document Camera in tilted position. 2. Do not place the Document Camera on an unstable trolley, stand or table. 3. Do not use the Document Camera near water or source of heat. 4. Use attachments only as recommended. 5. Use the type of power source indicated on the Document Camera.
Precautions Warning: To reduce the risk of fire or electric shock, do not expose this appliance to rain or moisture. This Document Camera has a 3-wire AC line Plug. This is a safety feature to ensure that the plug will fit into the power outlet. Do not try to disable this safety feature. If the Document Camera will not be used for an extended time, unplug it from the power socket. Note Risk of Electric Shock DO NOT Caution: To reduce the risk of electric shock, doOPEN not remove cover (or back).
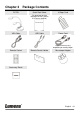
Chapter 2 Package Contents PC170 Quick Start Guide 4-Steps Card (For download of other language versions, please visit Lumens website) VGA Cable USB Cable Power Cord Appearance may vary depending on country/region Remote Control Remote Control Holder Microscope Adapter Accessory Pouch English - 6
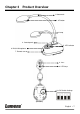
Chapter 3 Product Overview 1. Gooseneck 2. AF button 3 Lamp 4. Control panel 5. LED indicator 6. Built-in Microphone 7. Remote sensor 8. Lens 9. LED lamp 10.
3.
Chapter 4 Installation and Connections 4.
Monitor or HDTV 4.2 Installation and setup 1. Please set up the DIP Switch Settings first. Refer to Chapter 9 DIP Switch Settings in the DC190 User Manual. 4.
4.4 Connecting to a computer and use Lumens™ software USB Cable Projector Power Cord VGA Cable Computer AC Outlet Driver and software can be downloaded from Lumens website 4.5 Connecting to a computer and projector or monitor simultaneously VGA Cable VGA Cable Power Cord Monitor or Projector AC Outlet Computer Press [SOURCE] button to switch the image source.
4.6 Connect to a PC and read the SD card SD Card USB Cable Power Cord AC Outlet Computer Connected to a computer and turned off, the Document Camera is just regarded as an external storage device. 4.
4.8 Connecting to an HDTV Power Cord HDMI Cable AC Outlet HDTV 4.
4.10 Connecting to a Computer with RS232 EXTENDER Adapter Power Cord RS232 Adapter AC Outlet Computer After connecting to the RS232 cable, you can use RS232 commands to control PC170. 4.
Philippines. PAL: Countries/regions not listed above. You should unplug and reconnect the power cord, and then restart the machine for DIP Switch Settings to take effect. Once C-VIDEO is on, VGA OUT is not supported. Only the live image can be displayed in C-Video Out mode. 4.12 Installing application software The application software installed on the computer enables you to: Control the PC170. Capture and record images. Annotate the image, highlight important details and save it.
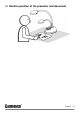
Chapter 5 Start Using 1. Place an object to be displayed under the camera. 2. Turn on Power . 3. Adjust the gooseneck and lens to the appropriate positions. 4. Press [AUTO TUNE] button to optimize the image. You are ready to teach/present. Each time the camera head is moved, please locate it and then press [FOCUS] to refocus the lens. When using the remote control, aim at the remote sensor on the PC170, and press the power button.
Chapter 6 Control Panel/Remote Control and Setting Menu 6.1 Functions of control panel and remote control The below functions are listed alphabetically. Name Function Descriptions Turn on and off the Document Camera. ,,, FOCUS Move up, down, left or right to select the needed function. AF Button.
Enter Mask/Spotlight mode. MASK Remote control MENU Activate the setting menu/exit the menu. PAN Enable/Disable the Partial Enlarged mode. Remote control /Control panel Remote control PIP Image comparison (to compare live images with stored image files). Remote control PLAYBACK Read files stored in the SD Card (priority) or internal memory. / RECORD ROTATE Record motion images. Press [RECORD] to record images to SD Card, and then press [RECORD] again to stop recording.
6.2 Setting Menu 6.2.1 Main menu Press [MENU] on the remote control or control panel to display the setting menu. Auto Tune Automatically adjust the image to have the best brightness and focusing performance. PAN Enable/Disable the Partial Enlarged mode. Slide Show Show the photos or videos stored in the SD card (priority) or internal memory in slide mode. Manual Focus AF Button. LAMP Lamp mode toggle switch.
6.2.2 Set up menu 1st Level Major Items 2nd Level Minor Items Capture Mode Capture Time Capture Settings Capture Interval Image Quality Slide Show Delay 3rd Level Adjustment values Single Capture / Time Lapse / Record / Disable Function Descriptions Press left and right arrow keys to select capture mode. 1. 1 hr 2. 3. 4. 5. 6. 7. 2 hr 4 hr 8 hr 24 hr 48 hr 72 hr 1. 2. 3 Sec 5 Sec 3. 4. 5. 6. 7. 10 Sec 30 Sec 1 Min. 2 Min. 5 Min.
Auto Exposure Auto White On/Off Enter Balance Control Regardless of outside environment, the machine will adjust the brightness to the optimal condition. Use the left and right arrow keys to select. Regardless of outside light or color, the machine will adjust the color to the optimal condition; Press [ENTER] to activate. Audio Volume 0~A~Max Use the left and right arrow keys to adjust the volume.
Preset Save Splash Screen Yes/No Read the value of the current image mode. Use the left and right arrow keys to select, and then confirm by pressing [ENTER]. Enter Open Splash Screen Setting window Yes/No Use the left and right arrow keys to select, and then confirm by pressing [ENTER] to restore the factory defaults. Settings Factory Reset Firmware Version NA Display FW version 6.2.
6.2.4 Spotlight Mode Setting Menu 2nd Level Major Items Spotlight 3rd Level 4th Level Adjustment values Minor Items Function Descriptions Press [ENTER] to return to live image. Live Enter Shape Ellipse/Rectangle Transparency 0~2~3 Adjust the transparency of the border in the Spotlight mode using left and right arrow keys. Step Large/Medium/Small Select the step distance of the spotlight zone using left and right arrow keys.
Chapter 7 Descriptions of major functions 7.1 I would like to automatically adjust the image to have the best brightness and focusing performance Use the remote control or control panel: 1. Press [AUTO TUNE] for the optimal brightness and focal length. 7.2 I would like to switch image sources Live image is the default image source. Press [SOURCE] on the remote control or control panel to have PC170 switch among the following images sources: 1. Live images (default). 2. Computer.
7.4.2 Setting Photo/Text mode To change the settings, please use the remote control or the control panel: 1. Press [MENU] to enter the setting menu. 2. Press [], [], [], or [] to select [Photo/Text]. (Please refer to 7.4.1 Photo/Text mode descriptions to make the best choice.) 3. Press [ENTER] key to enter. 4. Press [] or [] to select the [Photo/Text/Gray]. 5. Press [MENU] to exit. 7.5 I would like to zoom in/out images 1. Press [ZOOM+] on the remote control or control panel to zoom in images. 2.
light/Dual light/Head light) 7.9 I would like to freeze images 1. Press [FREEZE] on the remote control or control panel to freeze the current image on the screen. Press again to defreeze. 7.10 I would like to rotate the image Remote control: 1. Press [ROTATE] key to turn the screen. (The sequence of switching is: 0°/180°/Flip/Mirror) Control panel: 1. Press [MENU] to enter the setting menu. 2. Press [], [], [], or [] to select [Rotate]. 3. Press [ENTER] key to enter. 4.
menu. 2. Press [], [], [], or [] to select [Setting]. 3. Press [ENTER] key to enter. 4. Press [] or [] to the [Capture Settings] menu. 5. Press [] to find [Image Quality]. 6. Press [] or [] to select among [High/Medium/Low]. 7. Press [Menu] to exit. 7.11.3 Setting continuous capture 1. Press [MENU] on the remote control or control panel to enter the setting menu. 2. Press [], [], [], or [] to select [Setting]. 3. Press [ENTER] key to enter. 4.
7.12.2 Setting the quality of captured images 1. Press [Menu] on the remote control or control panel to enter the setting menu. 2. Press [], [], [], or [] to select [Setting]. 3. Press [ENTER] key to enter. 4. Press [] or [] to the [Capture Settings] menu. 5. Press [] to find [Image Quality]. 6. Press [] or [] to select among [High/Medium/Low]. 7. Press [Menu] to exit. 7.12.3 Recording setup 1. Press [MENU] on the remote control or control panel to enter the setting menu. 2.
7. Press [PLAYBACK] to return to the Thumbnail Mode to select other Audio/Video Files, or press [MENU] to exit. An external speaker must be connected to AUDIO OUT to play sound when you use VGA OUT. 7.14 I would like to delete the captured/recorded images Use Remote control: 1. Press [PLAYBACK] to show the thumbnails of all stored files. 2. Press [], [], [], or [] to select the file you want to delete. 3. Pressing [DELETE] will open a [Delete File] window. 4. Press [] or [] to select [Yes]. 5.
2. Press [], [], [], or [] to select [PAN]. 3. Press [ENTER] to activate. 4. Press [], [], [], or [] to move and view the partial enlarged images. 5. Press [MENU] to exit the partial enlarged mode. 7.17 I would like to use the MASK and Spotlight function 7.17.1 I would like to use the MASK or Spotlight mode Use Remote Control: 1. Press [MASK] key to enter the Mask/Spotlight mode menu. Press [] or [] to select mode. 2. Press [] or [] or [] or [] to move the zone position. 3.
2. Press [] or [] to select the item to be modified [Shape/Transparency/Step/V Size/H Size]. (For details, please refer to 6.2 Setting Menu.) 3. Press [] or [] to perform the modification. 4. Press [MENU] to exit the image OSD menu and return to Spotlight mode. 7.18 I would like to play the slides (Slide Show) 7.18.1 Setting delay time 1. Press [MENU] on the remote control or control panel to enter the setting menu. 2. Press [], [], [], or [] to select [Setting]. 3. Press [ENTER] key to enter.
7.19 I would like to compare images (compare live images with stored images (PIP)) This function will compare and contrast a live image with a stored image. C1 C2 C3 C4 C5 C6 C7 C8 C10 C11 C12 Live image Stored image Remote control: 1. Press [Playback] to enter the Playback image thumbnails. 2. Press [], [], [], or [] to select the file to be compared. 3. Press [PIP] to activate image comparison. 4. Press [], [], [], or [] to move the live image. 5.
2.2. Press [], [], [], or [] to select [Setting]. 2.3. Press [ENTER] key to enter. 2.4. Press [] or [] to select [Control]. 2.5. Press [] to enter [Projector Type]. 2.6. Press [] or [] to select [LCD/DLP]. 2.7. Press [MENU] to exit. 7.21 I would like to resume the factory default settings (Factory Reset) 7.21.1 Using OSD menu 1. Press [MENU] on the remote control or control panel to enter the setting menu. 2. Press [], [], [], or [] to select [Setting]. 3.
[] or [] to set up display time span. 9. Skip to Step 12 if your select [Default] in Step 7. 10. Press [] or [] to enter the [Power On Image Select] menu and press [ENTER] to read selected file. 11. Select [YES] to confirm the modification. 12. Press [] to display the [Exit] dialog box and press [ENTER] key to exit. 7.23 I would like to use a SD card 1. After the SD card is inserted, the [Copy To SD Card] dialog box will be displayed for you to select to copy files in PC170 to SD card.
2. Click [Get Picture] will capture the photos of live images and insert the files in use shown as top right figure. Support Windows XP Operation System only. 7.24.2 I would like to insert images in Photoshop 1. Click [File/Import/WIA Support] in Photoshop. 2. Complete by clicking [Capture], then clicking [Get Picture]. 7.24.
Lumens Document English - 36
Chapter 8 Connecting to Microscope 1 Mount the microscope adapter onto the microscope. The Microscope adapter accessories are applicable to eyepieces of about Ø 28.4mm. 2 Connect the lens of PC170 with the microscope adaptor 3 Select the [Microscope] mode 3.1. When using the control panel or remote control 3.1.1. Press [MENU] to enter the setting menu. 3.1.2. Press [], [], [], or [] to select [Image mode]. 3.1.3. Press [] or [] to the [Microscope]. 3.1.4. Press [MENU] to exit.
Chapter 9 DIP Switch Settings You should unplug and reconnect the power cord, and then restart the PC170 for all DIP Switch Settings to take effect. 9.1 Connecting to a projector or monitor 9.1.1 XGA output (default values): 9.1.2 SXGA output 9.1.
9.1.4 1080P output 9.2 Connecting to a TV 9.2.1 NTSC: USA, Taiwan, Panama, Philippines, Canada, Chile, Japan, Korea, and Mexico. 9.2.2 PAL: Countries/regions not listed above. Once C-VIDEO is on, VGA OUT is not supported.
Chapter 10 Troubleshooting This chapter describes problems you may encounter while using PC170. If you have questions, please refer to related chapters and follow all the suggested solutions. If the problem still occurred, please contact our distributors or service center. No. Problems Solutions 1 Boot without power Make sure you have plugged in the power cord. signal 2 There is no image 1. Check the power. output from PC170 2. Check all cable connections.
8 9 The images outputted from PC170 are too bright, dark or vague Unable to record images to capture images of Chapter 7 Descriptions of major functions. Press [AUTO TUNE] to automatically adjust to the optimal brightness and focal length. 1 2 10 The operating steps in the manual are not applicable to the machine 3 4 11 How to unlock the locked device 1. 2. 3. 4. 5. 6. Check to see if the stored data have reached the maximum size of the SD Card. The recording to internal memory is not supported.