DC120 Visual Presenter User Manual [Important] Please visit Lumens http://www.lumens.com.tw/goto.
Table of contents Copyright Information ..................................................................................... 3 Chapter 1 Safety Instructions ...................................................................... 4 Safety Precautions ........................................................................ 5 FCC Warning ................................................................................. 5 EN55022 (CE Radiation) Warning ................................................
7.6 I would like to freeze images ....................................................... 21 7.7 I would like to annotate the live image ........................................ 22 7.8 I would like to add text to the live image ..................................... 23 7.9 I would like to capture images ..................................................... 23 7.10 I would like to record videos ........................................................ 24 7.11 I would like to set up the timer. ......
Copyright Information Copyrights © Lumens Digital Optics Inc. All rights reserved. Lumens is a trademark that is currently being registered by Lumens Digital Optics Inc. Copying, reproducing or transmitting this file is not allowed if a license is not provided by Lumens Digital Optics Inc. unless copying this file is for the purpose of backup after purchasing this product. In order to keep improving the product, Lumens Digital Optics Inc.
Chapter 1 Safety Instructions Always follow these safety instructions when setting up and using the Visual Presenter: 1. Do not place visual presenter in tilted position. 2. Do not place the Visual Presenter on an unstable trolley, stand or table. 3. Do not use the Visual Presenter near water or source of heat. 4. Use attachments only as recommended. 5. Use the type of power source indicated on the visual presenter.
Safety Precautions Warning: To reduce the risk of fire or electric shock, do not expose this appliance to rain or moisture. Note Risk of Electric Shock Note: To reduce the risk of electric shock. Do not remove cover (or back). No user-serviceable parts inside. Refer servicing to licensed service Personnel. This symbol indicates that there This symbol indicates that this are important operating and equipment may contain maintenance instructions in this dangerous voltage which User Manual with this unit.
Revisions English - 6
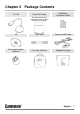
Chapter 2 Package Contents DC120 Quick Start Guide (For download of other language versions, please visit Lumens website) VESA Base Installation Guide CD USB Cable Extension USB Cable Microscope Adapter (Optional) Carry Bag (Optional) Padded Carry Bag English - 7
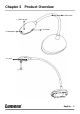
Chapter 3 Product Overview 4. Gooseneck 1. LED indicator 3. AF button 5. Microphone 6. Lamp 2.
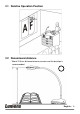
3.1 Relative Operation Position 3.2 Recommend distance * About 310 mm distance between camera and the desktop is recommended.
3.
Chapter 4 Installation and Connections 4.1 System Diagram USB Cable COMPUTER 4.2 Connecting to a computer Shown as the above figure. 4.
4.4 Mounting the DC120 1. Please purchase the standard VESA installation base. 2. Please use appropriate screws: Screw length = 5 mm + base thickness (H1); M4 screw (P = 0.7) VESA bolt pitch 75*75mm VESA base thickness (H1) Screw length = 5 mm + base thickness (H1) M4 screw (P = 0.7) 4.5 Installing application software After installing Lumens image software, you can use the following functions: Control the DC120. Capture and record images.
4.5.2 Install with Windows XP/Vista 1. Insert the software CD into your computer. 2. Auto installation screen will be displayed. Please select [Install Ladibug] to begin installation. 3. The installation wizard will guide you through the process. Please follow the on-screen instructions and click [Next] for the next step.
4. Click [Yes] to create Ladibug™ shortcut on your desktop.
5. Please click the [Finish] button then reboot the system. 4.5.1 Install with MAC 1. Insert the software CD into your computer. 2. Click the CD icon when appears. 3. Go to MAC folder. Click [Ladibug] to begin the installation wizard and follow the on-screen instruction through the installation process.
4. Click [Continue] to continue. 5. Click [Upgrade] to continue. 6. Enter your username and password, then click [OK].
7. Click [Continue] to continue. 8. Click [Restart] to finish installing the software.
Chapter 5 Start Using : Ensure that the USB cable is connected and Ladibug™ software is installed at first. Refer to Chapter 4 Installation and Connections in this user manual. FOCUS 1. Double click on 2. Move the mouse to USB Cable icon to begin Ladibug™ Software. icon, and the main function menu will be displayed. 3. Place an object to be displayed under the camera. 4. Press [PREVIEW] to display the POWER Frequency setting page, and then follow the on-screen instructions for setting.
Chapter 6 Function Menu 6.1 Main Function Menu Live Image Preview Image Optimization Lamp On/Off To adjust the size of image Begin the main function menu, and click the right button to display the information about the software. BRIGHTNESS Set up the recording format Annotation Tools Freeze the current image Advanced Function Menu Adjust the live image focus, Photo/Text mode, etc.
6.
Chapter 7 Descriptions of Major Functions 7.1 I would like to display a live image 1. Click to display a live image. 7.2 I would like to optimize the image 1. Click . 7.3 I would like to zoom in/zoom out 1. Click to display the image scrollbar. 2. Scroll up/down to enlarge/reduce the image. 7.4 I would like to use the auto focus 1. Click the AF button on the camera head of main unit. 7.5 I would like to adjust the brightness 1. Click to show the brightness scroll. 2.
7.7 I would like to annotate the live image 1. Click to show annotation tools 2. The default is the arrow tool [Pointer]. You can select the other annotation tool. 3. Select the color of the annotation tool, . 4. Set up the line width, . 5. Add an annotation to the live image. : Click to capture the annotated image.
7.8 I would like to add text to the live image 1. Click to show annotation tools 2. Select the text tool to show [Text Tool] window. 3. Click to set up font, size, and color. 4. After entering text, click : Click . to capture the text image. 7.9 I would like to capture images 1. Click to show the advanced menu. 2. Click to capture and save images.
7.10 I would like to record videos 1. Click to show the advanced menu. 2. Click to begin the recording tool. : Click to change settings including recording format and audio. 3. Click [Record] to show the “Save” window. 4. After entering the file name, click [Save] to begin recording. 5. Click [Stop] to stop recording. 6. Click to close the recording tool.
7.11 I would like to set up the timer. 1. Click to show the advanced menu. 2. Click to show the “Time Lapse” window. A. B. C. D. Set up the file directory. Set up the file name Set up the start time. Set up the time lapse. A B C D 3. Click [OK] to exit and the timer takes effect.
7.12 Working with Other Applications 7.12.1. I would like to insert a photo in MS-Paint 1. Click [File/From Scanner or Camera] in MS-Paint as shown in the bottom left figure. 2. Click [Get Picture] will capture the photos of live images and insert the files in use shown as top right figure. : Support Windows XP Operation System only. 7.12.2. I would like to insert a photo in MS-Word : For Windows Office 2003 or later versions, please use the function with OneNote. 1.
2. Select [USB Video Device #5] and click [Custom Insert]. 3. Click [Get Picture]. It will capture the photo of live image. 7.12.3. I would like to change the setting of the DC120 and then capture a photo in MS-Word : For Windows Office 2003 or later versions, please use the function with OneNote. 1. Click [Insert/Image/From Scanner or Camera] in MS-Word.
2. Select [Lumens Document Camera TWAIN] and click [Custom Insert]. 3. A window showing a live image (see below) will be displayed. 4. Click [Setting]. When the Camera Settings window pops up, the live image can be adjusted. 5. Click [Capture] to capture images in MS-Word. 6. Click [Cancel] to exit.
7.12.4. I would like to set the DC120 as a webcam for Skype The DC120 can be used as a webcam for instant message software such as Skype and MSN. With Skype as an example, operating instructions are provided below: 1. Begin Skype and enter [Tools] > [Options]. 2. Select [Video Settings], check [Start my video automatically when I am in a call] and select [USB Video Device] (XP) or [Lumens DC120] (Vista/Windows 7) as a webcam. 3. Start calling your contact.
Chapter 8 Connecting to a Microscope 1. Mount the microscope adapter onto the microscope. : Please choose an appropriate microscope adapter. Microscope adapter accessories are applicable to eyepieces of Ø 28 mm. 2. The lens of DC120 connects with the microscope adapter. 3. If the image is not clear 3.1 Click the [FOCUS] button on the DC120 camera head of main unit to activate the auto focus.
Chapter 9 Troubleshooting This chapter describes problems you may encounter while using DC120. If you have questions, please refer to related chapters and follow all the suggested solutions. If the problem still occurred, please contact our distributors or service center. No. Problems Solutions 1 Boot without power Ensure that the USB cable is connected. signal 2 Unable to focus Probably the document is too close. Pull away the distance between document and lens, then click [FOCUS].