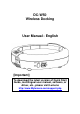
DC-W50 Wireless Docking User Manual - English [Important] To download the latest version of Quick Start Guide, multilingual user manual, software, or driver, etc., please visit Lumens http://www.Mylumens.com/support.
Table of Contents Copyright Information ..................................................................................... 2 Chapter 1 Safety Instructions......................................................................... 3 Precautions ................................................................................................ 4 FCC Statement........................................................................................... 4 EN55022 (CE Radiation) Warning ..............................
Copyright Information Copyrights © Lumens Digital Optics Inc. All rights reserved. Lumens is a trademark that is currently being registered by Lumens Digital Optics Inc. Copying, reproducing or transmitting this file is not allowed if a license is not provided by Lumens Digital Optics Inc. unless copying this file is for the purpose of backup after purchasing this product. In order to keep improving the product, Lumens Digital Optics Inc.
Chapter 1 Safety Instructions Please use the product following the safety instructions below: 1. Operation 1.1 1.2 1.3 1.4 1.5 1.6 Please use the product in the recommended operating environment. Do not place Light Engine in tilted position. Do not place the product on an unstable trolley, stand or table. Do not use this product near water or source of heat. Use attachments only as recommended. Use the type of power source indicated on this Product.
3.3 The charging of the product may cause overheating, do not place the product in the place where it is badly ventilated. 4 Storage 4.1 Do not place the Product where the cord can be stepped on as this may result in fraying or damage to the lead or the plug. 4.2 Never push objects of any kind through cabinet slots. Never allow liquid of any kind to spill into the Product. 4.3 Unplug this product during thunderstorms or if it is not going to be used for an extended period. 4.
cause harmful interference to radio communications. However, there is no guarantee that interference will not occur in a particular installation. If this equipment does cause harmful interference to radio or television reception, which can be determined by turning the equipment off and on, the user is encouraged to try to correct the interference by one or more of the following measures: —Reorient or relocate the receiving antenna. —Increase the separation between the equipment and receiver.
Chapter 2 Package Contents DC-W50 Quick Start Guide USB connector holder (For download of other language versions, please visit Lumens website) Adapter Power Cord Appearance may vary depending on country/region English - 6
Chapter 3 Product Overview 3.1 DC-W50 7. LED Indicator 6. LAN 5. USB connector fixing hole 4. USB Port 1. Power Switch 3. Default Values 2. WPS Button 8.
3.2 Lock USB Connector Holder 3 1 2 1. Disconnect the ball chain on the USB connector holder. 2. Thread the ball chain through the connector fixing hole on DC-W50. 3. Shackle the ball chain.
Chapter 4 Description of LED indicator 4.1 POWER: The indicator lights blue in normal conditions. 4.2 Power status : 4.2.1 No Light: No Power 4.2.2 Blue Light: Full Power 4.2.3 Red Light: Low power 4.2.4 Flickering Blue: When the device is powering on or in charging status. It will flicker red if it is charged when the power is not enough 4.3 WPS: 4.3.1 Flickering Red: Connection detection 4.3.
Chapter 5 Installation and Connections 5.1 Installation flow chart This product shall be used together with our company’s special software Ladibug and USB Document Camera, please install and use in accordance with the instruction as shown in the picture below. Start Install software Install Ladibug™ Refer to Ladibug Software Manual for software installation Install hardware Install USB Document Camera OK Start Using Refer to Sections 5.
5.2 Installing Application Software 5.2.1 System Requirements Windows Vista / Windows XP Windows 7 / 8 MAC OS X 10.7 / 10.8 / 10.9 ® Min CPU: Intel Core 2 Min CPU: Intel Core 2 Min CPU: Intel Pentium Duo 2 GHz Min Memory: 1 GB RAM Duo 2 GHz Min Memory: 1 GB 2 GHz Intel Core 2 Duo Min Memory: 1 GB Supporting Direct X 9 Min Resolution: 1024 x (32-bits)/2 GB(64-bits) Supporting Direct X 9 768 and WDDM 1.
5.3 Install DC125 5.3.1 Install DC125 on DC-W50 5.3.
Chapter 6 Start Using 7 2 1. Charge the unit for 3 hours before the first use. 2. Switch power to [ON]. (Caution: When the unit is fully charged, indicator lights blue) 3. To start connection of DC-W50 with computer, please follow the steps of 6.1.1 Manual connection. 4. Modify [Device Name] and [SSID] before the first use. Please follow the steps of 6.1.3 Change the SSID for modification. 5. Double click on 6. Click icon to open Ladibug™ Software. to open [Search Window]. 7.
regions. For more information on the operation of Document Camera, please refer to Document Camera User Manual Please refer to User Manual for Ladibug Software for how to operate the Ladibug in details 6.1 Start wireless connection [Note] How to improve the wireless signal quality The working frequency band of IEEE 802.11 b/g/n is 2.4 or 5 GHz.
6.1.1 Manual connection a. Open the computer wireless network list. For iPad users, go to [Settings] -> [Wifi] to select wireless network. b. Select the [Lumens_Wireless_Flyer] in the network list, click [Connection] and then input the password for connection (pre-set password [ladibugflyer]) to start the connection. 6.1.2 WPS connection a. Open the wireless network list on the computer. b.
6.2 Change the firewall settings 6.2.1 Windows XP a. Select [Console] in [Start] menu. b. Click [Information Security Center], and then click [Windows Firewall]. [Remark] Click [Windows Firewall] in the traditional view of [Console]. c. In [Windows Firewall Setting] window, click the tab [Exceptions]. d. Be sure to select Ladibug under [Programs and Services], and then click [OK]. e. If Ladibug was not listed under [Programs and Services], then click [Add Program]. f.
6.2.2 Windows 7 a. Select [Console] in [Start] menu. b. Click [System and Security], and then click [Allow a program through Windows Firewall]. [Remark] Click [Windows Firewall] in the icon view of [Console]. c. Select [Change settings] in [Allowed programs and features] window. d. Please select Ladibug program in the list. e. If Ladibug was not listed, please click [Allow another program], and then you will find Ladibug program. f. Select Ladibug, and then click [Add].
6.2.3 Windows 8 a. Point the mouse to the upper right corner of the screen and move the mouse pointer down, then press [Search] and input the firewall in the search block, click or press [Allow the Application Program or Function to pass Windows Firewall]. b. Click or press [Change Settings]. System may ask for your system administrator password or confirm your selection. c.
g. Select [Automatically allow signed software to receive incoming connections]. h. Change Ladibug in the list to [Allow incoming connections]. If the software name was not listed, please click [+] to add new programs to the list, and start to use the software.
Chapter 7 Administration Menu 7.1 Wireless 7.1.1 Basic After you enter the webpage, the [Basic] page displays. You can check and modify the current setting of the DC-W50 1 2 3 4 5 6 7 8 9 10 NO Item 1. Device Name 2. WPS Wireless Mode: AP Function Descriptions Set device name of Document Camera Turn on/off the WPS function Setup item when DC-W50 is set for wireless access point or single unit use 3. Frequency 2.4 GHz/5 GHz frequency band setting 4. SSID Set device name of wireless network 5. Channel 2.
access point 7.2 System 7.2.1.1 IP-LAN Network setting page 1 2 3 4 NO 1 2 3 4 Function Descriptions IP address setting Netmask Turn on/off DHCP function Available address range IP Subnet Mask DHCP DHCP Server Address Range 7.2.1.
7.2.1.3 Streaming You can update the software, return to the default value and restart the machine on this page.
7.2.1.4 Maintenance You can update the software, return to the default value and restart the machine on this page.
Chapter 8 Set DC-W50 for AP use Through this connection method, multiple DC-W50 can be controlled through DC-W50 at AP terminal 8.1 Connection diagram DC-W50 (Client) DC-W50 (AP) DC-W50 (Client) Computer 8.2 Equipment requirements Two or more DC-W50 One computer equipment One router (depending on network requirements) 8.3 DC-W50 setup 8.3.1 DC-W50 host setup a.
b. Open the computer wireless network list, connect the [Lumens_Wireless_Flyer], enter the connection password [ladibugflyer] to complete the network connection. c. Open the web browser, and enter [192.168.1.1] in the address bar d. Enter the Login account [Admin] and password [1234] e. Enter the [Basic] page to modify the [Device Name] and [SSID] of AP Device Name:Wireless Document Camera-AP (Custom) SSID:Lumens_Wireless_Flyer_AP (Custom) f. Click [Save] to apply the changes 8.3.
f. Select the wireless mode as [Client] and enter the SSID of AP [Lumens_Wireless_Flyer_AP] and connection password [ladibugflyer] g. Click [Save] to apply the changes 8.3.3 Start Using a. Open the computer wireless network list, connect the [Lumens_Wireless_Flyer_ap], enter the connection password [ladibugflyer] and complete the network re-connection with DC-W50 AP terminal b. Start the Ladibug software c. Click to open [Search Window] d.
Chapter 9 Troubleshooting This chapter describes problems you may encounter while using DC-W50. If you have questions, please refer to related chapters and follow all the suggested solutions. If the problem still occurred, please contact your distributor or the service center. No. 1 Problems No indicator is on after DC-W50 power is switched on Solutions Please make sure DC-W50 has enough battery power (the battery indicator lights blue).
cannot be displayed when the setting is updated Method 2: Please follow the steps of 6.1.1 Manual connection for reconnection Method 3: Please press and hold the DC-W50 [Reset] button for 5 seconds. After restarting, please follow the steps of Chapter 6 Start Using for reconnection. If the problem still occurs, please contact your distributor. 9 The corresponding DC-W50 cannot be identified when two or more DC-W50s are connected Please follow the steps of 6.1.3 Change the SSID to modify the SSID.