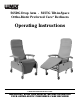
565DG Drop Arm - 565TG Tilt-in-Space Ortho-Biotic Preferred Care® Recliners Operating Instructions GF0500044A05RevA05 © Graham-Field Health Products 2005 IMPORTANT: READ THIS MANUAL BEFORE OPERATING YOUR ORTHO-BIOTIC PREFERRED CARE RECLINER
WARNINGS Warning: Read entire sheet before assembly or operation. Warning: Casters must be locked at all times, except during transit. Warning: This product should not be used without proper instruction from a health care professional. Warning: GF/Lumex assumes no responsibility for damage or injury caused by the improper installation, assembly or use of these products. Warning: The Tilt-in-Space and Drop Arm Recliners have a 250 lb.
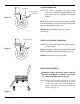
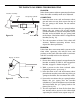
UNPACKING INSTRUCTIONS inspect contents for shipping 2. Do not remove the shipping support which is attached to the recliner’s upholstered back missing parts. If parts are until after the recliner’s upholstered back has missing, contact your dealer been assembled to the chair. The contents of this package 3. Save this booklet in a safe place for future reference. • One (1) Recliner frame with upholstered seat. • One (1) Upholstered back. • Two (2) Upholstered side panels. • Two (2) Pins with wire rings.
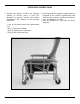
Upholstered Back Cushion BACK ASSEMBLY Elastic Band Figure 1 NOTE: Do not remove the shipping support which is attached to the recliners upholstered back until after the recliner's upholstered back has been assembled to chair. Shipping Support 1. Obtain upholstered back assembly. Remove the upholstered cushion from the metal back frame (See fig. 1). 2. Remove pins and wire rings from frame (See fig 1). 3.
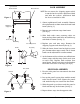
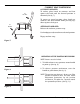
CASTER OPERATION To unlock To lock swivel and wheel Figure 4 NOTE: This chair is equipped with four swivel casters for improved maneuverability. The rear casters are also equipped with locking features. Lock: To prevent the rear casters from swiveling and wheel turning, step on the rear pedal of the caster until it latches (See fig 4). Unlock: Step on middle button to unlatch (See fig. 4). To lock swivel SWIVEL LOCK PEDAL OPERATION NOTE: The swivel lock feature will aid the chair in rolling straight.
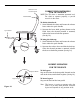
CORRECT SEAT POSITIONING To Recline OCCUPANT OPERATED To recline, place hands on armrests and lean against the back until the desired position is obtained (See fig. 7). To return to seated position, place hands on armrests and lean forward while pressing legs down against the legrest To Return ATTENDANT OPERATED Release the recliners position stop. Use handgrip to adjust recliner to desired position. Engage recliner stop. Figure 7 OPERATION OF THE POSITION MECHANISM NOTE: Casters must be locked. 1.
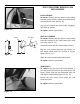
565G UPHOLSTERY REMOVAL AND REPLACEMENT BACK CUSHION To remove: Release the two elastic straps which hold the button of the cushion to the back frame with small wire clips (See fig. 10). Grip top of cushion near back frame handgrips and slide up and off. Figure 10 To replace: Reverse procedure. Frame Key Ring SEAT-LEG CUSHION To remove: Release the two elastic straps which hold the cushion to the back frame with small wire rings (See fig. 11). Adjust the chair into the semi-recline position.
RECLINER POSITIONING MECHANISM TROUBLE-SHOOTING Clevis ring and wire ring ADJUSTMENT INSTRUCTIONS FOR POSITION MECHANISM NOTE: Never lubricate the position mechanism assembly. 1. Turn the position adjustment handle down to the release position, and remove clevis pin and wire ring from top of assembly. (See fig. 13). Slide 2. Slide positioning plate up, and turn square washer clockwise until snug (See fig. 13). Positioning plate 3. Slide the positioning plate down over square washer.
TILT-IN-SPACE GAS SPRING TROUBLESHOOTING PROBLEM: If the chair actuates without squeezing the release lever, the cable assembly needs to be adjusted. Bracket Assembly Cable Gas Spring Cylinder CORRECTION: 1. Lean the chair on its side and remove clevis pin and wire rue ring that secure the top of the gas spring to the frame. Do not remove the cable. In Out Nut Rue Ring Figure 14 Clevis Pin 2. Loosen the nut above the gas spring bracket.
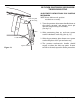
Release Lever Under Cusion Push Handle CORRECT TILT POSITIONING FOR TILT-IN-SPACE NOTE: The Tilt chair is attendant operated only. For chair to operate properly, a person must be in the chair. To tilt the chair back: 1. Stand behind the chair, and locate the release lever under the push handle. 2. Squeeze the lever while pushing down on the back. Once the desired position is attained, release the lever to lock into position (See fig. 16). Up Position To bring the chair up: 1.
U.S.A., Corporate Headquarters: Graham-Field Health Products 2935 Northeast Parkway Atlanta, Georgia 30360 telephone: 800-347-5678, 770-447-1609 fax: 800-726-0601, 678-291-3232 http://www.grahamfield.