
Installation & Assembly


INSTALLATION INSTRUCTIONS
ELECTRIAL SHOCK HAZARD
READ, UNDERSTAND, and FOLLOW these instructions
before installing the equipment.
WARNING
SAFETY
INSTALLATION
KUNCKLE MOUNT
Disconnect the Electrical supply power at the service panel (fuse or circuit breaker box). Failure
to do so could result in serious injury or death. Only qualified electricians should install this
fixture and the installation MUST conform to the National Electrical Code Part I and all local
codes and ordinances. Ensure that only proper tools, materials, and equipment are used to
complete the installation.
• Proper grounding is required to ensure personal safety
• Servicing this equipment should be performed by qualified service personnel.
• Save these instructions
The fixture has ½” NPS locking swivel knuckle that is suitable for mounting with a
junction box or into a landscape post (sold separately).
NOTE: Use appropriate size junction box and/or landscape post depending on the size
of fixture being mounted.
• Seal arm thread using Teflon tape or silicone sealant.
• Pull the wires into the hole of the junction box or landscape post (not provided).
• Connect the wires properly in the junction box or landscape post. See Wiring
Diagram
• Secure the fixture to junction box or landscape post by screwing the locking
swivel knuckle into the cover.
• If applicable, plug all unused holes and seal threads with silicone.
• Loosen the screw on swivel portion of the knuckle, adjust the fixture to a suitable
orientation, and then tighten the screw.
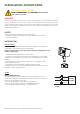
WIRING
ON-OFF WIRING METHOD:
Universal voltage driver permits operation at 120V through 277V, 50 or
60 Hz. Units ordered with (480V) suffix are 480V, 60Hz. For Non-Dimming,
follow the wiring directions as in FIG. 1
1. Connect the GROUND wire from fixture to supply ground
2. Connect the white fixture lead to the (-) COMMON supply lead
3. Connect the black fixture lead to the (+) LINE supply lead
FIGURE 1
LIGHTING
FIXTURE
(+) LINE
(-) COMMON
GROUND
BLACK
WHITE
GROUND
Please see back for dimming’s wiring instructions and troubleshooting.