® MAGPIX User Quick Guide 4.
© Luminex Corporation, 2011. All rights reserved. No part of this publication may be reproduced, transmitted, transcribed, or translated into any language or computer language, in any form or by any means without prior express, written consent of Luminex Corporation. LUMINEX CORPORATION 12212 Technology Boulevard Austin, Texas 78727-6115 U.S.A. Voice: (512) 219-8020 Fax: (512) 219-5195 MAGPIX® User Quick Guide 4.
MAGPIX® User Quick Guide 4.
Table of Contents Chapter 1 Starting the MAGPIX System for the First Time .............................................1 Starting xPONENT .......................................................................................................................................1 Start-up Indicators .......................................................................................................................................1 Logging On to xPONENT .........................................................
MAGPIX® User Quick Guide 4.
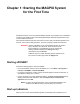
Chapter 1: Starting the MAGPIX System for the First Time Detailed instructions on how to install the MAGPIX System are provided in the PC Installation Instructions (89-30000-00-263) and Installing MAGPIX (89-30000-00-236) foldouts that you received with the instrument. This manual provides step-by-step instructions on how to start your MAGPIX system for the first time, how to perform daily operations, and how to properly maintain the instrument.
• Blue light indicator turns on. • Fans turn on. • Syringe pump initializes. • The filter wheel initializes. • Software connects to the instrument. NOTE: It may take several minutes for the instrument to initialize and connect to the software. The Software Connectivity indicator is located on the lower left corner of the software screen.
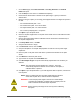
1. On the Home page, click Probe and Heater under Daily Activities. The Probe & Heater tab opens. 2. Use well D6 (this is the center of a standard 96-well plate). 3. Ensure that the well location is selected on the plate image. A green pin marks the selected well. 4. Based on the type of plate you are using, place alignment disks or an alignment sphere in the well. • For a standard 96-well plate - none • For a Filter-bottom plate - two 5.08 mm disks • For a Mylar-bottom plate - two 5.
FIGURE 1. Sample Probe Height Adjustment Revive After Storage Routine NOTE: The Revive After Storage routine is necessary when the system runs for the first time and is recommended when the system has been idle for more than a week. After you have adjusted the sample probe height, run the Revive After Storage (Luminex) routine. 1. Open the Maintenance page, then the Cmds & Routines tab. 2. Select Revive After Storage (Luminex) from the drop-down list.
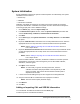
System Initialization System initialization prepares the system for data acquisition. On initial startup, the System Initialization should consist of: • Fluidics Prep • Calibration • Performance Verification Calibration normalizes the settings for the system and ensures optimal and consistent microsphere classification. Verification uses system controls to ensure that the analyzer is functioning properly with current calibration settings. 1. On the Admin page, select the System Setup tab. 2.
1. Load the CAL/VER CD (provided with the kit) on the computer. 2. On the Home page, click System Initialization. 3. Click Import Kit at the bottom right side of the window. The Import Calibration or Performance Kit dialog box opens. 4. Select Locate the CD in the appropriate drive and select the *.mpx folder and click Open. 5. Select the *.lxl file and click Open. 6. Click OK. Creating Calibration and Verification Reports 1. Open the Results page, then open the Reports tab. 2.
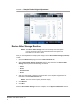
Chapter 2: Daily Start-Up Activities Defining the System Initialization Routine NOTE: Luminex recommends daily performance verification and weekly calibration of the MAGPIX system. You can set up the system initialization routine to include calibration and verification on the Admin page, System Setup tab, Maintenance Options section. 1. Open the Admin page. 2. Click System Setup.
3. Under Maintenance Options, select Fluidics prep, performance verification from the drop-down list. FIGURE 2. Setting System Initialization Routine 4. Click Save. Running the System Initialization Routine 1. On the Home page, click System Initialization under Daily Activities. The Auto Maint tab opens. On the Auto Maint tab, the System Initialization option is automatically selected. 2.
Chapter 3: Running Assays Creating a Quantitative Assay Protocol The protocol must contain multiple standards. The standards are assigned lot value information for each test. A standard curve is generated according to the lot values. Including controls in the protocol is optional, but recommended for judging the acceptability of batch results. To create a quantitative assay protocol: 1. Open the Protocols page, then open the Protocols tab. Click Create New Protocol. The Settings tab opens. 2.
. In the Analysis Settings dialog box, select the analysis method from the Method list, and the weighting in the Weight Type list. Click Apply to All Analytes to apply the selection to all analytes. 16. To change the analysis for a single analyte, click the Analysis field for the analyte you want to modify. The Analysis Settings dialog box opens. 17. Select an analysis method in the Method list. 18.
27. Click Next. The Plate Layout tab opens. • To add well commands, highlight the appropriate wells and mark them as unknown, standard, control, background, or wash. You can also delete commands that you have added and change the starting location on the plate. If you want to run in replicate, change the Replicate Count to the appropriate number and the Grouping to your preferred grouping method. NOTE: Select the Replicate Count and Grouping settings before adding a well command.
default Post Batch routine can be changed in the Batch Options tab of the Admin page. Creating a Kit To create a kit: 1. Open the Protocols page, then open the Protocols tab. 2. Select the protocol that you want to use for the kit, then click New Std/Ctrl. The Std/Ctrl Details tab opens. 3. Type the name of the kit in the Name box, the lot number in the Std/Ctrl Kit Lot# box, the expiration date using MM/DD/YY format in the Expiration box, and the manufacturer in the Manufacturer box. 4.
Create a New Batch from an Existing Protocol This option creates a new batch using a selected protocol from the Installed Protocols list. The list contains the following information about each protocol: • Name • Version • Manufacturer • Date When you click this option, the following tabs appear: 1. Protocols 2. Stds & Ctrls 3. Plate Layout These tabs are numbered because you must complete the steps on each tab sequentially.
1. Open the Results page, then the Reports tab. 2. In the Report drop-down list, select the category of report: batch, protocol, calibration and verification, performance verification, system log, or advanced. Depending on what you choose in the Report list, the content of the Type list changes and other features can be displayed in the window. 3. Select the specific report from the Type list. 4. If you selected either a batch report or a protocol report, select the specific batch or protocol from the list.
Chapter 4: Shutdown Shutting Down the Analyzer Run the daily shutdown routine to prevent clogs and crystallization of salt in the sample probe. Clogs and crystallization of salt in the sample probe can cause problems with calibration, verification, and data acquistion; they can also cause sample splashing. Shut down the system properly to ensure system integrity. 1. On the Home page, click Shutdown. The Auto Maint tab opens, with System Shutdown selected. 2. Click Eject. 3.
MAGPIX® User Quick Guide 4.
Chapter 5: Troubleshooting If you are not successful troubleshooting problems with MAGPIX, contact Luminex Technical Support. See Technical Support. If necessary, attach a support utility file to provide detailed information. To create a support utiltity file, access the Support Utility tab of the Maintenance page and follow the instructions in Sending a Support.zip File.
FIGURE 3. MAGPIX Off-Plate Reagent Block 1 Reservoirs 2 Strip Wells MAGPIX New System Startup Errors Problem Resolution 1. Check the sample probe height for correctness. Calibration Failure 2. Create and run the following routine. Create routines in the xPONENT Maintenance page Cmds & Routines tab.
Problem Resolution (1x) Clean with 0.1 N NaOH (reservoir C) (3x) Rinse (reservoir D) Run Calibration routine. Verify that reagent is freshly vortexed. Use 6 drops of reagent. 4. If calibration continues to fail, contact Luminex Technical Support. Performance Verification Failure 1. Sonicate and flush the sample probe using distilled water. Observe the probe calibration for positional accuracy (see procedure below). Verify all fittings are secured in place (see flowchart below).
Problem Resolution VER (strip well B) Verify that reagent is freshly vortexed. Use 6 drops of reagent. (1x) Rinse (reservoir D) Fluidics 1 (strip well C) Verify that reagent is freshly vortexed. Use 6 drops of reagent. Fluidics 2 (strip well D) Verify that reagent is freshly vortexed. Use 6 drops of reagent. (3x) Rinse (reservoir D) Check the Cal/Ver icon in the System Monitor Bar located at the bottom of the xPONENT screen to confirm that the operation has been completed successfully. 3.
MAGPIX Calibration and Performance Verification Troubleshooting Guide Troubleshooting 21
TABLE 1.
You can access the Technical Support website using a user name and password at https://oraweb.luminexcorp.com/OA_HTML/jtflogin.jsp. By Phone Inside the U.S. and Canada Phone: 1-877-785-BEAD (-2323) Fax: 512-219-5114 By Phone Outside the U.S. and Canada +1 512-381-4397 Email Email questions to support@luminexcorp.com. Sending a Support.zip File 1. If you want to include a batch file, select it and check Include Batch Information. 2. Press Support. The Support Utility launches. 3.
8. Verify the location where you want to store the file. To change the location, click Browse, then navigate to the new folder and click OK. 9. Click Save File. The saved file includes date and time information. 10. Send an email to support@luminexcorp.com and attach the support file (xPONENTSupportFile.zip) to the email. MAGPIX® User Quick Guide 4.