OWNER’S MANUAL TM VENUE SOUND AND LIGHT SYSTEM FOR USE WITH: Interactive Music Games Ipod® device or other MP3 player Computers Handheld Video Games DVD or CD player OR USE AS: Real Live Instrument Amplifier PA System Karaoke Machine Desk or Shelf Speakers 1
QUICK CONNECTIONS: - Ipod®, MP3 player, or Audio Device ........ See page 4 - Television ........................................................... See page 5 - DVD Player ......................................................... See page 5, Option 2 OR Option 1 to TV - Interactive Music Video Games .................. See page 6, Option 3 OR 4 - Computers ......................................................... See page 4 (portable audio device) - Handheld Video Games ................................
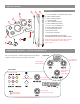
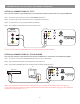
SET-UP GUIDE 8 9 PARTS LIST: 10 1 1) 2x ROCK SHOW™ UNITS WITH LED LIGHTS 2) SIDE CONTROL PANEL 3) BACK CONTROL PANEL 6 4) 1 MICROPHONE 3 5) 12V AC POWER ADAPTER 7 6) UNIT CONNECTOR CORDS 7) 2x 5 in. (12.7 cm) SPEAKERS 8) RCA TO MINI AUDIO CORD 9) RCA AUDIO/VIDEO CORD 10) RCA AUDIO CORD 7 11) RCA AUDIO COUPLER 2 THE ABOVE NUMBERS WILL BE USED FOR REFERENCE ON THE FOLLOWING PAGES 4 11 NOTE: Gaming microphones with USB connections must be connected directly to their respective game consoles.
BASIC SET UP Step 1: Connect the two Unit Connector Cords (6). Step 2: Plug in provided adapter (5) as pictured.* Step 3: Connect to audio source using one of the connection methods described in this manual. Step 4: Connect microphone cord if needed. Plug in 1 or 2 microphones to sing along.** BACK PANEL Step 1 Step 2 (ADAPTER) * CAUTION: Use ONLY provided adaptor! Different voltage may cause permanent damage. ** CAUTION: DO NOT place microphone directly in front of speakers. Feedback will occur.
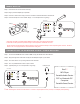
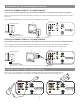
CONNECTING TO TV, DVD, OR GAME CONSOLE OPTION (1) CONNECT DIRECTLY TO TV This is an easy connection if you already have your TV hooked up to a DVD or game console or are using an HDMI cable. Step 1: Connect the ends of RCA cord (10) into AUDIO OUTPUT of television. Step 2: Connect the other ends of the RCA cord (10) into AUDIO IN of Rock Show™. Step 3: Turn Rock Show™ on by turning VOLUME knob clockwise. Step 4: Turn on Game Console/DVD and TV and turn up the volume.
CONNECTING TO VIDEO GAME CONSOLE OPTION (3) CONNECT DIRECTLY TO GAME CONSOLE This is an easy connection if your television does not have an AUDIO OUT or if you want to use multiple units together. Step 1: Using the special RCA cord that comes with your video game console, plug yellow RCA cord from game console into video input of TV. Step 2: Plug Red/White RCA cord from game console into AUDIO IN of Rock Show™.
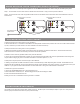
USING MULTIPLE UNITS TOGETHER (DAISY CHAINING) It’s even more fun to link multiple units together for an ULTIMATE ROCK SHOW! Here’s how you can link up to 4 pairs: Step 1: Connect RCA cord from audio source to AUDIO IN on Rock Show™ using one of the previous methods. Step 2: Connect the two main units using additional RCA cord from the AUDIO OUT of First Rock Show to the AUDIO IN of second Rock Show™.
LUMISOURCE, INC. LIMITED WARRANTY LIMITED WARRANTY: LumiSource, Inc. (“LumiSource”) warrants this product against defects in materials and workmanship for a period of ninety (90) days from the date of original consumer purchase.