INSTRUCTION MANUAL IMPORTANT: Please read this manual in its entirety prior to using this device!
INTRODUCTION Thank you for purchasing a quality LUNA OPTICS product. With proper care and maintenance your device will provide many hours of operation and outstanding reliability. Please read this manual – it is your key to enjoying this exciting and hi-tech product! NIGHT VISION Without getting too technical and confusing, let’s try to understand how this device works and what it can and cannot do: 1. Your night vision device works on the principle of amplifying (intensifying) available light.
lit room – the image will be way too bright for your comfortable viewing and it also may permanently burn the tube inside the unit and will surely void your warranty. Please note that for the safety of this device it has protective lens cover with special filter – to test the unit during daytime when you bring your newly bought unit home, or in the shop before you buy it. Please keep this lens cover on during daytime – even if the unit is turned off.
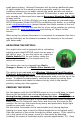
LN-ERS45M ELITE NIGHT VISION RIFLESCOPE 1 2 3 4 5 10 9 8 6 7 11 12 Glossary: 1 – Battery Compartment Cover 2 – ON/OFF/Standby Switch 3 – Reticle ON/OFF/Brightness Switch 4 – Ocular Focusing Wheel 5 – Rubber Eyecup 6 – Light Indicator 7 – Remote Control Cover 8 – Reticle Color Switch 9 – Weapon Mount 10 – Accessory (IR Illuminator) Mounting Plate 11 – Vertical/Horizontal Adjustments 12 – Distance Focusing Wheel 13 – Protective Lens Cover with IR Filter 13
INSTALLING THE BATTERY: Your night vision unit operates on one 3V Lithium battery, also known as 123type. It is also possible to operate this unit on one standard AA-type battery by removing the internal part of the Battery Compartment Cover (1). Please note that when unit is operating on AA-type battery, the operating time will be reduced compared to the 3V Lithium battery (see technical specifications). To install the battery, remove the Battery Compartment Cover (1).
small game hunting. Infrared Illuminator will provide an additional beam of light invisible to the naked eye and is especially useful in very dark conditions allowing you to better identify the target and also see what is behind the target. Mounting the optional IR illuminator is easy and takes only seconds, as the scope has a special Accessory Mounting Plate (10) already built-in.
the reticle is in the center of view, align the weapon with the target, so that the target is in the middle of the cross section of the reticle. Make the control shot. Observe the bullet impact on the target and, if necessary, make additional corrections via horizontal and vertical adjustment wheels. If necessary, repeat the shots until you can see the correlation between adjusting the scales and the bullet impact.
IMPORTANT INFORMATION: NEVER: 1. Intentionally turn on the unit without protective lens cover during daylight or in a well-lit area 2. Take precaution not to allow direct projecting light into the objective lens (automobile headlights, flashlight beams, laser beams) 3. Try to disassemble the unit by yourself or by anyone who is not our authorized technician. Doing so may result in injury and will void any warranty claims 4.