LN-G2-M44 / LN-G2-M50 GEN-2 HD DIGITAL TECHNOLOGY DAY & NIGHT MONOCULAR INSTRUCTION MANUAL IMPORTANT: Please read this manual in its entirety prior to using this device!
DIGITAL NIGHT VISION: 1. Your night vision viewer operates with batteries. Unlike a daylight binocular, where you see the image due to light traveling through the glass and the prisms, the digital night vision device works by projecting the image onto an LCD screen.
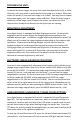
Please identify and remember all the parts of the monocular (LN-G2-M44 shown).
GLOSSARY: 1 – Objective Lens Focusing Wheel 2 – Ocular Focusing Wheel 3 – Battery Compartments 4 – Accessory / Tripod Mount 5 – Video Output 6 – Infrared Illuminator 7 – SD-Card / USB Compartment 8 – DC Output 9 – Video Recorder Button 10 – Still Image Button 11 – Image / Zoom Button 12 – Power ON/OFF Button 13 – Infrared / Menu Button 14 – Brightness Toggle Wheel 15 – SD-Card Slot 16 – USB Output INSTALLING THE BATTERIES: Your night vision unit operates on two 3V Lithium type batteries, known as CR123A t
replace the objective lens cover after the unit is turned off and no longer is in use to protect the lens. IMPORTANT: When turning the unit ON it is normal to see some image flickering, as the components warm up to display the image. This is normal and does not affect the unit. If the flickering continues after 5-10seconds, please try to decrease the brightness of the image by gently pushing the Brightness Wheel (14) to the left.
FOCUSING THE UNIT: To obtain the sharp image, you must first rotate the objective lens (1) in either direction, until you notice in which position the image is at its best. After that, rotate the ocular (2) also until the image is at its best. You may have to repeat the process again, until the image is sharp and clear. Once the clear image is obtained, you no longer need to adjust the ocular, just rotate the front objective lens to adjust the distance to the object you are viewing.
next to the eyepiece will light on, indicating the IR illuminator is operating. The image will remain full color. To switch image to night vision green – press IR button again. To switch image to B&W press the IR button again. To turn the IR illuminator OFF press the same IR button again once. The red light indicator will disappear when the IR illuminator is properly turned off.
To take a picture, focus the unit onto the object you are viewing and with a steady hand firmly press the PIC button (10) once. The display will give a countdown (2-1) and then image is taken and is automatically stored onto the SD card. To record a video, focus the unit onto the object and press REC button (9) once. The system will start recording. Please note that the video is being recorded in Full-High Definition (1080p) and in the Widescreen format (16x9).
CHOOSING CORRECT ISO (SENSITIVITY) SETTING: Your digital monocular comes with 5 user-selectable ISO (sensitivity) settings, plus an AUTO mode. All units come with AUTO mode as a default setting and in most conditions this mode is the best choice for viewing and recording.
5. 6. 7. IMPORTANT: make sure your smartphone or tablet does not automatically disconnect from this signal due to no internet availability – most smart devices do that by default – they automatically switch to the better/saved signal which has internet. Go to your smart device settings and allow it to keep connected to this signal. Now open the app and it will display the device name below the orange cam symbol – simply touch the cam symbol and app will connect to the device.
the product. To do so, insert the card into its slot, turn the night vision on and through the menu find and select “Format”, then select “OK”. Once the card is formatted inside the night vision device it is now ready to use. TROUBLESHOOTING: 1.
Leave the batteries inside the unit while operating it from the AC/DC source! You must remove the batteries prior to connecting the cord! Submerse the unit into water or use it during heavy rain. TECHNICAL SPECIFICATIONS: Image Sensor Resolution / Sensitivity: ____ 1920x1080 / 0.002lux (night) Image Display ________________________0.