
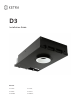
Installation Guide

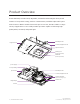

INSTALLATION
Option 1
MOUNTING WITH NAILER BARS
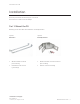
1. Attach nailer bars
a. If ceiling thickness is ¾” (19.05 mm) or greater: Use pliers to break o the tabs at the end ofboth
nailer bars. (see fig. 1)
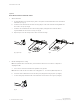
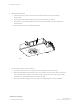
b. Insert the inner nailer bar into the three housing clasps on the end of the D3 housing. Make sure
the screw is on top. (see fig. 2)
c. Insert the outer nailer bar into the same housing clasps, locking the inner andouter halves
together. Make sure the screw is on top. (see fig. 3)
d. Repeat steps 12 for the clasps on the other end of the housing
fig. 1
(optional)
fig. 2
fig. 4
fig. 3
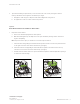
2. Mount downlight in the ceiling
Note: For optimal radio communication, ensure that the radio dome is not above or adjacent to
anything metallic.
a. Use a level to ensure the nailer bars are parallel to the ground.
Note: The D3’s collar needs to be flush to the ceiling plane or ~⁄
th
inches (1.5875 mm) above it.
b. Screw the ends of both bars into the wooden joists, fixing the housing in place. (see fig. 3)
c. T- Grid ceiling only: Bend the tabs on the nailer bars to lock them to the t-grid. (see fig. 4)
8|D3 INSTALLATION GUIDE
P/N 040444 Rev D
© 2019 Ketra, Inc. All rights reserved