
Installation Guide


INSTALLATION
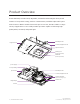
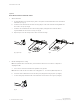
fig. 5 fig. 6
3.
Optional:
If installing a square fixture, loosen the collar's two outer screws, freeing the collar for
rotation, which then can be aligned to the fixtures per design.
a. Realign the collar using its v-shaped notches and an alignment string or laser.
b. Re-tighten the screws to lock the collar’s new position.
Option 2
MOUNTING WITH BUTTERFLY BRACKETS
1. Reposition emitter chassis
a. Remove the cardboard plug from the D3’s aperture.
b. Wall-wash downlight only: Carefully remove the optic and kick by turning counter-clockwise 9
degrees and pulling.
Note: If you remove the optic, be careful not to touch the exposed emitter.
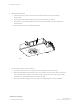
c. Unlock the tilt lock by pulling it toward the fixture aperture. The tilt lock is the red, horizontal lever
to the right or left side of the emitter chassis body. (see fig. 5)
d. Unlock the rotation lock by pulling it toward the fixture aperture. The rotation lock is the red,
vertical lever across from the emitter chassis body. (see fig. 6)
e. Tilt and rotate the emitter chassis to open an unobstructed path to the butterfly bracket openings
on either side of the housing.
Rotation Lock and Release
Locked Unlocked
Tilt Lock and Release
Locked Unlocked
continued on next page
D3 INSTALLATION GUIDE|9
P/N 040444 Rev D
© 2019 Ketra, Inc. All rights reserved