
Installation Guide


3-way Switch
Model Numbers: CA-3PS, LT-3PS, SC-3PS
Rated at 120 / 277 V~ 60 Hz 15 A
Model Numbers: CA-3PSNL, SC-3PSNL
Rated at 120 V~ 60 Hz 15 A
Purchase Lutron
® wallplate separately.
Important Notes
Please read before installing
1. Connect only #12 AWG or #14 AWG copper or
copper clad wire to switch. See device for strip
length.
2. Do not connect aluminum wire to this device.
3. Install in accordance with all national and local
electrical codes.
4. Clean unit with a soft damp cloth only. Do not
use any chemical cleaners.
Lutron Electronics Co., Inc.
7200 Suter Road
Coopersburg, PA 18036-1299, EUA
Fabricado nos EUA 2/08 P/N 030-986 Rev. B
Interruptor 3-way
Números dos Modelos: CA-3PS, LT-3PS, SC-3PS
Capacidade 120 / 277 V~ 60 Hz 15 A
Números dos Modelos:
CA-3PSNL, SC-3PSNL
Capacidade 120 V~ 60 Hz 15 A
O espelho para tomada de parede Lutron é
vendido separadamente.
Observações Importantes
Leia antes de instalar
1. Conecte ao interruptor somente fi os de cobre (ou
com revestimento de cobre) bitola 2,5 mm
2
.
2. Não conecte fi os de alumínio a este
dispositivo. Veja na parte posterior do
interruptor o gabarito para determinar o
comprimento do fi o a ser desencapado.
3. Instale de acordo com todos os códigos
elétricos locais e nacionais.
4. Só limpe a unidade com um pano macio e
úmido. Não use nenhum produto químico de
limpeza.
ON
OFF
ON
OFF
ON
OFF
Corte ou desencape
os fi os no
comprimento devido
Cu
Al
Lutron Electronics Co., Inc.
7200 Suter Road
Coopersburg, PA 18036-1299, U.S.A.
Made and printed in U.S.A. 2/08 P/N 030-986 Rev. B
ON
OFF
ON
OFF
ON
OFF
ON
OFF
ON
OFF
ON
OFF
Turn screw to loosen
Ground
(Green screw)
Tag
Different-colored screw
(COMMON)
Terminal Screws:
Turn screw to loosen
Backwired:
Insert screwdriver
and pull out wire
Trim or strip wires to
proper length
Cu
Al
ON
OFF
ON
OFF
ON
OFF
Gire o parafuso
para soltar
Parafuso de cor
diferente (COMUM)
Etiqueta
Terra
(Parafuso verde)
Parafusos do terminal:
gire o parafuso para soltar
Conexão por pressão:
introduza a chave de fenda;
puxe o fi o para fora.
Ground
Interruptor
3-Way
Interruptor
3-Way
Ground
Neutral
LIve
Load
Start screws
Align switch and
tighten screws
Comece s aparafusar.
Alinhe o interruptor e
aperte os parafusos.
Português
English
Technical Assistance
If you have questions concerning the installation or
operation of this product, call the Lutron Technical
Support Center. Please provide exact model
number when calling.
1.800.523.9466 (U.S.A., Canada, and the
Caribbean)
Other countries call, +1.610.282.3800
Fax +1.610.282.6311
Internet: www.lutron.com
Limited Warranty
(Valid only in U.S.A., Canada, Puerto Rico, and the Caribbean.)
Lutron will, at its option, repair or replace any unit that is defective in materials or
manufacture within one year after purchase. For warranty service, return unit to
place of purchase or mail to Lutron at 7200 Suter Rd., Coopersburg, PA 18036-
1299, postage pre-paid.
THIS WARRANTY IS IN LIEU OF ALL OTHER EXPRESS WARRANTIES, AND THE
IMPLIED WARRANTY OF MERCHANTABILITY IS LIMITED TO ONE YEAR FROM
PURCHASE. THIS WARRANTY DOES NOT COVER THE COST OF INSTALLATION,
REMOVAL OR REINSTALLATION, OR DAMAGE RESULTING FROM MISUSE, ABUSE,
OR DAMAGE FROM IMPROPER WIRING OR INSTALLATION. THIS WARRANTY
DOES NOT COVER INCIDENTAL OR CONSEQUENTIAL DAMAGES. LUTRON’S
LIABILITY ON ANY CLAIM FOR DAMAGES ARISING OUT OF OR IN CONNECTION
WITH THE MANUFACTURE, SALE, INSTALLATION, DELIVERY, OR USE OF THE
UNIT SHALL NEVER EXCEED THE PURCHASE PRICE OF THE UNIT.
This warranty gives you specifi c legal rights, and you may have other rights which
vary from state to state. Some states do not allow the exclusion or limitation of
incidental or consequential damages, or limitation on how long an implied warranty
may last, so the above limitations may not apply to you.
Lutron is a registered trademark of Lutron Electronics Co., Inc.
© 2008 Lutron Electronics Co., Inc.
Assistência Técnica
Caso tenha dúvidas a respeito da instalação
ou operação deste produto consulte o seu
representante Lutron ou ligue para o Centro de
Suporte Técnica de Lutron. Forneça o número do
modelo exato ao chamar por telefone.
1.800.523.9466 (E.U.A., Canadá e Caribe)
Outros países ligue para +1.610.282.3800
Fax +1.610.282.6311
Internet: www.lutron.com
Garantia Limitada
(Válido somente nos E.U.A., Canadá, Porto Rico e Caribe.)
A Lutron reparará ou substituirá, à sua escolha, qualquer unidade que estiver
com defeito de material ou de fabricação dentro de um ano após a compra. Para
serviço de garantia, devolva a unidade ao local de compra ou envie-a para a
Lutron no endereço 7200 Suter Rd., Coopersburg, PA 18036-1299, porte pago.
ESTA GARANTIA SUBSTITUI TODAS AS OUTRAS GARANTIAS, EXPRESSAS
OU IMPLÍCITAS E A GARANTIA IMPLÍCITA DE COMERCIALIZAÇÃO ESTÁ
LIMITADA A UMA ANO DA DATA DA COMPRA. ESTA GARANTIA NÃO COBRE
OS CUSTOS DE INSTALAÇÃO, REMOÇÃO OU REINSTALAÇÃO NEM OS
PREJUÍZOS RESULTANTES DE USO INCORRETO, ABUSOS OU DANOS
PROVOCADOS POR CONEXÕES OU INSTALAÇÃO IMPRÓPRIAS. ESTA
GARANTIA NÃO COBRE PREJUÍZOS INCIDENTAIS OU CONSEQÜENTES. A
RESPONSABILIDADE DA LUTRON SOBRE QUALQUER RECLAMAÇÃO POR
DANOS RESULTANTES DE OU EM CONEXÃO COM A FABRICAÇÃO, VENDA,
INSTALAÇÃO, ENTREGA OU USO DA UNIDADE NUNCA EXCEDERÁ O PREÇO
DA COMPRA DA UNIDADE.
Esta garantia lhe dá direitos legais específi cos, e você pode ter outros direitos
que variam de estado para estado. Alguns estados não permitem a exclusão ou
limitação de danos incidentais ou conseqüenciais, ou limitação sobre a duração
de uma garantia implícita, de forma que as limitações acima podem não se
aplicar ao seu caso.
Lutron são marca registrada da Lutron Electronics Co, Inc.
© 2008 Lutron Electronics Co., Inc.
030-986
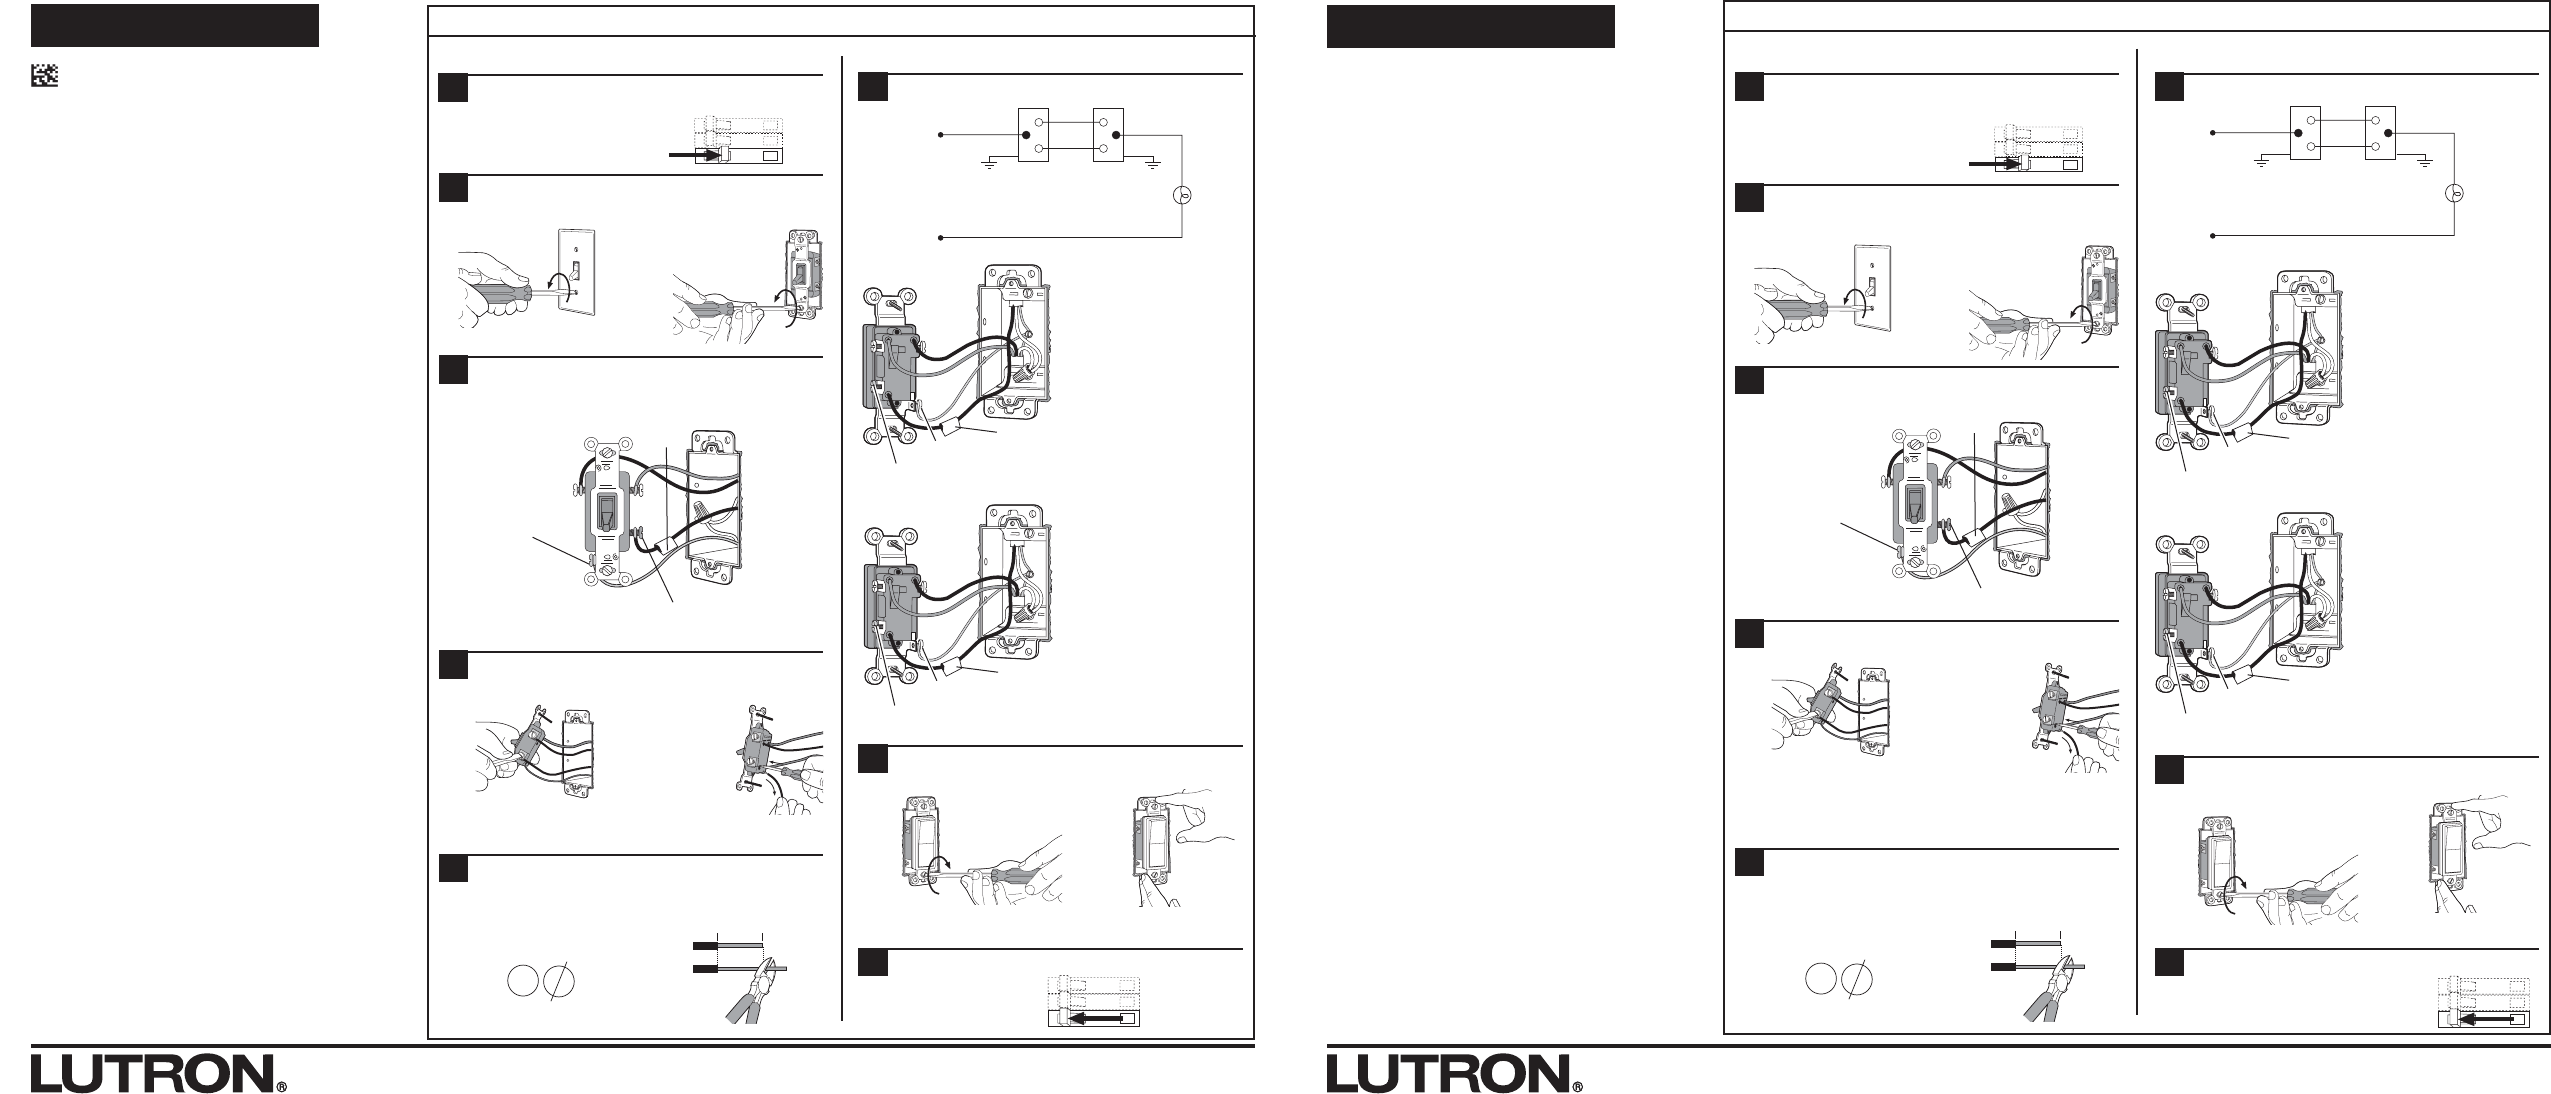
Installation
Turn Power OFF at Circuit Breaker or
Remove Fuse
Remove Faceplate and Pull Switch from
Wall
Disconnect Switch Wires
Prepare Wires
Tag the wire that is connected to the different colored
screw or screw labeled COMMON on switch (not the
green ground screw)
Trim or strip all wire conductors to the length shown on
the strip gauge on the back of the switch.
Tag the Wire
1
Lutron Technical Support Center 1.800.523.9466 24 hours / 7 days www.lutron.com
2
3
4
5
Wire the Switch
Using Screw Terminals.
• Connect the bare copper or
green ground wire to the green
screw terminal on the switch. If
there is no ground wire in your
wallbox, consult an electrician.
• Connect the wire removed from
the different-colored screw
(Tagged wire) to the screw
terminal marked common.
• Connect one of the remaining
wires to one of the remaining
screw terminals on the switch.
• Connect the remaining wire to
the last screw terminal on the
switch.
Using Backwire Holes.
• Connect the bare copper or
green ground wire to the green
screw terminal on the switch. If
there is no ground wire in your
wallbox, consult an electrician.
• Push the wire removed from the
different-colored screw (Tagged
wire) fully into the Backwire
Hole marked COMMON.
• Push one of the remaining
wires into one of the remaining
Backwire Holes.
• Push the remaining wire into the
remaining Backwire Hole.
6
Ground
(Green screw)
Different-colored
screw (COMMON)
Tag
Ground
(Green screw)
Different-colored
screw (COMMON)
Tag
7
Turn Power ON
Mount and Align Switch
Install wallplate (purchased separately).
8
Instalação
Desligue a fonte de alimentação no
disjuntor ou remova o fusível
Suporte Técnica de Lutron 1.800.523.9466 24 horas / 7 dias www.lutron.com
1
2
Retire o espelho do interruptor e puxe o
interruptor da parede
3
Marque o fi o COMUM do interruptor
existente
4
Desconecte os fi os do interruptor
5
Prepare os fi os
Corte ou desencape todos os fi os condutores no
comprimento indicado na parte posterior do interruptor.
Usando os terminais de
parafuso.
• Conecte o fi o terra ao
terminal de parafuso
verde do interruptor.
• Conecte o fi o marcado
ou identifi cado ao
parafuso do terminal
marcado “comum”.
• Conecte um dos fi os
restantes a um dos
terminais de parafuso
no interruptor.
• Conecte o fi o restante
ao último parafuso do
terminal no interruptor.
Usando os orifícios para
conexão por pressão.
• Conecte o fi o terra ao
terminal de parafuso
verde do interruptor.
• Introduza o fi o
marcado ou etiquetado
inteiramente dentro
do orifício marcado
COMUM.
• Introduza um dos fi os
restantes dentro de um
dos orifícios restantes.
• Empurre o fi o restante
dentro do orifício
restante.
Monte e alinhe o interruptor
Instale o espelho para tomada de parede Claro
(adquirido em avulso).
Ligue a fonte de alimentação
Etiqueta
Terra
(Parafuso verde)
Parafuso de cor
diferente (COMUM)
Etiqueta
Terra
(Parafuso verde)
Parafuso de cor
diferente (COMUM)
Terra
Interruptor
3-Way
Interruptor
3-Way
Terra
Neutro
Carga
Positivo/
Fase
6
Fiação do interruptor
7
8