
Operation Manual


27
LUVION Premium Baby products
GETTING STARTED
INSTALLING THE PARENT UNIT MONITOR
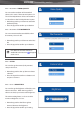
1. Carefully unpack the parent unit (monitor).
2. Connect the power adapter to the parent unit and power socket. The parent unit will start charging;
the indication LED will now light up (red). This LED will turn green when the parent unit is fully charged.
During rst use, please allow the unit to completely charge to ensure optimal battery capacity.
note: Charge the parent unit completely before rst use.
3. Press and hold the on/o button. The screen will now show the Luvion introduction screen.
INSTALLING THE BABY UNIT CAMERA
Before you install the baby unit (camera), carefully plan where and how you want to position it. Make sure
that you take in account the length of the power cable and the position of the power socket, because the
baby unit (camera) needs to be connected to the power grid.
1. Carefully unpack the baby unit (camera).
2. Place the baby unit in the preferred position. You can place the baby unit on a table/cabinet, or you can
mount it on a wall or ceiling. You can use the mounting frame to mount the camera on a wall or ceiling.
With the provided plugs and screws.
note: Before permanently installing the baby unit (camera), make sure that the wireless connection
between the baby unit and parent unit is sucient. Verify this when both the parent unit and baby unit are
placed in the positions from which you would like to use them.
note: Avoid installing the baby unit near walls or other obstruction between the baby and parent unit. For a
good sound sensitivity and image it is recommended to place the baby unit between a 1,5-3m distance .
LUVION