Luxier SP20-SS Features - Stunning stylish European inspired design - Fingerprint resistance finish - Durable stainless steel frame construction - Contemporary brass hand shower - 4 stage shower functions (Rainfall, Waterfall, Massage Spray, Hand Shower) Luxier 1 SP20-SS Rev.
Thank you for purchasing Luxier products. Please read the information below and keep this installation guide for future reference. If you require assistance, please contact our customer service department at 1-877-711-8828, Monday - Friday 9AM - 5PM Pacific Time. Or by email at support@luxierusa.com.
Attention • This installation guide is subject to change without notice, please contact us to request the most updated version of this installation guide. • This is a general installation guideline, actual installation may vary. Consult a professional if necessary. • Product drawings in this installation guide is for illustration purpose only. Actual product may vary depends on model. • Always take extra precautions and wear appropriate safety equipment when installing this product.
Fig. A * Shower panel drawing on this page is for illustration purpose only. Actual product may vary depends on model. Recommended 10” - 12” It is recommened to aim the top horizontal body jets at the chest area of the user for optimal showering experience. The installation height of the outlet box is approximately the total distance of measurement A and measurement B. Approximate shower inlet valve location approx.
Technical Data Compliance with the following code(s) and standard(s): Uniform Plumbing Code (UPC®) National Plumbing Code of Canada IAPMO IGC 154-2016 Recommended Operating Pressure: 60 PSI 200mm 7.875” 508mm 20” 1.625” 700mm 27.56”” 1,210mm 47.25” 500mm 19.69” 440mm 17.32”” 225mm 8.86”” 70mm 2.76” *All Measurements are Approximate Luxier 5 SP20-SS Rev.
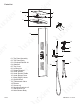
Parts List 1 5 3 4 2 17 16 15 18 8 14 13 6 7 12 9 01. Top Panel Assembly 02. Top Panel Body 03. Overhead Rainfall Jet 04. Waterfall 05. Top Cover 06. Locking Nut 07. Rubber Washer 08. Hand Shower 09. Hand Shower Cradle 10. Hand Shower Hose 11. Water Supply Hoses 12. Check Valves 13. Thermostatic Valve 14. Diverter 15. Screws x 4 16. Mounting Brackets x 2 17. Wall Anchors x 4 18. Main Shower Body Luxier 10 6 11 SP20-SS Rev.
Installation 1. Remove top cover. Attach the top panel to the main body with the supplied nuts and bolts. Run the water supply hoses through the hole on the top panel. 2. Trim off excess water supply hoses and attach to the spray head unit according to the hose labels and close the top cover. 2 3 4 5 3. Install hand shower cradle (1) to the shower panel by installing the rubber washer (2) and the locking nut (3) and attach white plastic hose tube connector (5) with PVC tubing to complete the connection.
Installation (cont.) 5. Mark the positions of the 2 brackets on the wall and prepare the tile wall for drilling. Use a piece of painters tape or masking tape over the drill area to prevent damages to the tiles. (NOTE: The distance between the two brackets should be 700 mm or 27.56”) 700mm 27.56” 6. Using a drill with a tile bit, drill the hole slowly into the tile. Do not drill into any piping or wiring in the wall. Insert the anchors into the wall. 1” 7.
Installation (cont.) 8. Apply thread sealant tape to the threading on the shut-off valves before connect both hot and cold water supply hoses to the valves. IMPORTANT : - Make sure the water supply hoses are connected to the corresponding shut-off valves - i.e. cold water hose to the cold water valve and hot water hose to the hot water valve. The thermostatic valve will not function properly if the hoses are installed incorrectly. - Before hanging the shower panel on the wall.
Operation 1. Turn the temperature control knob to set the desired water temperature. The control is preset to maximum temperature of Function Selector 100.4 degrees Fahrenheit. To set higher water temperature, push down the safety pin and turn the dial counterclockwise to the desired temperature mark. (IMPORTANT: Scalding may occur if bypass the safety pin, use this control with Temperature Control caution) 2. Select the desired water function by turning the selector to the corresponding marking. 3.
Troubleshooting NOTE: To maintaine the performance of the shower panel. The thermostatic valve needs to be cleaned at least once a year. More frequent cleaning is needed if water has high mineral content. NOTE: Proper pressure must be maintained for the thermostatic valve to work properly. Make sure water pressue is about the same on both hot and cold water side. 1.
Cleaning The Thermostatic Valve Before You Begin • Read and understand this instruction completely before service the shower panel. • Make sure the water supply is shut off to the unit. If necessary, shut off the water to the entire house. • Turn on one of the faucets in the house to relieve the water pressure in the plumbing system. • Make sure the service site is clean and free of dust and debris. Parts Diagram Fig. C Fig. D 9 7 6 Fig. A 5 4 100 .4 3-1 3 Fig. E 8 2 Fig. B 1 1. Cap 2.
Calibrating The Thermostatic Valve Before You Begin • Read and understand this instruction completely before service the shower panel. • Make sure the service site is clean and free of dust and debris. The valve may needs to be recalibrated after the valve was replaced or cleaned. The thermostatic valve is preset at 100.4 degree Fahrenheit when the safety pin is pointing at 12 o’clock position (Figure F) This is the starting point of the calibration.