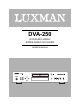
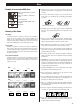
DVA-250 DVD AUDIO-VIDEO/ SUPER AUDIO CD PLAYER OWNER'S MANUAL
Contents IMPORTANT(for U.K.Customers) DO NOT cut off the mains plug from this equipment. If the plug fitted is not suitable for the power points in your home or the cable is too short to reach a power point, then obtain an appropriate safety approved extension lead or consult your dealer. Thanks for choosing LUXMAN. Read this manual carefully to get the best performance from this unit. Before Use ...............................................................................................3 Discs.........
Before Use “DTS” and “DTS Digital Surround” are registered trademarks of Digital Theater Systems, Inc. Manufactured under license from Dolby Laboratories. “Dolby” and the double-D symbol are trademarks of Dolby Laboratories. This product incorporates copyright protection technology that is protected by method claims of certain U.S. patents and other intellectual property rights owned by Macrovision Corporation and other rights owners.
Discs Type of Discs That Can be Played on This System This player can playback discs bearing any of the following logos: DVD Video: • Single-sided or double-sided discs • Single layer or dual layer discs • Dolby Digital, DTS, MPEG or Linear PCM digital audio • MPEG-2 digital video • This unit can play DVD-R/DVD-RW/DVD+R/ DVD+RW discs recorded in DVD video format. Discs are generally divided into one or more titles. Titles may be further subdivided into chapters.
Discs Example of Icons used on DVD discs: number of audio tracks recorded on the disc number of subtitles recorded on the disc < Always place the disc on the disc tray with the label side uppermost. (Compact discs can be played or recorded only on one side.) < To remove a disc from its storage case, press down on the center of the case and lift the disc out, holding it carefully by the edges.
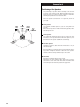
Remote Control Unit The provided Remote Control Unit allows the unit to be operated from a distance. When operating the remote control unit, point it towards the remote sensor on the front panel of the unit. < Even if the remote control unit is operated within the effective range, remote control operation may be impossible if there are any obstacles between the unit and the remote control.
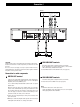
Connection 1 Amplifier 6CH IN DIGITAL IN OPTICAL FRONT SURROUND L A A CAUTION: Switch off the power to all equipment before making connections. Read the instructions of each component you intend to use with this unit. Be sure to insert each plug securely. To prevent hum and noise, avoid bundling the signal interconnection cables together with the AC power cord or speaker cables. R L CENTER SUBWOOFER R B C B 6CH AUDIO OUT terminals 6 channel analog audio is output from these terminals.
Connection 2 TV (MONITOR) COMPONENT VIDEO IN SCART VIDEO IN S-VIDEO IN Y PB PR D E F Connect one of these cables G Connection to a TV Connect the unit to your TV or monitor using one of the following types of connectors. The connections are listed in order of picture quality, beginning with the best possible.
Connection 3 F S-VIDEO or VIDEO jacks The S-VIDEO connection is your third choice, and is superior to the standard composite video connection. If the TV or monitor has an S-VIDEO jack, connect it with a high quality S-VIDEO cable. If neither COMPONENT VIDEO nor S-VIDEO are available, connect the TV or monitor with a high quality RCA cable designed for video applications. G AC power cord Insert the supplied AC power cord in the DVA-250’s socket.
Connection 4 Positioning of the Speakers The positioning of speakers differs according to the size and acoustics of the listening room. While actually listening to a program source, try various speaker positions to determine which layout provides the best surround effect. Place the speakers connected to “L” to your left, and “R” to your right. A Front speakers FRONT (LEFT) CENTER FRONT (RIGHT) SUBWOOFER Use magnetic shielded speakers, if you are using them near your TV.
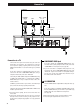
Names of Each Control 1 2 3 6 7 4 5 9 8 10 11 12 13 14 Front Panel 1 POWER switch 1 2 3 4 5 6 7 8 Press this switch to turn the unit on or off (standby). The equipment draws nominal non-operating power from the AC outlet with its POWER switch in the OFF position. VCD ROM P.SCAN TITLE GROUP CHP/TRK MP3 JPEG DVD AUDIO SACD MULTI 2 MENU button Use this button to confirm your selection or entry. 4 SETUP button PPCM PROG.
Names of Each Control Remote Control Unit 1 POWER System power on and off. 2 FUNCTION buttons 1 33 Use these buttons to select function modes. 3 Numeric buttons 2 These buttons serve as a 10 button numeric keypad to enter tuner preset positions. 4 TEST-T 3 - Output test tone for setting speaker levels.
Names of Each Control NTSC/PAL - Use this button to select NTSC, PAL or MULTI to match your TV standard. H STOP - Press to stop playback. 13 PRESET UP/ DOWN - Press to select a tuner preset channel. (AMP only) SEARCH(m/,) - During playback, these buttons are used for fast forward and fast reverse. 14 ANGLE Selects a DVD camera angle if available. 15 ZOOM Enlarges the DVD Video image. 16 GUI Brings up the ON-SCREEN display. 17 REPEAT A-B - To repeat a specific section on a disc.
DVD/CD/SACD/VCD/MP3/JPEG Playback 1 DVD When a DVD is loaded, the playback may start automatically. If a title menu appears on the screen, select an item by pressing the 5/b/g /t buttons and then press the ENTER button. 1 POWER DVD < Depending on the disc, you can use the numeric buttons to select an item. < “Title menu” may simply be called “menu” or “title” in the instructions supplied with the disc.
DVD/CD/SACD/MP3/JPEG/WMA Playback 2 WMA Listening to WMA (Windows Media Audio) CD-R/CD-RW This unit can play CD-R/RW music files that have been recorded in the WMA (Window Media Audio) audio compressing format. Windows Media and the Windows logo are trademarks, or registered trademarks of Microsoft Corporation in the United States and/or other countries. WMA (Windows Media Audio) : New audio coding of Microsoft Corporation.
Playback 3 SACD Sound Mode DVD/CD/SACD/VCD/MP3 SACD POWER F A 1 MENU B PAUSE A B 2 STOP PLAY PLAY C D A AUDIO B 1 OPEN/CLOSE E A To start playback In the stop mode, press the PLAY button (y). B To suspend playback temporarily (pause mode). Press the PAUSE button (J) during playback. The image stills with DVD discs, or music is interrupted with MP3 or CDs. To resume playback, press the PLAY button (y) or PAUSE button (J).
Playback from a specific chapter/track A To skip to a specific chapter/track. During playback, press the SKIP button (.or/) repeatedly until the desired chapter or track is found. The selected chapter/track will be played from the beginning. When the . button is pressed during playback, the track being played will be played from the beginning. To return to the beginning of the previous track, press the . button twice. < During PBC playback of a VCD, you cannot return to the previous track.
DVD Title Select You cannot select a track and a time at one time. 1 Press the GUI button during playback or pause. < When in the STOP mode, the display will look like “--/02” and current title number NUMERIC 3 01/02 2 ENTER 4 PLAY current chapter number 03/20 total number of titles on the disc elapsed time of the current title 00:03:42 total number of chapters in the current title only the title can be selected. If this is the case, go to step 3 .
Time Select Track or Time Select DVD CD/SACD/VCD NUMERIC NUMERIC 3 3 2 2 ENTER 4 PLAY PLAY 4 4 GUI GUI 1 1 You cannot select a track and a time at one time. 1 Press the GUI button. 01/02 03/20 00:00:00 2 Press the t button three times to change the time indication to “--:--:--”. 02/03 03/20 1 Press the GUI button in the playback mode. A GUI bar appears on the TV screen.
DVD Picture Zoom To zoom the picture, press the ZOOM button during playback. Each time the ZOOM button is pressed, the magnification level changes. < You can shift the zoom point by pressing the 5/b/g /t buttons during zoom playback. < Zooming does not work on subtitles or menu screens. < The magnification level varies depending on the TV DISPLAY selection in the SETUP menu.
DVD Select an Audio Language To select an audio language, press the AUDIO button during playback. Each time you press the AUDIO button, a language and its sound recording system included on the disc appears on the screen. MENU the total number of the audio included on the disc sound recording system : 5.1ch : 2ch (STEREO) language ANGLE channel numbers AUDIO < When no other audio is recorded on the disc, PROHIBIT icon A will be displayed.
DVD/CD/SACD/VCD/MP3/WMA Repeat Playback 1 Repeat Playback of DVD Each time the REPEAT 1/ALL button is pressed during playback, the mode changes as follows: A REPEAT 1/ALL Chapter Repeat The chapter being played will be played repeatedly. If you select another chapter in CHAPTER REPEAT mode, the chapter you selected will be played repeatedly. Title Repeat All the chapters of the current title will be played repeatedly. During programmed playback, programmed chapters will be played repeatedly.
DVD/CD/SACD/VCD Repeat Playback 2 Repeat Playback of a Designated Section (A-B Repeat) 1 Start playback and designate the point at which the A-B repeat should start (point A) by pressing the REPEAT A-B button. “A TO B REPEAT SET A” appears on the screen and the “ ” indicator lights up in the front panel display. 2 When the point at which repeat playback should end (point B) is reached, press the REPEAT A-B button again.
CD/VCD Programmed Playback 2 To check the programmed content In the stop mode, press the 5orb button repeatedly. The programmed content (program number, track number and playback time) will be shown on the display in the programmed order. POWER To delete a programmed track ENTER In the stop mode, press the 5orb button repeatedly until the programmed track to be deleted is displayed. Then press the CLEAR button.
DVD/CD/SACD/VCD/DVD-AUDIO GUI 1 The GUI (Graphical User Interface) button provides access to a variety of reporting, locating and setting features. During playback or pause of DVD When you press the GUI button once during playback or pause, a GUI bar appears on the TV screen. It should look like this: You can specify a title or a chapter number to play or a time location where you want play to start from, as discussed on pages 18 and 19.
DVD-AUDIO GUI 2 During playback or pause of DVD-Audio When you press the GUI button during the playback or pause, the TV display changes as follows. GROUP NUMBER TRACK NUMBER TOTAL GROUPS PLAYING TIME TOTAL TRACKS AUDIO CHANNEL SUBTITLE ANGLE OFF Time Display 1 Press the TIME DISPLAY button or the DISPLAY button on the front panel repeatedly during playback to display different information on the front pannel display about the disc.
Time Display 2 B DVD-Audio SINGLE REMAIN B DVD-Audio SINGLE REMAIN GROUP ELAPSED SINGLE ELAPSED GROUP REMAIN current group number current track number remaining time of current track GROUP ELAPSED current current track group number number elapsed time of current group GROUP REMAIN current group number remaining time of current group SINGLE ELAPSED current group number current track number elapsed time of current track C CD, VCD SINGLE REMAIN C CD, VCD SINGLE REMAIN TOTAL REMAIN SINGLE EL
Settings 1 This chapter describes how to use the SETUP menu. Most settings and adjustments are required to be set when you first use the system. Using the SETUP menu, you can adjust the picture size, set a language for the subtitles and the OSD (on screen displays), limit playback by children, et cetera. Notes < Some settings cannot be selected during playback and RESUME mode of DVD. In that case, press the STOP button once or twice to stop playback completely, “STOP” lighting in the display.
Settings 2 A TV Display A VIDEO AUDIO SPEAKER DISC SYSTEM TV Display TV Type Video Output Picture Mode Slide show Mode Angle Mark Captions 4:3 LB PAL RGB Auto None On Off Set TV Display Mode Basic Mode Expert Mode Select the aspect ratio to match your TV. 4:3 PS (Pan & Scan mode) When you connect a normal TV to the system, this setting displays a wide picture on the whole TV screen with a portion (right and left sides of the picture) automatically cut off.
Settings 3 D Picture Mode D VIDEO AUDIO SPEAKER TV Display TV Type Video Output Picture Mode Slide show Mode Angle Mark Captions Set Picture Mode DISC This setting is accessible only when SETUP MENU MODE is set to EXPERT. (See page 36) SYSTEM 4:3 LB PAL RGB Auto None On Off Basic Mode Expert Mode This integrated solution takes advantage of utilizing the embedded flag information in the MPEG stream and makes the proper compensation for re-construction of the progressive frame.
Settings 4 E Slide show Mode This setting is accessible only when Setup Menu Mode is set to Expert. (See page 36) E VIDEO AUDIO SPEAKER DISC SYSTEM 4:3 LB PAL RGB Auto None On Off TV Display TV Type Video Output Picture Mode Slide show Mode Angle Mark Captions Basic Mode Some DVD discs contain still pictures that cycle automatically while audio is played. The default setting is None.
Settings 5 H Digital Out H SPEAKER VIDEO AUDIO SPEAKER DISC DISC Digital Out MPEG Out 96K LPCM Out Downmix Audio DRC SYSTEM Bitstream PCM 96K>48K Multi-Channel Off Set SPDIF Basic Mode Expert Mode Bitstream: Select this when the unit is connected to an audio component equipped with a built-in Dolby Digital or DTS decoder via the DIGITAL OUT terminal. PCM: Select this when the unit is connected to an audio component such as amplifier/receiver, CD recorder or MD deck via the DIGITAL OUT terminal.
Settings 6 L Audio DRC (Dynamic Range Compression) L SPEAKER VIDEO AUDIO SPEAKER DISC DISC Digital Out MPEG Out 96K LPCM Out Downmix Audio DRC This setting is accessible only when Setup Menu Mode is set to Expert. (See page 36) SYSTEM Bitstream PCM 96K>48K Multi-Channel Off Dynamic Range Compression Basic Mode Expert Mode In many listening situations, you may find loud passages objectionable.
Settings 7 O Languages on DVD Movies O VIDEO AUDIO SPEAKER DISC You can select a preferred language for audio, subtitle and disc menu respectively. SYSTEM Audio English Subtitle Off Disc Menu English DVD-Audio Play Mode Audio Navigation Super Audio CD Play Mode STEREO Basic Mode < When you select a preferred language that is not recorded on the DVD, one of the actual recorded languages is automatically selected.
Settings 8 P DVD-Audio Play Mode P VIDEO AUDIO SPEAKER DISC This setting is accessible only when Setup Menu Mode is set to Expert. (See page 36) SYSTEM Audio English Subtitle Off Disc Menu English DVD-Audio Play Mode Audio Navigation Super Audio CD Play Mode STEREO Basic Mode The DVD video play mode can be set to play the DVD video contents included on a DVD audio disc. Expert Mode Press ENTER button to switch between Audio Navigation and Video Navigation.
Settings 9 T Password T VIDEO AUDIO SPEAKER DISC SYSTEM You can set a new password as follows. OSD Language English Parental Rating Unlock Password Change Defaults Reset Setup Menu Mode Expert Change Password 1. After selecting “PASSWORD” in the SYSTEM tab, press the ENTER button. 2. Enter “2580” (or your privacy password) using the numeric buttons. 3. Enter a new password. You will be asked to confirm, then enter the same password again. 4. Press the ENTER button.
Controlling other Components Connected to the DVA-250 The DVA-250 is equipped with a powerful remote control not only DVD's functions, but also most popular brands of audio and video equipment, including CD players, cassette decks, TV sets, cable boxes, VCRs, satellite receivers and other home theater equipment. Learning a Pre-programming Code By following one of the methods below, you may program the remote to operate a wide range of devices from other manufacturers.
Programming the Remote VCR Brand List Brand AKAI ALBA AMSTRAD ANITSCH ARC EN CIEL ARISTONA ASA AWIA BAIRD BAUER.
Programming the Remote VCR Brand List Brand SAISHO SALORA SAMSUNG SANSUI SANYO SBR SCHAUB LORENZ SCHNEIDER SEI-SINUDYNE SELECO SENTRA SHARP SHINTOM SIEMENS SIERA SINUDYNE SONY STERN STS SUNKAI SYLVANIA SYMPHONIC TASHIKO TATUNG TEAC TEKNIKA TELEAVIA TELEFUNKEN TENOSAL THOMSON THORNFERGUSON SAT Brand List CODE No.
Programming the Remote SAT Brand List Brand PHILIPS PHONOLA PROSAT PYE QUADRAL QUELLE RADIOLA REDIFFUSION SABA SALORA SAMSUNG SAT PARTNER SATPORTNER SCHAUB LORENZ SCHNEIDER SIEMENS SIERA SILVA SKY STARCOM STARSAT TECHNISAT TELEFUNKEN TELESYSTEM THORNFERGUSON TRIAD UNIDEN UNITED CABLE V TECHNOLOGY VORTEC ZENDER 40 TV Brand List Brand CODE No.
Programming the Remote TV Brand List Brand ERRES EUROPHON FERGUSON FIDELITY FINLUX FISHER FORGESTONE FORMENTI FORTRESS FRABA FRONTECH FUJITSU FUNAI GBC GEC GELOSO GOLDSTAR GOODMANS GORENJE GREATZ GRANADA GRUNDIG HANSEATIC HANTAREX HEMMERMANN HIFIVOX HINARI HITACHI HYPER IMPERIAL INGELEN INNO HIT INTERFUNK IRRADIO ITT JVC KTV CODE No.
Programming the Remote TV Brand List Brand SELECO 121 111 126 116 132 030 079 010 049 149 053 049 078 049 101 132 013 050 078 109 050 050 136 018 019 088 111 019 145 091 098 124 098 049 099 148 QUASAR 046 QUELLE 047 055 113 074 RADIOLA 099 149 RADIOMARELLI 046 062 RANK 074 RBM 074 REDIFFUSION 062 REX 096 069 ROBOTRON 048 RTF 048 SABA 028 040 115 SAISHO 090 SALORA 053 123 SAMBERS 046 077 SAMPO 121 SAMSUNG 015 136 SANYO 001 048 054 SBR 049 SCHAUB LORENZ 001 128 SCHNEIDER 096 019 149 SEG 046 SEI 059
Troubleshooting In case of any trouble with this unit, please take the time to look through this chart and see if you can solve the problem yourself before you call your dealer or a LUXMAN service center. No power e Check the connection to the AC wall outlet. Playback does not start. e Reload the disc with the label side UP. e If the disc is dirty, clean the surface of the disc. e A blank disc has been loaded. Load a prerecorded disc. e Check the region code of the DVD.
Specifications DVD Player Signal system: PAL/NTSC Laser: Semiconductor laser, wavelength 650/790 nm Frequency range: DVD: 2 Hz to 22 kHz (fs:48kHz) 2 Hz to 44 kHz (fs:96kHz) CD: 2 Hz to 20 kHz SACD: 2 Hz to 100 kHz Signal-to-noise rating (DVD): 105 dB Audio dynamic range (DVD): 100 dB Harmonic distortion (DVD): 0.005% Wow and flutter: Below measurable level (less than ± 0.001% (W.PEAK)) Operating conditions: Temperature: 5˚C to 35˚C Operation status: Horizontal Outputs Video output: RCA jack x 1 1.
LUXMAN CORPORATION, JAPAN