
Operation Manual


9
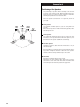
Connection 3
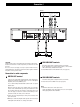
S-VIDEO or VIDEO jacks
The S-VIDEO connection is your third choice, and is superior
to the standard composite video connection.
If the TV or monitor has an S-VIDEO jack, connect it with a
high quality S-VIDEO cable.
If neither COMPONENT VIDEO nor S-VIDEO are available,
connect the TV or monitor with a high quality RCA cable
designed for video applications.
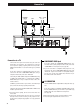
AC power cord
Insert the supplied AC power cord in the DVA-250’s socket.
After all other connections are complete, connect the plug to
the wall socket.
To avoid fire, electric shock, etc., do not use any power
cords other than the one included with the DVA-250. If you
are not going to use the unit for some time, disconnect the
power cord from the wall socket.
G
F
COLOR SYSTEM
You have to select the color system to match your TV.
When all the connection has been done, turn the DVD player
and the connected TV on.
If your TV is MULTI or PAL, press the PAL/NTSC button repeat-
edly until “Multi” or “PAL” appears on the TV screen.
The default setting is PAL.
PAL:
Select PAL when a PAL TV (European
standard) is connected.
NTSC:
Select NTSC when a NTSC TV (American
standard) is connected.
Multi:
Select Multi when a MULTI TV is con-
nected.
Note:
< This setting will be reset to the default when you turn the
power off. Be sure to set the desired mode in the SETUP menu.
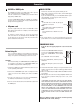
PROGRESSIVE SCAN
If your TV does not support progressive scan, do not use this
setting.
1. Connect the COMPONENT VIDEO OUT jacks
to your TV’s COMPONENT VIDEO IN jacks,
and select “COMPONENT” in the SETUP
menu.
(See “CAUTION” on the left column.)
2. Press the SETUP button, and then press the
GUI button.
“PROG ON” will light up on the front panel
display.
< The default “PROG OFF” setting is for regular TVs that are not
capable of progressive scan (the technology called interlace
scan is used).
< When set to PROG ON, the RGB, S-VIDEO and VIDEO terminals
are disabled.
< Not all progressive scan TVs are fully compatible with this unit.
If you encounter problems with progressive scan, select
“PROG OFF”.
‘CONSUMERS SHOULD NOTE THAT NOT ALL HIGH DEFINI-
TION TELEVISION SETS ARE FULLY COMPATIBLE WITH THIS
PRODUCT AND MAY CAUSE ARTIFACTS TO BE DISPLAYED IN
THE PICTURE. IN CASE OF 525 OR 625 PROGRESSIVE SCAN
PICTURE PROBLEMS, IT IS RECOMMENDED THAT THE USER
SWITCH THE CONNECTION TO THE ‘STANDARD DEFINITION’
OUTPUT. IF THERE ARE QUESTIONS REGRADING OUR TV SET
COMPATIBILITY WITH THIS MODEL 525p AND 625p DVD
PLAYER, PLEASE CONTACT OUR CUSTOMER SERVICE CEN-
TER.’
There are additional settings you need to set before operating
the DVA-250. See the section, “Settings”.
NTSC/PAL
GUI
SETUP
Before Going On
Once a connection with the TV or monitor has been made,
you need to set the following settings. Otherwise, distorted
images or no picture at all would appear on the TV screen.
CAUTION:
In the default setting, the COMPONENT (and S-VIDEO) jacks
are not active. If you want to use COMPONENT VIDEO OUT
(or S-VIDEO OUT), perform the following steps.
1. Connect the VIDEO jacks with an RCA video cable. You can
use the provided yellow cable.
2. Connect the COMPONENT jacks with a component video
cable. (Or connect the S-VIDEO jacks with an S-VIDEO
cable.)
3. Turn the unit and TV on, and select “COMPONENT”
(or “RGB”) in the SETUP menu. (See page 29)
4. Turn the unit off and disconnect the RCA video cable from
the VIDEO jacks.