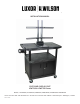
® ® INSTALLATION MANUAL FLAT PANEL DISPLAY CART LEWTUD & LEWCTUD Series Models: LE27WTUD, LE27CWTUD, LE40WTUD, LE40CWTUD, LE48WTUD & LE48CWTUD 3KRQH )D[ $GGUHVV 'HODQ\ 5G :DXNHJDQ ,/ 5(9
LEWTUD & LEWCTUD Series ® ® Thank you for your purchase. The LEWTUD & LEWCTUD Series are totally integrated mount/cart solutions for 32”-50” flat panel displays. To truly appreciate the capabilities and versatility of the flat panel display cart, please read this installation manual completely.
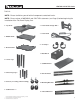
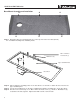
LEWTUD & LEWCTUD Series ® Part List: NOTE: Please familiarize yourself with all components contained herein. NOTE: Please review all WARNING and CAUTION statements (see Page 2) before beginning the installation of the Flat Panel Display Cart. 1 - Top Shelf 1 - Power Cord Storage Arm ** 1 - Power Cord 1 - Middle Shelf * 2 - “E” Clips ** 1 - Bottom Shelf 1 - Base Block 4 - 17.
LEWTUD & LEWCTUD Series ® Part List Continued: NOTE: Please familiarize yourself with all components contained herein. NOTE: Please review all WARNING and CAUTION statements (see Page 2) before beginning the installation of the Flat Panel Display Cart. 1 - Electric Hardware Bag A. B. C. D. A. B. C. D. 1 - Grommet Pass-Through 1 - Power Cord Retainer Clip 4 - Cord Management Ties 4 - Slotted Self Tapping Screws 1 - Sandwich Plate Hardware Bag E. F. G. H. I. J. K. I.
LEWTUD & LEWCTUD Series ® Part List Continued: NOTE: Please familiarize yourself with all components contained herein. NOTE: Please review all WARNING and CAUTION statements (see Page 2) before beginning the installation of the Flat Panel Display Cart. 1 - Display Connection Hardware Bag Section 1 L. 4 - M4 x 12 mm Screws M. 4 - M4 x 30 mm Screws N. 4 - M4 Lock Washers Section 2 O. 4 - M5 x 12 mm Screws P. 4 - M5 x 30 mm Screws Q. 4 - M5 Lock Washers Section 3 R. 4 - M6 x 12 mm Screws S.
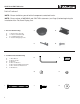
LEWTUD & LEWCTUD Series ® LEWTUD & LEWCTUD Assembly Instructions Long Legs Rubber Mallet Caster Wheels Bottom Shelf Rubber Mallet Bottom Shelf Step 1. Push the four casters firmly into the holes in each corner of the bottom shelf. Important: Casters must be fully seated. Tap firmly with rubber mallet to properly seat casters. Step 2. Insert the 4 long legs into each corner. Using the rubber mallet, firmly tap each leg unit it is seated securely into position.
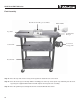
LEWTUD & LEWCTUD Series ® Electrical Assembly and Cable-Track Management System Your Flat Panel Display Cart incorporates th e Cable-Track™ Cord Management System. This exclusive feature manages electrical cords, keeping them safely out of the way. This system includes a 3-outlet, 15 foot surge suppressing electric assembly (U.L. and C.S.A. listed) which is built into the safety handle.
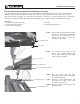
LEWTUD & LEWCTUD Series Base Mount Assembly and Installation A A ® A A A A Step 11. Determine where the mounting points are on the top shelf of the Luxor Cart (Arrows). A – Sandwich Mounting Plate Mounting Points. M5 x 12 mm Hex Head Screw (J.) M5 Washer (K.) Upper Sandwich Plate Base Block Step 12. After locating the mounting points for the base block, it is now time to attach the base block to the upper sandwich plate. Step 13.
® LEWTUD & LEWCTUD Series Upper Sandwich Plate Mounting Point Luxor Cart Mounting Point Step 15. Place the upper sandwich plate flat on the top shelf of the Luxor Cart. Line up the mounting holes that are located on the upper sandwich plate with the mounting holes that are located on the top shelf. Step 16. NOTE: At this time, have an assistant hold the lower sandwich plate in place while the screws are being threaded into place. Insert 6 - M5 x 55 mm Phillips screws (I.) into the upper sandwich plate.
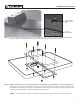
LEWTUD & LEWCTUD Series ® Final Assembly Base Mount Assembly (pre-assembled) Rubber Mallet Top Shelf Grommet Pass Through Center Shelf Power Cord Storage Arm Bottom Shelf Step 17. Place the top shelf over the four (4) short legs that are attached to the center shelf. Step 18. Once the short legs are lined up with the mounting posts of the top shelf, tap the top shelf firmly onto the short legs using the supplied rubber mallet. This will complete the first part of the assembly. Step 19.
LEWTUD & LEWCTUD Series ® Thread Depth Indicator 1. 2. 3. 4. Insert the thread depth indicator through the thread inserts found on the back of the flat panel display to make sure the inserts measure the same full depth and mark it with a pencil (see below). Locate the correct diameter screw for the thread insert from the display connection hardware bag. Compare your markings to the screws (supplied). If your selected screw is longer than the marking on the thread depth indicator, DO NOT USE this screw.
LEWTUD & LEWCTUD Series ® Stand Assembly Mounting Points Mounting Points Step 21. Place the display on a soft and flat surface. Step 22. Locate the mounting points that are on the back of the display. Screwdriver Step 23. Place the mounting brackets over the mounting points. NOTE: Please refer to page 5 to determine which mounting screws and spacers (if applicable) will be used. Step 24.
LEWTUD & LEWCTUD Series ® Support Pole Allen Wrench M8 x 16mm Socket Head Set Screw Step 25. Slide each support pole into the mounting bracket. Step 26. Make sure the support poles are even (see NOTE: below), and then tighten the M8 x 16 set screw with the Allen wrench (supplied).
LEWTUD & LEWCTUD Series ® Support Poles Display Mounting Brackets Base Block TWO PEOPLE WILL BE NEEDED FOR THE FOLLOWING STEPS. Step 27. After the assembly has been put together, make sure all the hardware is tight. Step 28. Two people should carefully lift the assembly and place the bottom of the support poles into the base block. Step 29. Once the support poles are seated, tighten the M8 x 16mm socket head set screws using the Allen wrench (supplied).
LEWTUD & LEWCTUD Series ® Side Panel Rubber Band Bottom Shelf 1. Place the included rubber band around the legs. 2. Back Panel 3. Insert the back panel. Insert the side panels. Front Panel 4. Insert the front panel. NOTE: If you have a 2 shelf unit go back to Step 6 (page 7). NOTE: If you have a 3 shelf unit go back to Step 3 (page 6).
® ® LE27WTUD LE40WTUD LE48WTUD LE27CWTUD LE40CWTUD LE48CWTUD 3KRQH )D[ $GGUHVV 'HODQ\ 5G :DXNHJDQ ,/ 5(9