
Installation Guide

www.allstarlighting.com
INSTALLATION GUIDE
LR32180, LR32181, LR32183, LR32184, LR32185, LR32186
33 Randolph Ave. • Avenel NJ 07001 | 732-882-1500
1
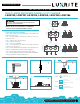
MULTI-HEAD RECESSED GIMBAL 5 CCT CHANGE
Fig. 2
FIXTURE INSTALLATION
STEP 1. Measure distance from walls and mark position of fixture to be
installed on the the ceiling.
STEP 2. Carefully scribe hole template in accordance to cut hole size
on desired location.
STEP 3. Carefully cut hole in ceiling. (Fig. 1)
STEP 4. Electrical connections.
STEP 5. Select Color Temperature
STEP 6. Connect hardwire box to engine by connecting the quick male
and female connector. (Fig. 2)
STEP 7. Pass the hardwire box and attached bx cable through the hole
and place on straight surface inside the ceiling cavity. (Fig. 3)
STEP 8. Push the spring clip up towards the LED engine. (Fig. 4)
STEP 9. Push the fixture through the hole until the trim is flush with the
ceiling. Spring clip will retrat to hold trim in place.
TURN THE POWER OFF FROM ELECTRICAL PANEL BEFORE
INSTALLATION OR MAINTENANCE.
• DO NOT MODIFY THIS FIXTURE. ANY MODIFICATIONS MAY
RENDER THE PRODUCT UNSAFE AND VOID WARRANTY.
• THIS PRODUCT IS SUITABLE FOR WET LOCATIONS
Fig. 3
Fig. 4 Fig. 5
Fig. 1
1 HEAD
1 HEAD
2 HEAD
3 HEAD
2 HEAD
3 HEAD
4 3/8”
3 1/2”
7 7/8”
4 3/8”
3 1/4”
4 3/8”
3 1/4”
3 1/4”
4 3/8”
7 1/4”
11 5/8”
Cutout:
3.75” (95 mm)
Cutout:
7.25” x 3.75”
(185 mm x 95 mm)
Cutout:
10.82” x 3.75”
(275 mm x 95 mm)