
User's Manual

User Guide
8
© Copyright 2011 Luxul. All rights reserved. Trademarks & Registered Trademarks are property of respective holders.
X
DO NOT pull any connected cable with force. When disconnecting cables, do so
by disconnecting first from the access point. When reconnecting, connect the AP
first and then the Power/data source.
X
When installing the access point, be sure it is firmly secured.
X
Accessories of this access point, such as mounting screws, the POE injector and
power supply may be dangerous to small children under 3 years of age. KEEP All
ACCESSORIES OUT OF THE REACH OF CHILDREN!
X
The access point may become hot when in use for extended time periods. This is
normal and is not a malfunction. DO NOT install this access point where it will
be exposed to paper, cloth or other flammable materials. If not using the electri-
cal box included with the unit, ALWAYS use a properly shielded and UL listed
electrical box for installation.
X
The XAP-1030 contains no user-serviceable parts. If the access point is not
working properly, contact your dealer and ask for help. DO NOT attempt to
disassemble the access point.
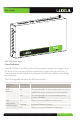
4 HARDWARE FEATURES AND INSTALLATION
The XAP-1030 high powered access point is designed for optimal performance as
well as for simple and efficient installation and setup. It implements Luxul’s Xen3D™
high performance technology and is packaged for installation on a shelf or wall. It
can also be placed discreetly in a closet, attic or other non-public area. Note that
the signal generated by the XAP-1030 is Omnidirectional and the unit should be
placed in a location that is central to the desired coverage area. The XAP-1030 is
optimal for use in single level or two level installations where the network access is
centrally located, the desired coverage area is substantially the same distance on all
sides (i.e. square) and the total area does not exceed 5,000 square feet.
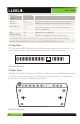
4.1 Front View
On the front of the XAP-1030 are 4 LEDs. LEDs indicate 1) Power, 2) LAN Link/
Activity, 3) WLAN Status and 4) Bridge Mode.