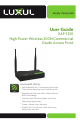
Simply Connected User Guide XAP-1230 High Power Wireless 300N Commercial Grade Access Point Use the XAP-1230 to: Deliver Broader Wi-Fi Coverage and Eliminate Client Device Roaming Issues with Fewer APs Improve Data Rates with Multi-Stream Wireless 802.
XAP-1230 User Guide Model Number: XAP-1230 Luxul High Power Wireless 300N Commercial Grade Access Point FCC ID: W59XAP1230 IC: 8584A-XAP1230 © 2014 Luxul. All Rights Reserved. No part of this publication may be modified or adapted in any way, for any purposes without permission in writing from Luxul. The material in this manual is subject to change without notice. Luxul reserves the right to make changes to any product to improve reliability, function, or design.
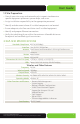
User Guide CONTENTS DOCUMENT CONVENTIONS 2 FCC COMPLIANCE 2 1 INTRODUCTION 4 1.1 Warnings 4 1.2 Site Preparation 5 2 XAP-1500 SPECIFICATIONS 5 3 GETTING STARTED 6 3.1 System Requirements 6 3.2 Package Contents 6 4 HARDWARE FEATURES AND INSTALLATION 7 4.1 Front View 7 4.2 Rear View 8 4.3 Environmental Requirements 8 4.4 Hardware Installation 9 5 CONFIGURATION 11 5.1 Login 11 5.2 Quick Setup 12 5.3 Wireless 15 5.4 Network 18 5.
XAP-1230 1 INTRODUCTION Congratulations on your purchase of the Luxul XAP-1230 - High Power Wireless Commercial Grade Access Point. The XAP-1230 is designed for use in residential and commercial Wi-Fi installations—delivering optimal wireless network performance. With this high powered, single-band wireless access point, wireless devices that are compatible with 802.11b/g/n can sustain high data rates and improved overall performance at significantly greater distances.
User Guide 1.2 Site Preparation Consult your site survey and network analysis reports to determine specific equipment placement, power drops, and so on. Assign installation responsibility to the appropriate personnel. Identify and document where all installed components are located. Ensure adequate, dust-free ventilation to all installed equipment. Identify and prepare Ethernet connection.
XAP-1230 3 GETTING STARTED 3.1 System Requirements Devices Supporting 802.11b, 802.11g or 802.11n Web Browser (Microsoft IE 9.0 and up, Mozilla Firefox 24 and up, Safari 5.1 and up, Google Chrome 18 and up) CAT5/6 Ethernet Cable, CAT6 recommended AC Power Socket (100 – 240 V, 50/60 Hz) 3.
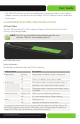
User Guide The XAP-1230 contains no user-serviceable parts. If the access point is not working properly, contact your dealer and ask for help. DO NOT attempt to disassemble the access point. 4 HARDWARE FEATURES AND INSTALLATION 4.1 Front View The XAP-1230 has four LEDs. LEDs indicate 1) Power, 2) WLAN Status 3) LAN Link/ Activity, and 4) Bridge Mode. NOTE: The LEDs may be enabled or disabled through the user interface. The LEDs are enabled by default.
XAP-1230 4.2 Rear View The back of the XAP-1230 provides one RJ-45 connection. This port is used to deliver both power and data to the access point. The reset button is also located on the back of the AP for restoring the access point to factory default settings. XAP-1230 Rear View To Restore the Default Settings: With the XAP-1230 powered on, press and hold the Reset button for 15 seconds. Release the reset button. The XAP-1230 will reboot and be reset to factory defaults.
User Guide Keep the access point away from strong electromagnetic fields (i.e. Air Conditioner compressors, fluorescent light ballasts, CRT monitors/televisions, etc.), and free from vibration, dust and direct sun light. 4.4 Hardware Installation 4.4.1 Access Point Placement This XAP-1230 uses omnidirectional antennas. The ideal placement is the center of the desired coverage area. 4.4.
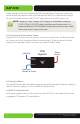
XAP-1230 simply connect an Ethernet cable to the PoE injector (Power/Data port) and the opposite end of the Ethernet cable to the PoE port of the AP. An Ethernet cable length of up to 100 meters can be used. DO NOT apply power to the PoE injector yet. NOTE: Category-5, super Category-5 or Category-6 unshielded twisted pair (CAT5/CAT5e/CAT6 UTP) cables should be used. For best results, it is recommended that CAT6 shielded twisted pair be used to ensure stable data transmission at highest data rates. 4.4.
User Guide XAP-1230 LEDs 5 CONFIGURATION 5.1 Login To configure the XAP-1230 enter the IP address of the AP into a browser. For your computer to find the AP, it must be on the same subnet as the AP. The default address for the XAP-1230 is 192.168.0.10. If connected to a Luxul router still at default settings, the XAP-1230 will be on the correct subnet address. If your computer is on a different subnet, it may need to be manually configured to be on the 192.168.0.xx network.
XAP-1230 5.2 Quick Setup Quick Setup: For most installations, the Quick Setup page will be sufficient to configure the XAP-1230. The Quick Setup page consists of the following: DHCP Client: Enabled or Disabled. DHCP (Dynamic Host Configuration Protocol) is used to automatically assign an IP Addresses to a device on the network.
User Guide IP Address. This field shows the IP Address that is assigned to the XAP-1230. To ensure plug and play capability with other Luxul networking products, the IP Address is set to 192.168.0.10. If desired, the user can set this to a different static IP Address. To change the IP address of the Access Point, simply type in the desired IP Address (the text field will be red if the address is not valid), click Apply and then Reboot for the changed to take effect.
XAP-1230 Security Mode: Sets the Wireless Security and Encryption modes. It is HIGHLY recommended to change the Security Mode and use the highest security level supported by the client devices in the network. In most wireless networks, WPA/WPA2 Personal is an excellent option that will support the largest cross section of client devices.
User Guide More than the minimum number of characters One or more capital letters Numbers and/or special characters After confirming the desired Quick Setup configuration settings, select Save and then Reboot for the settings to take effect. w w w 5.3 Wireless 5.3.
XAP-1230 Wireless Mode: Sets the type of 802.11 wireless network to be broadcast. Available modes are: 11g (802.11g) 11n+g (802.11g/n with 20MHz or 40MHz channels) The default setting is 11n+g, and is recommended to allow all types of devices to connect to the network. Use the 11g Mode ONLY if there are 802.11b/g client devices in the network that will not connect in 11n+g Mode. ww ww Channel Width: Sets the width of the 802.11n channel.
User Guide 5.3.2 Wireless Profiles Wireless Profiles: This page allows configuration of up to 6 Wireless Network SSID’s on the 2.4GHz band. From the Profiles menu, select 2.4GHz and use the drop down menu to 1) modify an existing SSID or 2) add a new SSID. Network Name (SSID): Sets the name of the Wireless Network. If the SSID is not set on a profile, the name of the network will not be broadcast.
XAP-1230 WPA Passphrase: Sets the passphrase for WPA or WPA2 protected wireless network access. NOTE: To remove a SSID, select it from the profile drop down menu and press the Delete key. VLAN ID: This field is used to set the Port VLAN Identifier (PVID) associated with a particular SSID. This feature is used to create multiple wireless networks that are not accessible to each other (i.e. Home, Guest, Control, etc.). Up to 6 VLAN ID’s can be set (one for each Profile).
User Guide VLAN Tagging: Turns on the VLAN Tagging function for all SSIDs. This can be used to create two wireless networks that are isolated from each other with a VLAN Trunking switch. All current Luxul routers (except the XBR-2300) and managed switches (except the XMS-1008P) support VLAN Trunking. 5.5 Administration Administrator Password: Sets the password for Administrator access to the web management interface.
XAP-1230 Upgrade: This page allows for the upgrade of the firmware on the XAP-1230. To check for firmware updates, visit www.luxul.com/support 4. Go to the Luxul website and download the new version of firmware 5. Click Browse to locate and select the firmware file on your computer 6. Click Upgrade to perform the update CAUTION: 1)Do not power off the access point or computer being used during the upgrade or the access point may be damaged.2) Upgrades should be performed over an ethernet connection.
User Guide Backup/Restore: This page is used to create a backup of the XAP-1230 configuration and Restore the configuration at a later time if desired. The backup file can also be used to set up multiple Luxul Access Points using the same configuration. Click Backup to save the current configuration settings as a file. To restore those settings, click Browse and select the backup file on your Computer, and then click Restore. CAUTION: It can take several minutes to complete the restoration.
XAP-1230 System Log: This screen displays a log file created by the Access Point. The system log file can be useful in diagnosing problems. You can save the latest entries in the log file and view them through a standard viewing tool. NOTE: When the AP is rebooted all previous log messages are lost.. 22 a: 14203 Minuteman Drive, Suite 201, Draper, UT 84020-1685 | luxul.
User Guide LED Control: This page allows you to turn the LEDs on the Access Point on or off. Simply select enable or disable. The change will take effect immediately – no need to reboot the Access Point. © 2014 Luxul. All Rights Reserved.
XAP-1230 24 Iperf: This page allows you to run an Iperf Server feature on the Access Point. You can select the time period (from 1, 2 or 3 hours) for the service to be enabled. Simply enable or disable the service. The change will take effect immediately – no need to reboot the Access Point. a: 14203 Minuteman Drive, Suite 201, Draper, UT 84020-1685 | luxul.
User Guide 5.6 Status 5.6.1 Basic Status Basic Status: This page displays basic setup information of the configuration and status of the AP including: Firmware Version, Hardware Model, Uptime, IP Address, Subnet Mask, Default Gateway, LAN MAC Address, Wireless Mode, Wireless MAC Address, Network Name (SSID), Channel Width, Channel, and type of Security © 2014 Luxul. All Rights Reserved.
XAP-1230 5.6.2 Connections Connections: This page displays the MAC Address, Speed and Signal Strength of all currently attached wireless devices. 6 REGULATORY COMPLIANCE The device complies with internationally recognized standards covering human exposure to electromagnetic fields from radio devices. This equipment also complies with FCC radiation exposure set forth for an uncontrolled environment.
User Guide RF Exposure Guidelines Safety Information: The device complies with internationally recognized standards covering human exposure to electromagnetic fields from radio devices. Warning: Exposure to Radio Frequency (RF) Radiation: The radiated output of this device is below the FCC radio frequency exposure limits. Nevertheless, the device should be used in such a manner that the potential for human contact during normal operation is minimized.
Connect the equipment into an outlet on a circuit different from that to which the receiver is connected Consult the dealer or an experienced radio/TV technician for help. Radio Transmitters (Part 15) This device complies with Part 15 of the FCC Rules. Operation is subject to the following two conditions: (1) this device may not cause harmful interference, and (2) this device must accept any interference received, including interference that may cause undesired operation.